Prep Tools
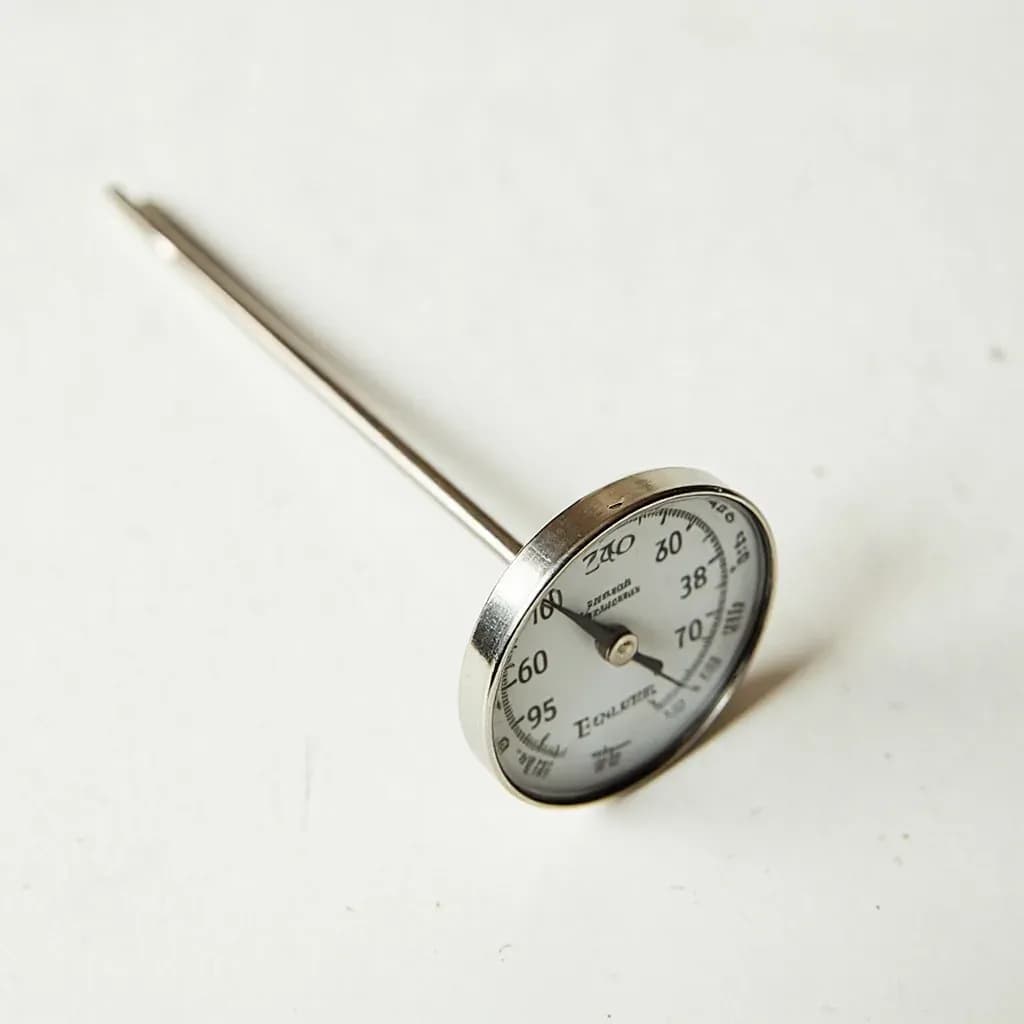
Bimetal Stem Thermometer
A dial probe thermometer that reads temperature via a coiled bimetallic strip in the stem.
A bimetal stem thermometer has a long metal probe containing a coiled strip of two bonded metals that flex with temperature, turning a needle on the dial face. It is inserted into roasts, soups or oil to check cooking temperatures and is common for food-safety spot checks. It is rugged and battery-free, though slower to respond and less precise than a digital instant-read probe.
The bimetal stem thermometer is the kitchen's original analog temperature gauge: a stainless-steel probe housing a tightly coiled strip of two metals with different rates of thermal expansion, bonded face to face. As the tip heats, one metal grows longer than the other and the coil winds tighter; that mechanical curl is geared to a pointer that sweeps a circular dial. Because the reading is produced by a physical spring of metal rather than an electrical sensor, the dial holds whatever temperature it sees until it sees a different one — there is no auto-shutoff, no battery, and no display to squint at across a busy kitchen.
That mechanical character defines both its strengths and its limits. The coil needs 15 to 30 seconds to fully equilibrate with what it's measuring, which makes a bimetal dial noticeably slower than a thermistor or thermocouple instant-read. In exchange, the cook gets a steady, legible number that does not blink off mid-roast, works in any orientation, and costs almost nothing to own. It is the thermometer to leave in a pot of stock, hang from the rim of a candy kettle, or park in a roast that will sit in the oven for hours — situations where speed is irrelevant and a stable, glanceable reading is everything.
In a modern kitchen, the bimetal thermometer is rarely the only thermometer in the drawer. Serious cooks keep an instant-read digital probe for thin cuts, quick checks, and griddle work, and a bimetal dial as the steady-state, second-opinion workhorse. Treated with reasonable care — kept out of the dishwasher, calibrated occasionally in an ice slurry, and replaced when the needle wavers — it is one of the most reliable tools in the kitchen.
Alternatives
Types & varieties
5–8 in. stem, ~0–220 °F range; the standard home form for inserting into whole roasts and large poultry.
Clip-on stem for the side of a pot; range typically 100–500 °F; dial often marked with candy stages from thread to hard crack.
Sealed dial and stem rated to remain in the meat throughout oven cooking; the only variant meant for sustained dry heat.
Short stem with a loop or hook at the top, made to hang from the rim of a pot for stocks, milk scalding, or yogurt incubation.
Compact 4–5 in. stem and small dial carried in a sheath; general-purpose checking of liquids and thin foods.
How the Bimetallic Strip Works
The strip is a sandwich of two metals — most often Invar (an iron-nickel alloy with very low expansion) and a higher-expansion copper alloy or brass — fused along their length and then wound into a tight spiral. Heat makes the higher-expansion metal grow longer than its partner; because the two faces are bonded, the strip cannot lie flat and instead curls inward. The curl is small at any given temperature, so the coil is geared up to drive the dial pointer through a useful arc. Cool it, and the metals contract back toward their original lengths, unwinding the coil and returning the pointer toward zero. It is the same principle John Harrison used to compensate his marine chronometers in the 1720s and 1730s, and the reason the thermometer is essentially a slow, deliberate mechanical animal: it cannot read faster than heat can travel through the metal to the coil.
Calibration and Care
A bimetal thermometer has no self-correcting electronics, so it must be calibrated by hand. The standard check is the ice-point test, performed in a slush of crushed ice and a thin film of water — this is true 0 °C (32 °F) only when ice and water coexist in equilibrium, not in plain cold water or a glass straight from the freezer. With the stem immersed up to its immersion line (or at least 2 in. into the slush), wait a full minute for the coil to settle, then read the dial. If the pointer sits above 32 °F, the unit reads high; turn the hex nut on the back of the dial in small increments until the pointer lands exactly on 32 °F. If it reads low, turn the nut the other way. Once a month is a reasonable cadence for a home cook; more often if the thermometer has been dropped or subjected to thermal shock (a hot stem plunged into cold water, for example). The dial housing should never see the dishwasher or be submerged — even a small amount of trapped moisture will fog the lens and corrode the coil, permanently destroying accuracy.
- Fill a cup with crushed ice, add just enough cold water to make a slushy mix, and stir.
- Insert the stem at least 2 in. into the slurry, avoiding contact with the cup's sides or bottom.
- Wait a full 60 seconds for the coil to equilibrate.
- Adjust the hex nut on the back of the dial until the pointer sits exactly on 32 °F (0 °C).
- Dry the stem immediately and never submerge the dial.
Common uses
Tips & pitfalls
- Wait for the needle to stop moving — give it a full 20 to 30 seconds after insertion. The reading is not valid until the coil has equilibrated with the food.
- Insert into the thickest part of the meat, angling the tip toward the thermal center but never touching bone; bone conducts heat and reads falsely high.
- Calibrate in an ice slurry (crushed ice plus just enough water to make a slush) before first use and roughly once a month thereafter. If it reads 33 °F, turn the hex nut until it sits on 32 °F.
- Keep the stem at least 1/2 in. away from the bottom and sides of the pot when measuring liquids — direct contact with hot metal reads higher than the liquid itself.
- Never submerge the dial or put the thermometer in the dishwasher. Wipe the stem with a damp cloth and dry it immediately.
- Do not leave a standard bimetal thermometer in the oven unless the dial is specifically labeled 'oven-safe.' Sustained dry heat can damage the coil or crack the housing.
- If the pointer wavers, hovers, or fails to return to room temperature after a hot reading, the coil has fatigued — replace the thermometer rather than chase a moving target.
- Reach for a thermistor instant-read instead when speed matters — searing on a griddle, flipping thin fillets, or checking a sauce in a moving pan. The bimetal dial is the tool for steady-state monitoring.
Good to know
- Mechanism
- Coiled bimetallic strip (typically Invar bonded to brass or a copper alloy). Heat curls the coil; the curl drives the pointer across the dial.
- Power source
- None — entirely mechanical.
- Typical probe range
- 0–220 °F (–18 to 105 °C) for meat/roast models; 100–500 °F (40–260 °C) for candy and fry models, often dual-scaled °F/°C.
- Response time
- 15–30 seconds to stabilize; considerably slower than thermistor or thermocouple instant-read thermometers (2–5 seconds).
- Accuracy
- ±2–4 °F (±1–2 °C) out of the box; drifts with age, drops, and thermal shock.
- Calibration
- Adjustable via a hex nut on the back of the dial while the stem sits in a 32 °F (0 °C) ice-and-water slurry.
- Oven use
- Most are NOT oven-safe; only models specifically labeled 'oven-safe' are sealed for continuous dry heat.
- Care
- Hand-wash the stem only; never submerge the dial housing — moisture clouds the face and corrodes the internal coil.
Also called
Dial Thermometer · Bimetallic Thermometer
Related

Peeler
Swift blade for stripping skin off fruit and vegetables

Grater
Sharp-toothed surface for shredding cheese and vegetables

Microplane
Ultra-fine rasp for citrus zest, garlic, and hard cheese

Mixing Bowl
All-purpose bowl for combining, whisking, and tossing

Whisk
Looped wires that beat air into eggs, cream, and sauces

Spatula
Flat blade for flipping, lifting, and scraping

Slotted Spoon
Pierced spoon that lifts solids and drains the liquid behind

Wooden Spoon
Gentle, heat-friendly spoon for stirring anything