Prep Tools
Honey Bottling Bucket
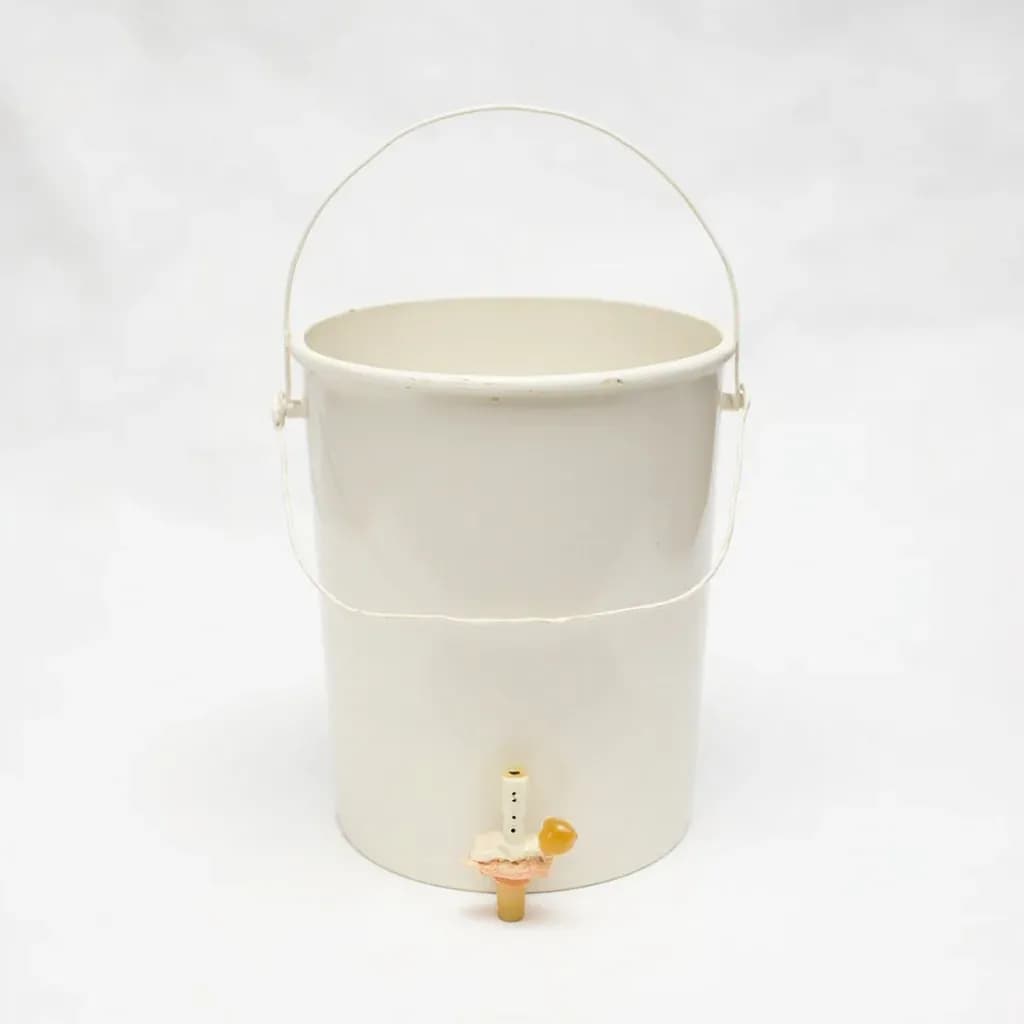
A lidded food-grade pail with a bottom honey gate valve for cleanly filling jars.
A honey bottling bucket is a food-grade plastic or stainless pail fitted with a honey gate, a slide valve near the base, that dispenses thick honey straight into jars. Beekeepers fill it from the extractor and let air bubbles rise before bottling. A heater belt wrapped around it keeps crystallized honey fluid enough to pour.
A honey bottling bucket is the quiet middle step of home honey harvesting — the lidded, food-grade pail that catches honey as it comes out of the extractor and holds it still while air bubbles, wax flecks, and the occasional bit of bee debris float to the top. Once the honey has clarified by sitting for a day or two, a valve at the bottom (called a honey gate) lets you fill jars from the bottom up, so the cleaner honey at the base goes out first and the foamy layer on top stays behind to be skimmed or eaten on toast. Without it, bottling honey means ladling sticky syrup from pot to jar with no real control over clarity, foam, or mess.
The bucket earns its place through two specifics: it is genuinely food-grade plastic, and the gate is smooth and tight. Anything that will sit in the pantry for a year passes through this vessel, so a #2 HDPE (high-density polyethylene) bucket marked food-safe is non-negotiable — hardware-store pails often look identical but are not certified for food contact and can carry residues from prior contents. The gate, ideally nylon or polypropylene rather than reactive metal, is what makes bottling clean instead of a sticky disaster. Honey is too viscous to pour neatly from a rim; a bottom valve lets gravity do the work and keeps drips off labels and counters.
Size tracks the standard 5-gallon pail because that volume conveniently matches the harvest from a typical medium honey super — about 50 to 60 lb of honey, since honey weighs roughly 12 lb per gallon. Smaller 2- and 3-gallon versions exist for partial harvests or small apiaries, but most hobbyists buy one 5-gallon bucket and use it for years. The bucket is technically beekeeping equipment rather than a kitchen tool, but during bottling season — late summer through fall across most of North America and Europe — it lives in the kitchen or pantry, and it is the single piece of gear that turns a sticky extraction day into a tidy row of finished, label-ready jars.
Alternatives
Types & varieties
The workhorse size; holds a full extraction from a medium honey super, roughly a 60-lb harvest.
Smaller, lighter alternative for partial harvests or small apiaries; easier to lift and store.
Two stacked gates allowing clearer honey to be drawn from the bottom while skimming the cloudy top layer.
Removes wax and large debris as honey is poured in; reduces but does not replace dedicated filtering for retail-clear honey.
Lets you visually track settling and clarity; opaque or white buckets are preferred for long-term storage because light gradually degrades honey.
Heavier and more expensive, used by commercial operations; easy to sanitize and will not stain or absorb odors.
Choosing a Bucket That Won't Let You Down
The two details that matter are food-grade plastic and a quality gate. Everything else is convenience. Look for the recycling #2 stamp and an explicit food-safe marking on the pail, and avoid any bucket whose history you don't know — restaurant pickle buckets, paint pails, and feed buckets look similar but carry residues you do not want in honey. The gate should be nylon or polypropylene; metal gates work, but copper- or brass-alloy valves can discolor honey over time and stainless steel is fine but pricier. Threaded gates that screw into a molded hole are more leak-proof than slip-in versions. A snap-on or gamma-seal lid is worth paying for, because during a 48-hour settle you do not want dust, ants, or curious bees finding the surface.
The Settling Stage
Honey straight out of an extractor is full of tiny air bubbles and suspended wax from the uncapping process. Given stillness and a bit of warmth, the bubbles rise and form a thin, papery foam on top, while larger wax fragments cling to the bucket walls or float just under the surface. This is why a lidded settling bucket matters: you cannot skim foam off an open pot without making more mess. Leave the bucket alone for at least 24 hours, ideally 48, in a warm room. The surface will clarify visibly. Before bottling, lift off the foam with a slotted spoon or small ladle and reserve it for cooking — it is perfectly good honey, just not pretty in a jar.
Working the Honey Gate
Set the bucket on a stable, level surface at a comfortable working height — a full 5-gallon pail at 60 lb is awkward to hoist onto a counter. Slide a drip tray or sheet pan under the gate, then crack the gate open slowly. A wide-open gate on a full 5-gallon bucket will overflow a pint jar in about 1.5 seconds, so go gentle and let the stream thin to a pencil-width before you slide a jar under it. Fill jars to the meniscus, slide them off, cap quickly, and move on. The gate's intake port sits a little above the bucket floor, so honey below that level won't drain — you'll lose the last inch or two sitting at the bottom. Stop bottling when the honey line approaches the intake, not when the bucket is fully drained.
Common uses
Tips & pitfalls
- Confirm the bucket is food-grade — look for the #2 HDPE recycling stamp and a 'food safe' marking. Hardware-store pails often look identical but are not certified for food contact.
- Warm the whole bucket of honey in a warm room or water bath before bottling. Cold honey stalls in the gate and forces you to squeeze the jar to keep up, which is tiring and messy.
- Settle honey for at least 24–48 hours after extraction. Bottling immediately gives you jars full of foam and suspended particles that no amount of capping will hide.
- Skim the thin foamy/waxy layer off the top with a slotted spoon or ladle before opening the gate. The foam is fine to eat — it just does not belong in a finished jar.
- Open the honey gate slowly. A wide-open gate on a 5-gallon bucket will overflow a pint jar in about 1.5 seconds and waste a jar's worth of honey on the counter.
- Choose a nylon or food-grade plastic gate over reactive metal alloys. Copper and brass can discolor honey and subtly affect flavor during long contact.
- Place a drip tray or sheet pan under the gate. Even experienced beekeepers drip on the first jar; plan for it rather than chasing stickiness across the counter.
- If honey crystallizes in the bucket, warm the whole pail in a warm-water bath under 110 °F rather than microwaving — localized heating darkens honey and degrades its enzymes.
- Clean promptly after use with hot water only. Soap leaves residues that are hard to rinse out of the plastic and will flavor the next batch.
- Set the bucket on a stable, level surface at a comfortable working height — do not try to lift a full 60-lb pail onto a counter.
- Stop when honey drops to the level of the gate's intake port. Honey below the opening won't drain and you'll leave the last inch or two in the bucket.
Good to know
- Material
- Food-grade HDPE plastic (#2); honey gate typically nylon, polypropylene, or food-grade stainless steel
- Standard Capacity
- 5 gallons (≈ 60 lb of honey; honey weighs roughly 12 lb per gallon); 3- and 2-gallon versions also sold
- Honey Gate Size
- Most commonly 1.5-inch or 2-inch opening with an integrated or replaceable sealing gate
- Working Temperature
- Honey flows cleanly at 95–110 °F (35–43 °C); cold honey is too viscous to gate properly
- Settling Time
- 24–72 hours typical to let air bubbles, wax flecks, and debris float to the surface
- Lid
- Fitted snap-on or gamma-seal lid to keep out dust, debris, and insects during settling
- Weight When Full
- A full 5-gallon bucket weighs 60–62 lb including the pail itself
Also called
Bottling Tank Heater Belt · Honey Pail · Honey Gate Bucket
Related

Peeler
Swift blade for stripping skin off fruit and vegetables

Grater
Sharp-toothed surface for shredding cheese and vegetables

Microplane
Ultra-fine rasp for citrus zest, garlic, and hard cheese

Mixing Bowl
All-purpose bowl for combining, whisking, and tossing

Whisk
Looped wires that beat air into eggs, cream, and sauces

Spatula
Flat blade for flipping, lifting, and scraping

Slotted Spoon
Pierced spoon that lifts solids and drains the liquid behind

Wooden Spoon
Gentle, heat-friendly spoon for stirring anything