Prep & Assembly
Rolling Out Dough
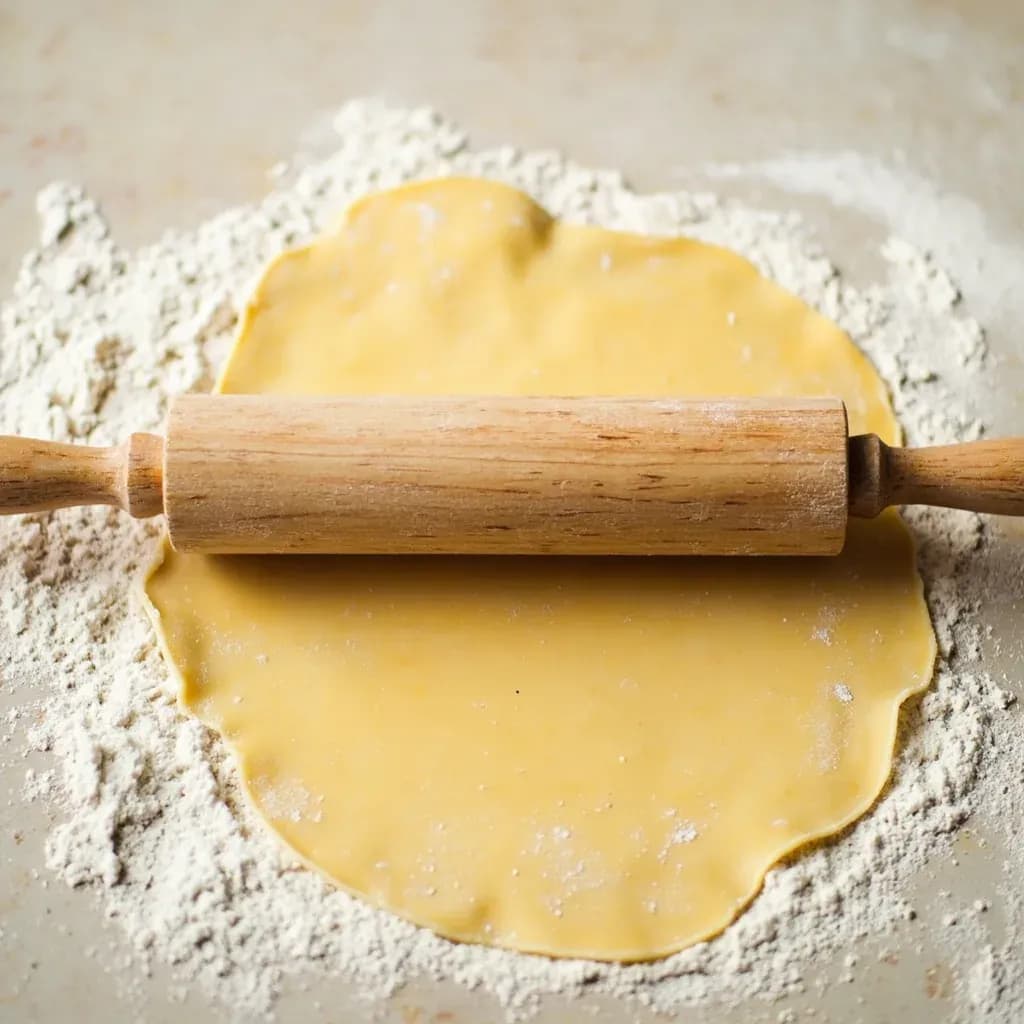
Flattening dough to an even thickness with a pin or hands for pasta, breads, and pastry.
Rolling out dough uses a rolling pin or hands to press a ball of dough into a thin, even sheet or round for pasta, flatbreads, pastry, and tortillas. Consistent thickness is essential so the dough cooks evenly, and a lightly floured surface keeps it from sticking. Skilled cooks rotate and stretch as they go, as with Italian sfoglia or Indian chapati, working quickly before the gluten tightens and resists.
Rolling out dough is the controlled flattening of a rested dough into a sheet of even, predictable thickness — the gateway step for nearly every laminated, filled, and shaped baked good, from pie crust and puff pastry to fresh pasta and rolled cookies. The craft lies less in strength than in feel: matching dough temperature to the job, applying even pressure from the center outward, and resisting the urge to add flour at the first sign of sticking. Get it right and the dough is supple, uniform, and cooperative; get it wrong — too cold, too pressed, too floured — and you fight it all the way to the oven.
The physics are simple. Cold butter stays in distinct flakes for flaky pastry; warm butter melts and disappears. Tight, unrelaxed gluten springs back the moment you stop pressing; rested gluten holds whatever shape you give it. Flour prevents sticking but, in excess, toughens the final product by absorbing liquid and forming extra gluten networks. The variables a cook controls are temperature, pressure, rotation, and dust — and the tools, surfaces, and technique are all in service of those four.
Thickness is the single most underestimated measurement in home baking. A pie crust rolled to 5 mm instead of 3 mm bakes into a dense, biscuit-like slab; a pasta sheet at 3 mm instead of 1.5 mm is a noodle, not a sheet. Most bakers under-roll, leaving the dough too thick because the eye is a poor judge of small differences. A ruler, marked mat, or set of thickness rings is the cheapest upgrade in any kitchen.
- Difficulty
- Medium
Types & varieties
Pushed from center outward; gives the most tactile feedback and is the choice of most pastry chefs.
Channels body weight through the grips; well suited to large pie and pizza sheets and stiffer doughs.
Handles stay stationary while the barrel rolls; reduces fatigue and keeps pressure even — excellent for cookies and pie.
Long and handle-free; favored for very large sheets and for rolling long pasta shapes.
Dough is rolled directly on a chilled stone or marble slab to keep butter firm during laminated-dough work.
Dough is pressed between calibrated rollers rather than rolled with a pin; produces the thinnest, most uniform pasta sheets, down to about 0.5 mm.
A wine bottle, smooth dowel, heavy glass, or river stone all work as substitutes; many pre-pin cultures used exactly these.
How to do it
- 1
Prepare the dough
Bring dough to the right temperature for its type. Pastry and laminated doughs should be cold but pliable — out of the fridge 5–10 minutes, until the disc gives slightly when pressed. Most pasta and enriched bread doughs are rolled at room temperature, after any required rise and a 10–15 minute rest. Give the dough a few quick kneading turns to even it out, then shape it into a thick disc or oval so it has a stable footprint to roll from.
- 2
Set up the work surface
Clean and dry the surface. Dust lightly with all-purpose flour, semolina (for pasta), or rice flour (for delicate shortcrust), or work directly on parchment or a silicone pastry mat. Have a bench scraper, a small bowl of dusting flour, and a ruler or thickness guide within reach. For laminated doughs, chill a marble slab or the pin itself in the fridge to keep butter cold through a long rolling session.
- 3
Make the initial flatten
Press the dough disc flat with the palm of your hand, or tap it firmly 2–3 times with the rolling pin. This gives a stable starting shape, knocks out large air pockets in yeasted doughs, and prevents the edges from cracking once full rolling begins.
- 4
Roll from the center outward
Place the pin across the center of the dough. Push away from you with even pressure, then return without pressing. Move the pin slightly to one side and repeat, working outward toward — but not over — the far edge. The sheet should grow gradually; if it resists and springs back sharply, the gluten is still tight and a short rest will help.
- 5
Rotate and continue
Turn the dough a quarter turn. If it sticks, loosen it with a bench scraper and re-dust the surface sparingly. Roll again from the center outward, then rotate. Repeat until the dough is the desired shape and thickness. Rotating keeps the sheet roughly square (or round, if started round) and reveals uneven spots early.
- 6
Check thickness and shape
Use a ruler, dough thickness rings, dowel guides, or a marked mat to confirm evenness. For a pie shell, the rolled round should be 3–4 cm (about 1.5 in) larger than the pan all the way around. For pasta, aim for 1–2 mm depending on the cut shape. Eyeballed thickness is the single most common cause of uneven baking.
- 7
Rest if the dough springs back
If the dough resists and shrinks as fast as you roll, the gluten is still tight. Cover loosely and let it rest 10–15 minutes at room temperature (or 20–30 in the fridge for pastry). The next pass will reach target thickness without tearing or cracking.
- 8
Transfer and shape
Roll the sheet loosely around the pin, or fold it in quarters, to lift it onto the pan or work surface. Unroll gently and press into place; never stretch, or the dough will spring back and shrink in the oven. For a pie, lift the edges to let the dough settle into the pan by gravity, then trim.
Matching temperature to the dough
Every dough type has a window where it rolls cleanly and a window where it fights you. Butter-rich doughs for pie, tart, and puff need to come out of the fridge 5–10 minutes ahead — cold enough that the butter is still firm (visible streaks in puff, distinct flakes in rough puff) but pliable enough that the disc gives slightly when pressed. Too cold and the edges crack; too warm and the butter smears into the flour, destroying the layers that create lift. Enriched breads and yeasted doughs are usually rolled at room temperature, after a full primary rise and a brief 10–15 minute rest. Pasta dough is the exception: it rolls best after a long, room-temperature rest, well-wrapped so a skin does not form, and tolerates a little extra dusting flour (semolina in particular) without becoming tough.
Thickness targets by use
A quick reference for the most common rolled-dough applications. Always measure rather than guess; the difference between a crisp tart shell and a thick cracker is often 1–2 mm.
- Pasta sheets (lasagna, ravioli, tagliatelle): 1–2 mm, thinner for filled shapes
- Pie and tart shells: ~3 mm (about 1/8 in)
- Puff pastry: 3–4 mm between folds; final dock and bake sheet 3–4 mm
- Pizza: 5–8 mm at the center, thinner at the edge for a puffy cornicione
- Cut-out cookies and shortbread: 2–5 mm depending on desired snap
- Crackers: 2–3 mm for snap; 3–5 mm for sturdier flatbreads
- Empanada, pierogi, and dumpling wrappers: 2–3 mm
Common uses
Tips & pitfalls
- Chill butter-rich doughs thoroughly before rolling so fat stays solid — this keeps layers distinct in puff and flakiness in pie crust. Give them 5–10 minutes on the counter only to take the chill off the edges.
- Start from the center and push outward in smooth strokes; never saw back and forth over the same line. Repeated rolling over one spot compresses the dough unevenly and can overwork the gluten.
- Rotate the dough a quarter turn every few passes to keep it roughly square (or round) and to catch uneven spots before they become baked-in problems.
- Use the minimum flour needed to prevent sticking, and brush off excess before shaping or baking — surplus flour streaks the surface and toughens the crumb by forming extra gluten.
- If dough sticks, slide a bench scraper or long knife underneath to free it rather than piling on more flour. Adding flour is the most common cause of tough pastry.
- For even sheets, use dowel guides, pastry rings, or a marked silicone mat. Eyeballed thickness is the most common cause of uneven baking in home kitchens.
- If the dough springs back hard, stop and rest it 10–15 minutes. The gluten has tightened; a second pass after rest will reach target thickness without tearing.
- Roll on parchment or a silicone mat for easy transfer to a sheet pan — no need to lift the dough at all, and the sheet slides straight onto a peel or tray.
- Common mistake: pressing the pin down with the wrist. Drive the motion from the upper arm and shoulder for uniform thickness; the wrist only guides.
- Common mistake: rolling cold-from-the-fridge pie dough straight from the package. Give it 5–10 minutes to relax, or it will crack at the edges and fight every pass.
- Common mistake: adding flour to the top of the dough as you roll. Dust the work surface beneath, not the dough itself, and keep the top clean so it does not streak or toughen.
Good to know
- Primary tool
- Rolling pin (wood, marble, or stainless steel) on a flat work surface
- Pin styles
- French (tapered, no handles), American (handled), ball-bearing (fixed rings for thickness), and dowel (long, no handles)
- Target thickness
- Pasta sheets 1–2 mm; pie/tart dough ~3 mm (about 1/8 in); puff pastry ~3–4 mm; pizza 5–8 mm; crackers and cut-out cookies 2–5 mm
- Dust options
- All-purpose flour, semolina (for pasta), rice flour, or potato starch — used sparingly to prevent sticking without toughening
- Surfaces
- Wood, marble, stainless steel, or a silicone pastry mat; marble's high thermal mass keeps it naturally cool, ideal for laminated doughs
- Dough rest before rolling
- 30–60 minutes refrigerated for butter-rich doughs; 20–30 minutes for enriched breads; pasta often rests 30+ minutes at room temperature, wrapped
- History
- Rolling-pin-style tools date to antiquity; a Roman-era Etruscan burial from around the 1st century BCE is associated with early rolling-pin use
- Common upgrades
- Bench scraper, pastry cloth, silicone rolling mat, dough thickness rings or dowel guides, and a ruler or tape measure
Also called
Rolling Dough Thin · Hand-Rolling Dough · Stendere la Sfoglia · Flatbread Rolling
Dishes that rely on it
Related

Whisk
Beat ingredients smooth and aerated with a looping wire motion

Sift
Pass dry ingredients through mesh to aerate and remove lumps

Strain
Pour through mesh to separate solids from liquid for a smooth result

Filter
Pass liquid through fine material to clarify out the smallest particles

Rice
Press cooked potatoes through small holes for fluffy, lump-free texture

Mash
Crush soft cooked food into a rustic, creamy purée

Grind
Crush food into a coarse to fine texture, from spices to meat

Grate
Shred food into fine bits against a sharp-toothed surface