Prep & Assembly
Layering an Iced Latte
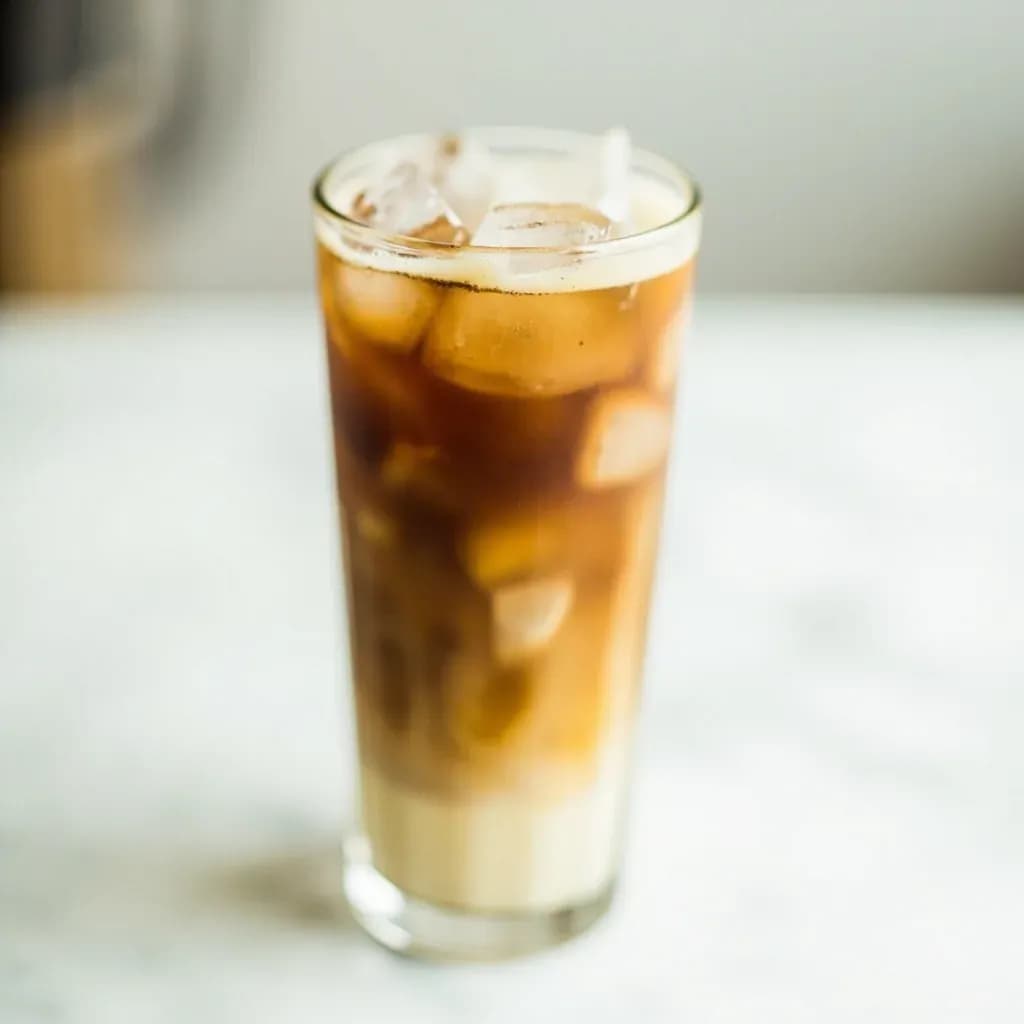
Pouring espresso over cold milk and ice so the drink forms distinct stratified bands.
Layering an iced latte exploits the density difference between sweetened cold milk and espresso so the coffee floats in a visible band above the milk before being stirred. Pouring slowly over ice or the back of a spoon keeps the layers from mixing, giving the cafe-style ombre look. It is a presentation technique, since stirring is still needed for an even taste.
Layering an iced latte is the simple barista move of pouring a fresh, crema-rich espresso shot over cold milk and ice so the drink settles into distinct bands rather than blending on contact. The effect depends on a small but real density contrast: cold milk is heavier than water and noticeably denser than freshly pulled espresso, whose crema is aerated with CO₂ and emulsified oils that lower its effective density. The hot shot therefore floats on the cool milk for a brief, photogenic window before temperature equilibration, ice dilution, and convection erase the boundary and the drink becomes a conventional iced latte.
The technique matters less for flavor than for presentation and pacing. The layered glass signals craftsmanship, lets the drinker see exactly what they are getting, and stages the experience from cool, mellow milk at the bottom to bright, intense espresso at the top. It is also a forgiving technique — no steaming, no pouring practice, no specialty tools — but a few variables (chilled glass, fat content of the milk, freshness of the shot) make the difference between a clean float and a muddy one.
- Difficulty
- Easy
Types & varieties
The classic: milk on the bottom, a crema-topped espresso band floating above.
Adds a cap of cold foam or whipped cream for a third, paler band.
Foamed cold milk first, then espresso marks the foam for a streaked rather than cleanly banded look.
Vanilla, caramel, or other syrup stirred into the milk before pouring, tinting the lower layer.
Espresso shaken hard with ice and syrup, then poured over milk for a foam-capped gradient.
How to do it
- 1
Chill the glass and milk
Place a tall clear tumbler in the freezer for a few minutes, or rinse it with cold water and dump. Keep the milk refrigerated until the moment you assemble; warm milk layers poorly.
- 2
Fill with ice
Pack the glass about three-quarters full with ice. Large cubes are better than small ones — they dilute more slowly and give the espresso a calmer surface to land on.
- 3
Pour cold milk
Add 150–200 mL of cold milk over the ice, leaving roughly 3–4 cm of headspace for the shot. Do not stir.
- 4
Pull a fresh espresso shot
Brew a double (≈60 mL) so crema is intact and the liquid is hot at 88–93 °C. A crema-rich shot is non-negotiable for a clean float; old or cold espresso will punch through the milk.
- 5
Layer the espresso
Hold a chilled bar spoon just above the milk surface, or tilt the glass at a slight angle. Pour the espresso in a thin, steady stream so it spreads across the top rather than plunging in. It should sit as a darker band with a pale crema cap.
- 6
Serve immediately, unstirred
Hand the glass to the drinker with a straw or spoon on the side. Bands will last roughly 30–90 seconds before fading — that is the point. The drinker mixes when they are ready.
Why the layers hold (and why they don't)
Two forces hold a layered iced latte together, and both are temporary. The first is density: a chilled, full-fat milk at roughly 1.03 g/mL is heavier than an espresso with crema at roughly 1.00 g/mL, so the shot sits on top the way cream sits on water. The second is temperature — the hot espresso is less viscous and more buoyant, and the steep gradient at the interface suppresses mixing for a short window.
That window closes quickly. Hot espresso conducts heat into the milk, convection cells form at the boundary, ice melts and dilutes the milk, and any disturbance (a straw, a spoon, a jostled table) accelerates blending. In practice, a clean band holds for 30–90 seconds, then fades into a uniform tan. Treat layering as a presentation and pacing tool rather than a permanent state.
- Crema is the unsung hero — without it, espresso is denser than milk and punches straight through.
- Whole milk layers more reliably than skim; the extra fat and protein slow interfacial mixing.
- A pre-chilled glass buys you extra seconds because the milk stays colder longer.
- Stirring collapses the layers immediately; let the drinker mix at the table.
Common uses
Tips & pitfalls
- Use a freshly pulled double shot with visible crema — stale, cold, or crema-less espresso will sink straight through the milk. If the shot disperses on contact, the milk is probably too warm or the shot too old; chill and retry before adjusting pour height.
- Chill the glass and the milk in advance; warmer milk layers less cleanly and fades faster.
- Whole milk (≥3.25% fat) layers more reliably than skim because fat and protein stabilize the boundary.
- Pour the espresso very slowly, ideally over the back of a chilled bar spoon held just above the milk — height and speed are the enemies of clean banding.
- A large single ice cube buffers the impact of the espresso and gives the shot a calm surface to spread across.
- Do not stir, swirl, or shake the glass after layering; even small vibrations begin blurring the bands within seconds.
Good to know
- Origin
- Modern third-wave coffee-shop technique, popularized in the 2010s alongside gradient drink photography.
- Principle
- Density stratification: cold milk sinks, hot espresso with crema floats above it when poured gently.
- Milk density (whole, ~4 °C)
- ~1.030–1.035 g/mL — measurably denser than espresso.
- Espresso density (with crema)
- ~0.99–1.01 g/mL; crema is lower because emulsified CO₂ and oils trap air.
- Temperature contrast
- Milk at ~4 °C vs. espresso at ~88–93 °C widens the density gap and slows mixing.
- Active time
- 1–2 minutes of assembly, plus brewing the shot.
- Best milk
- Cold whole milk (≥3.25% fat); fat and proteins stabilize the interface briefly.
- Glass size
- 12–16 oz (350–470 mL) clear tumbler, typically a highball or Collins.
Also called
iced latte layering · ombre latte
Related

Whisk
Beat ingredients smooth and aerated with a looping wire motion

Sift
Pass dry ingredients through mesh to aerate and remove lumps

Strain
Pour through mesh to separate solids from liquid for a smooth result

Filter
Pass liquid through fine material to clarify out the smallest particles

Rice
Press cooked potatoes through small holes for fluffy, lump-free texture

Mash
Crush soft cooked food into a rustic, creamy purée

Grind
Crush food into a coarse to fine texture, from spices to meat

Grate
Shred food into fine bits against a sharp-toothed surface