Prep & Assembly
Maki Roll Rolling
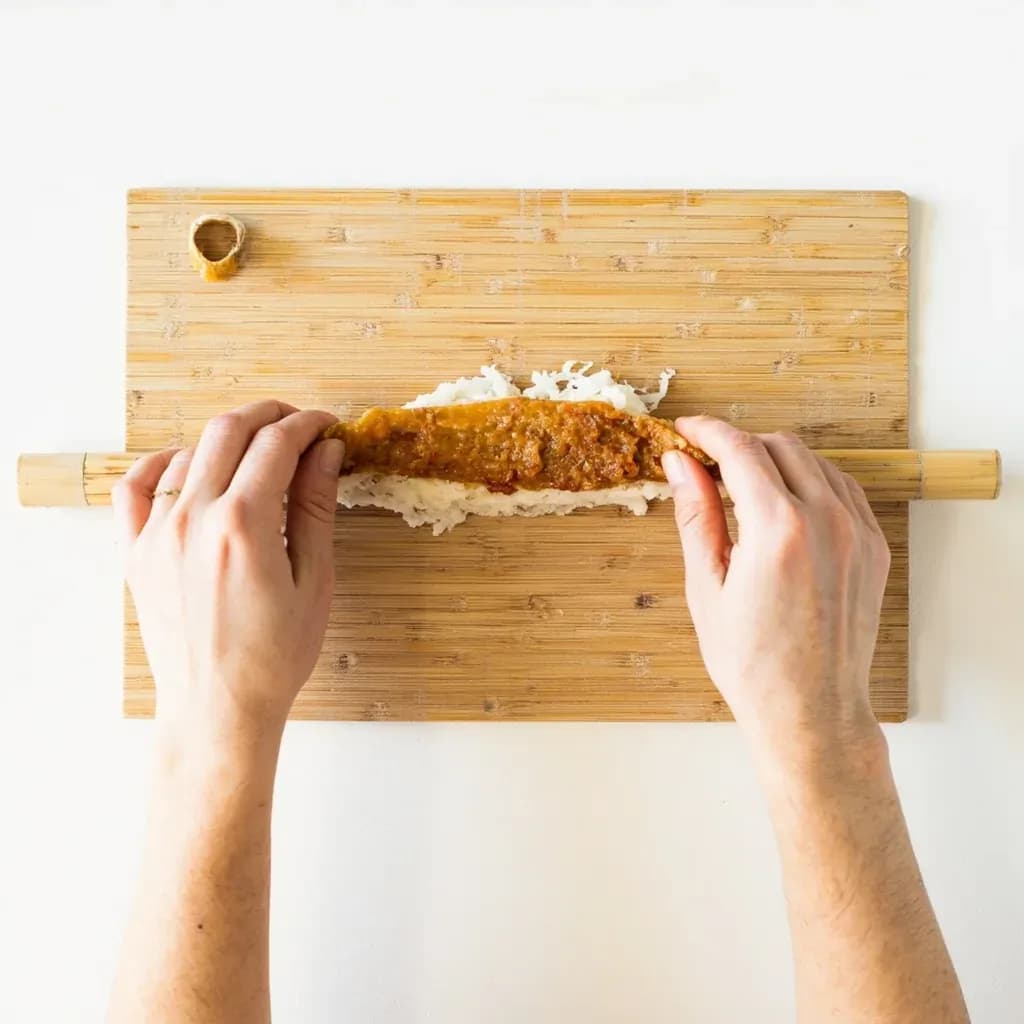
Rolling sushi rice and fillings in nori using a bamboo mat into a tight cylinder.
Maki rolling spreads seasoned sushi rice over a sheet of nori, lays fillings across it, then uses a bamboo mat to roll it into a firm, even cylinder for slicing. Steady, even pressure keeps the roll tight so it holds together when cut without crushing the contents. A wet knife and clean slices give the neat rounds expected of maki.
Maki rolling is the technique of wrapping seasoned sushi rice and fillings in a sheet of toasted nori to form a tight cylinder, using a bamboo mat (makisu) as both form and compression tool. The cook's job is deceptively simple: hydrate and spread the rice evenly, arrange fillings in a tidy line, and apply consistent pressure through the mat while the nori does the structural work of sealing. Once the geometry of a single roll is internalized, the same hand movements transfer directly to hand rolls (temaki), nori-wrapped battleship sushi (gunkan), and the inside-out rolls that dominate modern sushi menus.
The technique is often the first one taught in a sushi curriculum because the mat compensates for uneven hand pressure and turns what feels like a juggling act into a repeatable motion. Roll size changes the difficulty curve: a thin hosomaki with a single filling forgives a great deal of imprecision, while a thick futomaki built from several fillings exposes any weakness in rice spread or rolling tension. The accompanying skill of cutting is half the result — a dull blade will drag rice from the seam regardless of how cleanly the roll was built, which is why professional sushiya sharpen a dedicated knife for the task.
Rice and nori behave in concert during the roll. Body-temperature rice adheres to the rough side of toasted nori without crushing the grains; hot rice tears the sheet and traps steam that loosens the seam. A brief rest after rolling, seam-side down, lets the moistened nori strip rehydrate just enough to seal. Mastering those small timing and temperature choices is what separates a tight, glossy roll from a soft, leaky one.
- Difficulty
- Medium
Types & varieties
Thin roll, one filling only, nori on the outside; about 2–2.5 cm across. Tekkamaki (tuna), kappamaki (cucumber), and kanpyomaki (pickled gourd) are the classics.
Medium roll with one to a few fillings, nori on the outside; about 3–4 cm across.
Thick roll with multiple fillings arranged in decorative patterns, nori on the outside; 4–5 cm across. Traditional at setsubun (mamemaki) and at New Year.
"Inside-out roll" — rice on the outside, nori wrapping the filling, often coated with sesame seeds or tobiko. The California roll is the uramaki template.
Hand roll — a half-sheet of nori formed into a cone with rice and fillings. Not mat-rolled but part of the maki family.
Palate-cleansing thin rolls of cucumber (kappo) or pickled gourd (shikai), served at the end of a sushi meal or alongside sake.
How to do it
- 1
Set up the station
Lay the bamboo mat flat with the slats running horizontally. For uramaki, lay a sheet of plastic wrap over the mat. Keep a small bowl of tezu (water with a splash of rice vinegar) and a damp cloth (te-bouzu) within reach for hands and knife.
- 2
Position the nori
Place one full sheet of yaki-nori shiny side down, rough side up, across the mat so the long edge runs parallel to the slats and the bottom edge sits roughly 1 cm above the near edge of the mat.
- 3
Spread the rice
Dip your fingertips in tezu, shake off excess, and scoop about 150–180 g of seasoned sushi rice. Distribute it in a thin, even layer roughly 5–7 mm thick across the nori, leaving a 1.5–2 cm strip of bare nori along the far edge. Do not press the rice flat — it should remain fluffy.
- 4
Lay the fillings
Arrange the fillings in a straight line across the rice about one-third of the way up from the near edge, running the full width of the nori. Keep them compact and parallel so the roll stays even.
- 5
First tuck
With your thumbs under the near edge of the mat and your fingers lightly holding the fillings in place, lift the mat and nori up and over the fillings, tucking the nori underneath them so the filling is completely enclosed. Pull the mat back so it does not get rolled into the sushi.
- 6
Roll and tighten
Continue rolling forward, lifting the mat as you go so only the nori and rice enter the roll. After each half-rotation, press gently but firmly along the top and sides of the mat to shape a tight, even cylinder. The seam lands on the bare nori strip.
- 7
Seal the roll
Lightly brush or dab water along the exposed nori strip just before the final half-turn so it adheres, then complete the roll. Press once more along the length, pinching the ends inward to prevent bulging. Set the roll seam-side down on a cutting board.
- 8
Rest and cut
Let the roll rest 30–60 seconds so the nori seal sets. Wet a sharp knife, wipe the blade, and cut the roll in half with a single smooth stroke. Press the halves together, cut each into thirds, and wipe the blade between every cut for clean faces.
Two structural systems: nori-outside and uramaki
Most maki is built nori-outside, in which the rice sits against the rough face of the nori and the fillings ride inside. This is the default because it lets the nori do the structural work — the toasted sheet is rigid enough to hold a cylinder on its own once sealed, and the rice layer protects diners from any chewiness in the seaweed. Uramaki inverts that relationship: rice goes on the outside, and the nori wraps the filling along with the rice. To keep the rice from sticking to the mat and to press an even coating of sesame or tobiko onto the surface, lay a sheet of plastic wrap over the makisu before building, flip the partially rolled sheet so rice faces out, then finish rolling through the plastic. Uramaki demands more coordination than nori-outside maki — the rice layer is the visible exterior, so any holes, bald patches, or uneven thickness show immediately — but the technique is the same roll-and-tighten motion with one extra flip.
Cutting clean pieces
Cutting is where a well-built roll is most often ruined. The grains of seasoned rice grip the blade, and a dragging saw motion will pull rice out of the seam and mangle the cross-section. Wet a sharp thin-bladed knife (a yanagiba-style knife or a slender chef's knife works well) with a damp cloth before the first cut, make a single decisive stroke rather than a sawing motion, and wipe the blade between every cut. The standard method is to halve the roll first, press the two halves together, then cut each half into thirds; that pairing step realigns the filling and gives uniform pieces. A roll that has rested seam-side down for 30–60 seconds cuts more cleanly than one sliced immediately, because the nori seal has set and the rice has firmed slightly against the mat.
Common uses
Tips & pitfalls
- Wet your hands in tezu (water with a splash of rice vinegar) before handling rice so it does not stick and a thin starch film helps the roll hold together.
- Lay nori shiny side down, rough side up — the rougher surface grips the rice better and the shinier side becomes the roll's exterior.
- Spread rice in an even 5–7 mm layer and leave a 1.5–2 cm strip of bare nori along the far edge to seal the roll; compressing the rice too hard makes the cylinder dense and gummy.
- Place fillings in a line across the lower third of the rice, not the center — they need to sit closer to you so the first tuck encloses them cleanly.
- Common mistake: overfilling. A roll that bursts its seam mid-rotation cannot be recovered; slice the filling down and start a fresh sheet rather than trying to patch.
- Lift the near edge of the mat with your thumbs, tuck the nori over the fillings, and pull the mat back so the nori rolls over itself rather than over the mat.
- For uramaki, lay plastic wrap on the mat before the nori, flip the partially rolled sheet so rice faces out, then roll in the plastic to compress and press sesame or tobiko evenly onto the surface.
- Rest the finished roll seam-side down for 30–60 seconds before cutting so the nori seal sets; cut with a very sharp knife wiped clean between cuts — a dull or dry blade drags rice out of the seam.
- Use rice at body temperature, not hot — hot rice tears nori and releases steam that loosens the seam from inside.
Good to know
- Japanese name
- Maki-zushi (巻き寿司) — maki means "roll," zushi the contracted form of sushi
- Origin
- Japan; rolled sushi is attributed to Hanaya Yohei of Edo (Tokyo) in the early 19th century, evolving from earlier boxed and pressed forms
- Equipment
- Bamboo rolling mat (makisu / 巻き簾), often covered with plastic wrap for inside-out rolls
- Wrapper
- Yaki-nori — a sheet of pressed, toasted Porphyra seaweed, typically 19 × 21 cm for a full-size roll
- Rice per full roll
- Roughly 150–180 g of seasoned sushi rice for one standard nori sheet
- Typical cut
- Hosomaki and chumaki are usually cut into 6 pieces; futomaki into 6–8 pieces
- Active time
- 5–8 minutes per roll once ingredients and rice are prepped
- Storage
- Best eaten within a few hours; tightly wrapped and refrigerated, rolls keep up to 24 hours but the rice hardens
Also called
Sushi Rolling · Makizushi
Related

Whisk
Beat ingredients smooth and aerated with a looping wire motion

Sift
Pass dry ingredients through mesh to aerate and remove lumps

Strain
Pour through mesh to separate solids from liquid for a smooth result

Filter
Pass liquid through fine material to clarify out the smallest particles

Rice
Press cooked potatoes through small holes for fluffy, lump-free texture

Mash
Crush soft cooked food into a rustic, creamy purée

Grind
Crush food into a coarse to fine texture, from spices to meat

Grate
Shred food into fine bits against a sharp-toothed surface