Prep & Assembly
Nigiri Hand-Forming (Nigiru)
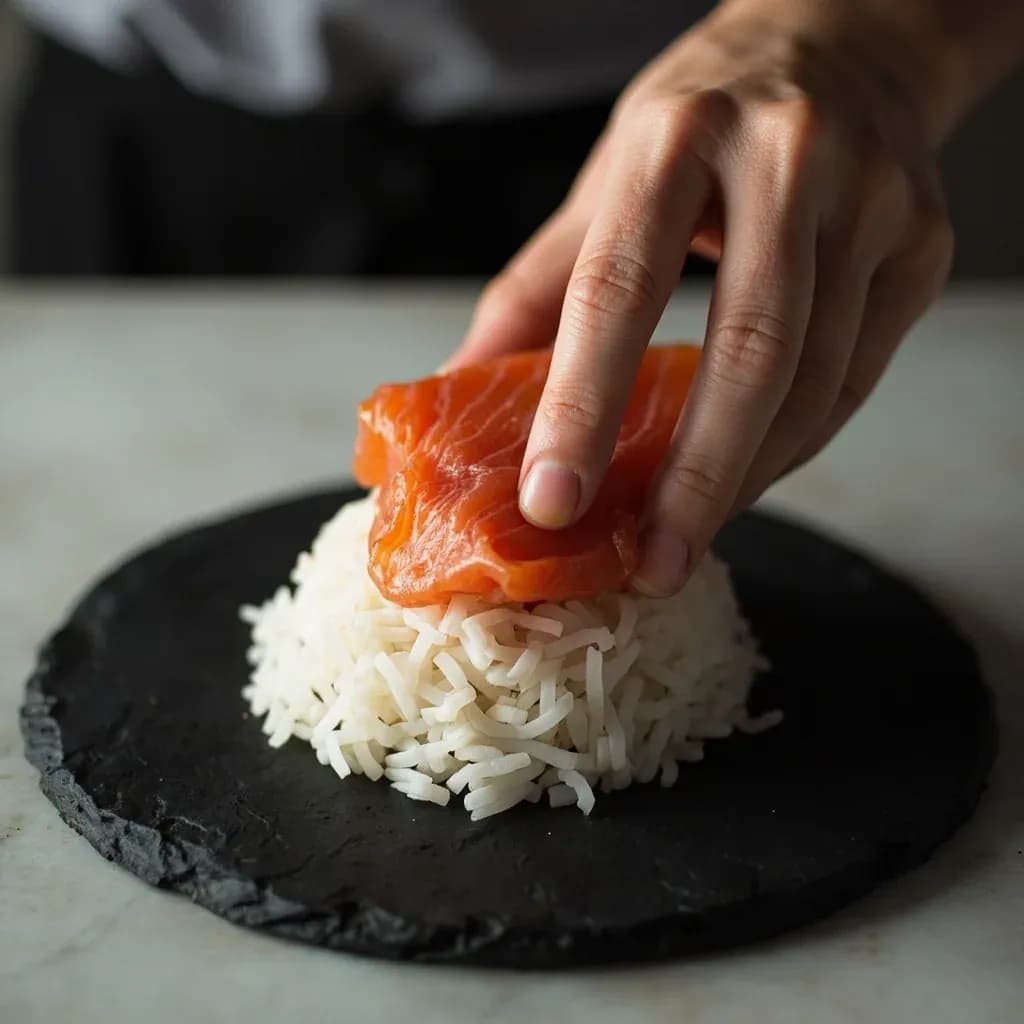
Pressing seasoned sushi rice into a small oblong mound and draping fish over it by hand.
Nigiri hand-forming, or nigiru, is the sushi chef's technique of cupping a bite-sized amount of vinegared rice and shaping it into a firm yet airy oblong before pressing a slice of fish on top. It is done with lightly moistened hands so the rice releases cleanly, and the pressure must be just enough to hold without compacting the grains. A dab of wasabi is often smeared between rice and fish, and the finished piece should hold together in transit yet fall apart gently in the mouth.
Nigiri-forming, called nigiru (to grasp or squeeze) in Japanese, is the foundational gesture of Edomae sushi: a small oblong of seasoned rice, pressed by hand until the grains just cohere, then topped with a slice of fish or other neta that drapes over the rice and bonds to it with a single firm press. The technique looks simple and is, in fact, teachable in an afternoon — but it rewards years of practice because every variable lives in the hand: the moisture on the fingers, the temperature of the rice, the pressure applied and released, and the way the slice of fish is laid across the grain. A correctly formed piece is glossy, lightly packed, and visibly grainy at the edges, with the rice holding its shape when picked up but dissolving cleanly against the tongue.
What makes the technique distinctive among sushi formats is that nothing mechanical intervenes between the chef and the rice. Unlike maki, which can be rolled in a bamboo mat, nigiri demands tactile calibration: the rice must be cool enough to handle, warm enough to feel alive, and seasoned so that the surface starch is intact. The hand is wet with tezu — vinegared water — to keep grains from sticking, and the forming is done in a single, fluid motion rather than corrected in stages. This is why nigiri is treated as the benchmark skill of an itamae: how a chef's hand moves here is read as a signature across the entire counter.
The dish itself traces to the 1820s in Edo (modern Tokyo), where Hanaya Yohei is credited with popularizing the format at a street stall in Ryōgoku. Originally a quick, handheld meal sold from yatai, nigiri moved into sit-down counters over the following century and became the dominant sushi format worldwide. The core hand-forming technique has remained essentially unchanged since then, which is why learning it well is a direct connection to the Edo origins of modern nigiri-zushi.
- Difficulty
- Hard
Types & varieties
Tokyo-style nigiri built on fish cured or seasoned in Edo-era methods — zuke (soy marinade), shiozake (salt cure), konbujime (kelp cure). Defined by topping prep rather than forming technique, but the canonical form most chefs learn first.
A 1.5–2 cm band of yaki-nori wrapped around the middle of the finished piece to hold the topping in place; common with unagi, anago, awabi, iwashi, and aji.
Rice formed as a small mound then ringed with a tall strip of nori to form a cup for loose or soft toppings — ikura, uni, tobiko, kani, or chopped negitoro.
Rice pressed into a small sphere and topped or wrapped decoratively, often with marbled or vividly colored fish. Same hand-pressing principle applied to a round shape.
Topping is lightly scored and brushed with marinade so it drapes flat and takes a sheen; the rice form is the same oblong.
Topping cut into a clean rectangular slab — common for saba, hamachi, and salmon — which demands a precisely rectangular rice form to match.
A thin smear of wasabi, about 0.3–0.5 g, placed between rice and fish; standard for tuna, white fish, and most shellfish, but omitted or minimal for salt-cured or eel toppings.
The top surface of the fish is briefly seared with a torch or charcoal after forming; the rice form itself is unchanged, but the surface of the neta is altered.
How to do it
- 1
Prepare the station
Set a bowl of tezu and a folded, damp (not dripping) hand towel at the dominant hand. Have the sushi rice in a hangiri or wide bowl, fanned and at body temperature, with the prepared fish toppings within easy reach on a cool plate or sushi geta.
- 2
Wet the hands
Dip the fingertips of the right hand in tezu, shake off the excess, and lightly pat both palms. Keep the damp cloth nearby; wipe and rewet between every one or two pieces so rice doesn't build up on the skin.
- 3
Portion the rice
Scoop roughly 15–20 g of rice with the right hand — about a heaping tablespoon. Transfer it to the cupped left palm, loosely gathering without pressing. Some chefs roll the portion between the fingertips first to expose air and loosen the grains.
- 4
Shape the oblong (shari)
Cup the rice against the base of the left palm. With the pad of the right thumb and the side of the right index finger, apply gentle pressure to the middle of the rice while rotating the left hand slightly, forming an oblong about 5–6 cm long and 2–3 cm wide. The rice should be firm enough to hold but visibly grainy at the edges — never a smooth, doughy mass.
- 5
Optional: add wasabi (kiriwasabi)
With the tip of a clean finger or a small spatula, dab about 0.3–0.5 g of wasabi in the center of the top surface of the rice, hidden under where the fish will sit. Omit or use sparingly for shellfish, eel, and salt-cured toppings.
- 6
Lay the topping (neta)
Pick up a slice of fish with the thumb and index finger of the right hand and drape it across the rice from left to right, so the grain runs parallel to the long axis of the nigiri and the slice overhangs each end by a few millimeters. The cut side should face down against the rice.
- 7
Press to seal
Place the pad of the right thumb on the left side of the fish and the side of the right index finger on the underside of the rice. Press gently — one firm, brief squeeze — to bond the fish to the rice and refine the shape. Do not press again.
- 8
Finish and plate
Flip the nigiri so the fish faces up, set it on a plate with the long axis running left to right (Edomae convention), and brush a light stroke of nikiri over the fish if appropriate. Serve immediately; do not refrigerate the formed piece.
- 9
Optional: nori band (tsutsumi)
For unagi, anago, awabi, or similar, wrap a 1.5–2 cm strip of yaki-nori around the middle of the formed piece after pressing, sealing with a dab of water on the overlap. The nori is added last so the rice stays defined.
The two halves of nigiri: shari and neta
Two terms recur in any discussion of nigiri and are worth keeping distinct. Shari refers to the seasoned sushi rice on its own — short- or medium-grain Japanese rice seasoned with rice vinegar, sugar, and salt, fanned in a hangiri to body temperature before forming. Neta refers to the topping: the slice of fish, the shellfish, the piece of egg, or the cured or cooked ingredient that goes on top. The nigiri itself is the union of the two. Conflating the terms is the most common verbal mistake beginners make; treating them as separate components is the first step toward forming them well, because the rice and the topping each have their own temperature, moisture, and handling requirements that have to meet in the hand at the moment of assembly.
Reading a correctly formed piece
A well-formed nigiri tells you almost everything about the chef's hand in a single glance. The rice should be visibly grainy at the edges, never a smooth or doughy mass, and the grains should run lengthwise along the oblong so the piece holds its shape when dipped. The fish should drape softly over the top, bulging slightly and hanging a few millimeters past each end of the rice, with the cut side flush against the rice and no air gap between them. The piece should be glossy but not wet, firm enough to pick up with chopsticks or fingers yet fall apart cleanly against the tongue. If the rice looks mashed, the hand pressed too hard; if the fish peels away, the seal was incomplete; if the piece rocks on the plate, the oblong was formed round rather than long.
Common uses
Tips & pitfalls
- Wet the hands lightly — dip fingertips in tezu and shake off so the palm is barely damp. Pooling water on the skin dissolves the rice surface and turns the grains gummy.
- Form the rice oblong, not a ball. A round shape reads as gunkan-maki and eats too dense per bite; aim for roughly twice as long as it is wide.
- The pressure rule: the rice should hold together when picked up but fall apart easily against the tongue. If it feels gummy or pasty in the mouth, the hand squeezed too hard.
- Keep hands at body temperature. Wipe with a cool, not cold, cloth; very cold hands chill the surface of the rice and dull its sheen.
- Wipe and rewet between every one or two pieces. Starch paste on the fingers transfers to the next portion and muddies both flavor and texture.
- Aim for a single gesture: cup, press, and place in one fluid motion. Multiple corrections collapse the rice grains and turn the shari into a sticky mass.
- Run the grain: orient the rice so the long grains lie parallel to the length of the nigiri. This is what keeps the piece from crumbling when it is dipped in soy sauce.
- Match topping thickness to rice weight. Heavy toppings (anago, engawa, scallop) tolerate a slightly firmer press; delicate ones (toro, hirame) need almost no pressure at all.
- Drape the fish, don't press it flat. The topping should bulge slightly over the rice and hang past the ends; a flat, sticky piece signals over-handling of the neta.
Good to know
- Japanese name
- Nigiri (握り), from the verb nigiru ('to grasp/squeeze'); the assembled piece is nigirizushi
- Origin
- Edo (modern Tokyo), c. 1820s
- Generally credited to
- Hanaya Yohei (1799–1858), a street-stall vendor in the Ryōgoku district
- Forming method
- By hand only — molds exist for training but are not used in traditional practice
- Typical rice portion
- 15–20 g per piece
- Finished size
- Roughly 5–6 cm long, 2–3 cm wide, 1.5–2 cm tall
- Rice temperature when forming
- Body temperature, about 35–40 °C / 95–104 °F
- Hand moistener
- Tezu — vinegared water, roughly 1 part rice vinegar to 3–5 parts water; some chefs float a slice of lemon or yuzu in the bowl
- Time per piece (skilled itamae)
- Roughly 10–15 seconds
- Pairing condiment
- Soy sauce (shoyu) and a small amount of wasabi, applied between rice and fish rather than at the table for most toppings
Also called
Nigiru · Sushi Rice Forming
Related

Whisk
Beat ingredients smooth and aerated with a looping wire motion

Sift
Pass dry ingredients through mesh to aerate and remove lumps

Strain
Pour through mesh to separate solids from liquid for a smooth result

Filter
Pass liquid through fine material to clarify out the smallest particles

Rice
Press cooked potatoes through small holes for fluffy, lump-free texture

Mash
Crush soft cooked food into a rustic, creamy purée

Grind
Crush food into a coarse to fine texture, from spices to meat

Grate
Shred food into fine bits against a sharp-toothed surface