Prep & Assembly
Sausage Stuffing (Casing Filling)
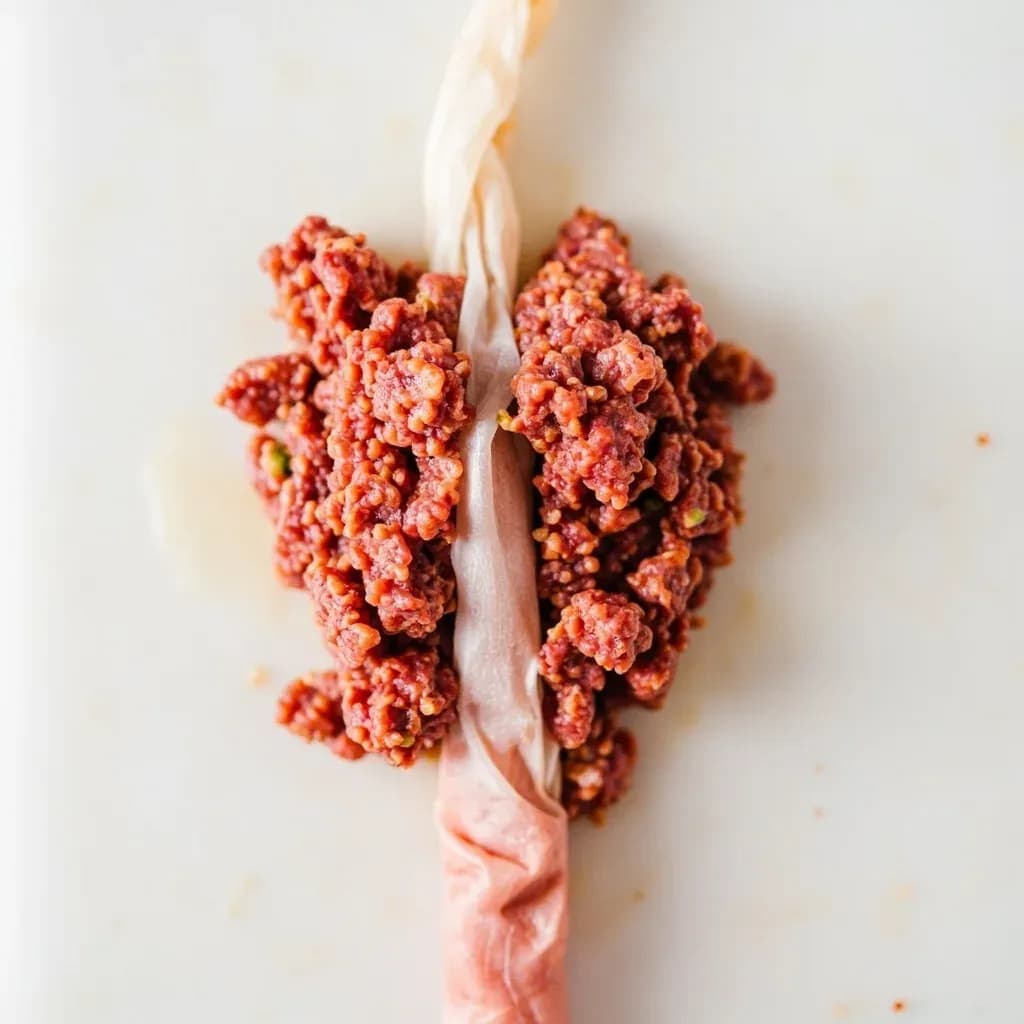
Forcing seasoned ground meat into a casing to fill it evenly without air pockets.
Sausage stuffing pushes ground, seasoned meat through a stuffer horn into a natural or synthetic casing, filling it firmly and steadily. Even, air-free packing is essential so the sausages hold their shape and don't burst or develop voids when cooked. Casing diameter and fill tightness determine the sausage's final size and snap.
Sausage stuffing is the moment a loose, seasoned farce becomes a defined sausage. Everything upstream — the cut, the grind, the cure, the seasoning — must already be right, because stuffing itself is largely about handling three things gracefully: the casing, the pressure, and the air. Get those right and the sausage cooks evenly, looks taut, and takes smoke or develops a good bloom; get them wrong and you get wrinkled dogs, burst casings, or pockets of fat that weep into the pan.
The craft has changed little in principle since Homer and Apicius described it: ground, seasoned meat forced into an animal intestine, twisted or tied, then cooked, smoked, or dried. What has changed is the equipment. A hand-crank piston stuffer, vertical or horizontal, gives you the even pressure that an improvised funnel never can, and a graduated set of stuffing tubes matched to casing diameter turns a frustrating wrestle into a calm, repeatable job. Whether you are making breakfast links, a coil of kielbasa, or a tight salami for hanging, the same handful of habits govern the result: cold meat, soaked casings, a steady crank, pricked air pockets, and a long cold rest before the cooker or smoker ever sees them.
Considered as a technique, stuffing sits between grinding and linking. It is a physical skill more than a recipe skill — the cook learns to feel when a casing is approaching its limit, to hear the difference between meat and air moving through the tube, and to read the bounce of a finished link between two fingers. A few sessions of practice is usually enough to make it second nature.
- Difficulty
- Medium
Types & varieties
Filled into natural hog or sheep casings and cooked the same day; the standard approach for breakfast links, Italian sausage, and bratwurst.
Often uses collagen or smoke-tolerant natural casings; stuffed firmer than fresh sausage to withstand hanging and heat in the smoker.
Tight, firm packs for salami, soppressata, and saucisson, traditionally in hog middles or beef rounds to support long air-dry and significant shrink.
Continuously stuffed into a long length and formed into a spiral or coil; the classic shape for kielbasa, boudin, and fresh Mexican longaniza.
Large-diameter tubes (32–40 mm) for bologna-style sausages and mortadella, often tied off into sections by hand rather than twisted.
Stuffed as a continuous rope then twisted or tied into individual portions; the retail standard for breakfast links and chipolata.
How to do it
- 1
Chill the seasoned farce
Hold the mixed sausage meat at 32–38°F (0–3°C) for at least 30 minutes. If it feels sticky or smeary when you press it, return it to the chill. A firm, cold pack keeps fat from smearing against the cylinder wall and stops the casing from tearing on the way out.
- 2
Prepare the casings
Soak natural hog or sheep casings in cool water for at least 30 minutes; for tighter, more tender casings soak up to overnight in the refrigerator. Flush the lumen by running water through the bundle until it runs clear, then drain. Edible collagen casings usually only need a brief dip; do not over-soak them or they will turn rubbery and split at the twist.
- 3
Set up the stuffer and choose a tube
Pick a stuffing tube matched to the casing diameter — natural hog 19–22 mm for breakfast links, 28–32 mm for Italian, 32–40 mm for kielbasa; sheep 16–22 mm for small chipolata. Lock the tube onto the barrel, expel any trapped air from the cylinder, and load the cold farce into the hopper.
- 4
Thread the casing
Open the casing end by gently squeezing or pushing it forward, then slide the casing onto the tube in a continuous strand, leaving a 2–3 cm tail. Tie a tight knot in the tail or seal it with a clip. Do not stretch the casing over the tube — let it slip on loosely.
- 5
Prime the stuffer
Crank slowly until a small amount of meat reaches the end of the tube to push out any trapped air. Pause so the casing is not inflated with air before the meat enters it; an air-filled start is the single most common cause of pockets in finished links.
- 6
Stuff under steady, gentle pressure
Crank with even pressure and let the casing slide off the tube by itself. Keep your off hand cupped beneath the nozzle to control the rate of fill and to feel for any pinching or tearing. Aim for a sausage that feels like a firm grape — not tight, not loose.
- 7
Prick and inspect as you go
Prick visible air pockets with a sausage pricker or fine needle as they appear. Look for thin spots where a clump of fat has stalled, and massage the casing lengthwise to redistribute the meat before pricking. Never squeeze an air pocket toward the end of a coil — that forces pressure back into the rest of the link.
- 8
Twist or tie into links
For links, twist consecutive portions in opposite directions at the desired length — 4–5 inches for breakfast links, 6 inches for Italian sausage. Pinch the casing at the mark, rotate one segment clockwise, the next counter-clockwise, then pinch back. For larger or wider sausages, tie with kitchen twine at regular intervals.
- 9
Rest and dry the casings
Hang the sausages or lay them on a wire rack uncovered in the refrigerator for 12–24 hours. The surface dries, the casing tightens, and the flavor settles. For long storage, freeze on a sheet tray first and then vacuum-seal so the links hold their shape.
Matching casing to stuffing pressure
Not all casings forgive the same mistakes. Natural hog and sheep casings are elastic and forgiving — they stretch with the meat during stuffing, shrink back as the farce firms in the cold, and tolerate a slightly loose pack without wrinkling. Collagen casings (edible fresh, inedible smokeable) and fibrous cellulose hold their shape more rigidly; an underfilled collagen link stays slack and pruny, and an overfilled one splits cleanly. For this reason, natural casings are the training wheels of sausage making, and synthetic casings reward cooks who have learned to feel the right pressure.
- Aim for a sausage that bounces back when lightly squeezed — too slack means underfill, rock-hard means a blowout is coming.
- Natural casings tolerate 80–90% fill because they shrink back with the meat; collagen and fibrous casings hold their shape, so they want consistent, even pressure closer to spec.
- Underfilled synthetic casings wrinkle and trap liquid against the meat; overfilled natural casings tend to burst at the weakest point, often where a clump of fat has stalled.
Common uses
Tips & pitfalls
- Keep the farce and casings cold throughout; warm meat smears fat against the cylinder, drags in the casing, and produces greasy, split links.
- Thread slippery natural casings onto a wet tube or a short length of PEX tubing so they glide on without tearing.
- Crank steadily and let the casing advance off the nozzle on its own; pulling it from the tube stretches and breaks it.
- If a casing splits mid-stuff, cut out the bad section, re-thread, and keep going — never try to knot a burst point in a natural casing.
- Burp air pockets as you stuff with a sausage pricker; a final prick after the overnight rest is fine, but never prick during the cook.
- For smoked links, let the stuffed casings bloom at room temperature for 30–60 minutes so the surface is tacky and the smoke will adhere evenly.
- Work in small batches for emulsified sausages like boudin blanc or frankfurters, and re-chill the remaining farce in the hopper between passes to protect the emulsion.
- Do not over-soak collagen casings — they absorb water, turn rubbery, and split at the twist when you try to link them.
Good to know
- Also called
- Casing filling; sausage linking (when followed by twisting into links)
- Primary equipment
- Sausage stuffer (hand-crank vertical or horizontal, or hydraulic), graduated stuffing tubes, sausage pricker
- Casing types
- Natural (hog, sheep, beef middle/round), collagen (edible fresh or inedible smokeable), fibrous cellulose, synthetic
- Typical casing soak
- 30 minutes to overnight in tepid water for natural casings; flush the lumen before stuffing
- Meat temperature
- Hold the farce at 32–38°F (0–3°C); fat smears and the emulsion breaks above about 45°F (7°C)
- Fill pressure
- Firm but even — roughly 80–90% of casing capacity to allow for expansion during cooking
- Rest after stuffing
- 12–24 hours uncovered on a rack in the refrigerator to dry the surface and set the flavor
- Common issues
- Burst casings (overfill, rough handling), wrinkled casings (underfill), fat smear (warm meat), air pockets
Also called
Casing Filling · Stuffing Sausage · Filling Casings
Dishes that rely on it
Related

Whisk
Beat ingredients smooth and aerated with a looping wire motion

Sift
Pass dry ingredients through mesh to aerate and remove lumps

Strain
Pour through mesh to separate solids from liquid for a smooth result

Filter
Pass liquid through fine material to clarify out the smallest particles

Rice
Press cooked potatoes through small holes for fluffy, lump-free texture

Mash
Crush soft cooked food into a rustic, creamy purée

Grind
Crush food into a coarse to fine texture, from spices to meat

Grate
Shred food into fine bits against a sharp-toothed surface