Prep & Assembly
Coil Fold
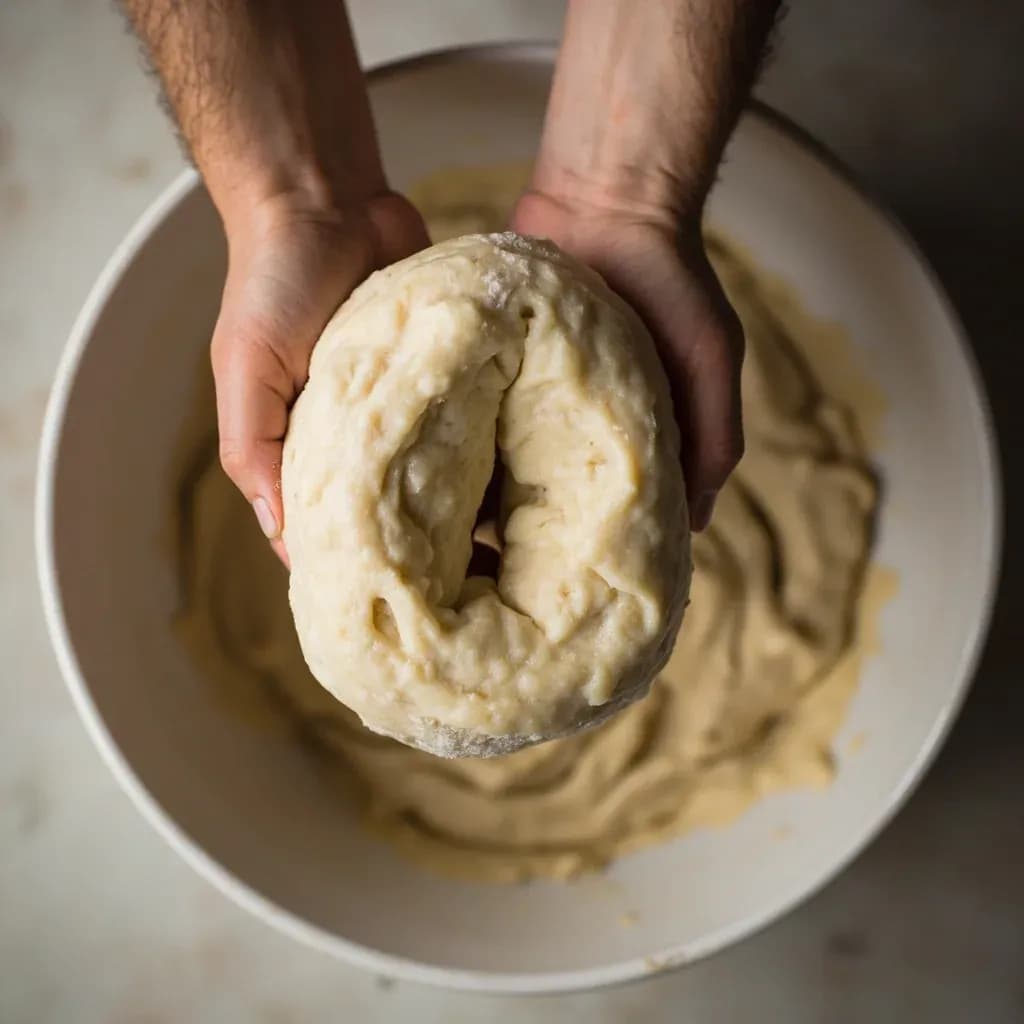
Lifting wet dough so it coils under itself, building strength gently in high-hydration bread.
The coil fold strengthens slack, high-hydration dough by lifting it from the middle so the ends tuck and coil beneath it, repeated around the bowl. It builds gluten structure with very little handling, which suits delicate, wet doughs that would degas under heavier kneading. Like stretch and fold, it is done in spaced sets during bulk fermentation.
A coil fold is a gentle dough-strengthening move used during bulk fermentation, in which the baker slides wet hands under a slack, high-hydration dough, lifts it straight up until its own weight pulls it taut, and lets the lifted portion coil back down onto itself. The motion is repeated at four points around the container, building gluten organization and surface tension without pressing, kneading, or degassing the dough. It is the technique of choice when a dough is too wet to knead by hand and too precious in its trapped gas to be worked aggressively.
Where a stretch-and-fold pulls a corner of dough across the surface — useful on firmer doughs but prone to tearing on very wet (80%+) doughs — a coil fold lifts from underneath and lets gravity do the folding. This preserves the CO₂ that produces open, glossy crumb and creates the kind of aligned gluten network that holds its shape through a long, cold proof. The technique is a quiet one: each set takes under a minute, and the dough rests for 30–45 minutes between sets, giving gluten time to relax and reorient before the next pass.
- Difficulty
- Medium
Types & varieties
Four lifts at roughly 12, 3, 6, and 9 o'clock around a round tub — the most common form.
Lift from one side, rotate the tub 90°, lift again, and repeat four times to spread the folds evenly.
One large lift from the center of the dough, letting it fold entirely onto itself; used when a single, dramatic set is desired.
How to do it
- 1
Prepare the dough and vessel
Mix your high-hydration dough and transfer it to a straight-sided, lightly oiled round tub or bucket. The walls should be roughly twice the height of the resting dough so it has room to be lifted without slopping over.
- 2
Wet your hands
Dip both hands in a bowl of cool water and shake off the excess. Wet hands slide under the dough without sticking or tearing the surface — and a quick re-dip between lifts keeps the operation clean.
- 3
Lift from one side
Slide your fingers and palms under the dough from one edge, grip the underside gently, and lift straight up. You will feel the dough resist and stretch as its own weight pulls taut; that resistance is the fold doing its work. The dough should stretch, not tear.
- 4
Let it coil down
Allow the lifted portion to fold back over onto itself and coil under the bulk of the dough. Do not press, pat, or shape — gravity does the work. Set the dough back down in the tub.
- 5
Rotate and repeat
Turn the tub 90° and repeat the lift-and-coil motion. Continue for a total of four lifts, spacing them evenly around the dough so gluten is built on all sides.
- 6
Rest, then repeat sets
Cover and let the dough rest 30–45 minutes. Repeat the four-lift set one to three more times. By the second or third set the dough should feel noticeably tighter, smoother, and more cohesive.
- 7
Stop at the right moment
Cease coil folding once the dough holds its shape and shows early doming — typically before a 50% rise. Leave it undisturbed to finish bulk fermentation, so the crumb can trap the gas it will need for oven spring.
Coil fold vs. stretch-and-fold vs. slap-and-fold
These three moves are often listed together as 'folds,' but they behave very differently in the bowl.
- Stretch-and-fold: a corner of dough is pulled up and stretched across the surface. Excellent for doughs at 65–75% hydration; tends to tear on wetter doughs and can deflate the outermost gas cells.
- Coil fold: hands slide under the dough and lift vertically; the mass falls and coils onto itself. Gentler on gas, more effective above 80% hydration, and creates stronger surface tension for shaping later.
- Slap-and-fold: dough is lifted, slapped against the counter, and folded over itself repeatedly. The most aggressive option, used to build strength quickly in moderately hydrated doughs; usually too violent for the open-crumb style.
How it builds gluten without kneading
Gluten strengthens through alignment and rest, not through force. A coil fold takes slack, randomly oriented gluten strands and lines them up vertically as the dough is lifted. The 30–45 minute rest that follows lets the strands relax into their new orientation and form new cross-links, so each successive fold works on a slightly stronger network. By the third or fourth set, the dough has the kind of internal structure a stand mixer would have produced — but with far more gas still in the system.
Common uses
Tips & pitfalls
- Wet your hands thoroughly with cool water before each lift; a quick dip between folds prevents sticking without adding flour, which would tighten the crumb.
- Reach underneath with fingertips and palms, grab the underside, lift straight up until you feel resistance, then let the dough fold onto itself — do not press, push, or pull sideways.
- Work in a high-sided, straight-walled tub so the dough has room to hang and coil; low bowls or wide sheet pans cause the dough to collapse rather than fold.
- Stop coil folding once the dough holds a roughly spherical shape and resists spreading — overfolding tightens the gluten and produces a closed, tight crumb.
- If the dough is too slack to lift cleanly, the hydration is too high for the current stage or the bulk is too early; let it rest 15–20 minutes and try again rather than fighting it.
- Do not coil fold after the dough has more than doubled — you will deflate gas that the crumb needs for oven spring and an open internal structure.
- Use coil folds for the first 2 hours of bulk, then leave the dough undisturbed so it can ferment and trap gas for the rest of the rise.
- Aim for a dough temperature of 24–26°C (75–78°F); cooler doughs relax slowly between folds and tighten the schedule, warmer doughs over-ferment before you finish your sets.
Good to know
- Primary use
- Strengthening high-hydration bread dough during bulk fermentation
- Typical hydration range
- Best at 75% hydration and above; awkward on stiffer doughs
- Number of sets
- 2 to 4 sets, spaced 30–45 minutes apart
- Time per set
- About 30–60 seconds for a full set of 4 lifts
- When to start
- 20–30 minutes after the levain is incorporated, when the dough is active but still slack
- When to stop
- Before the dough has risen more than ~50%, so the final rise proceeds undisturbed
- Equipment needed
- A straight-walled, high-sided tub and wet hands
- Origin
- Popularized in the mid-2010s open-crumb sourdough community, widely credited to baker Trevor J. Wilson
Also called
Coil Folding
Related

Whisk
Beat ingredients smooth and aerated with a looping wire motion

Sift
Pass dry ingredients through mesh to aerate and remove lumps

Strain
Pour through mesh to separate solids from liquid for a smooth result

Filter
Pass liquid through fine material to clarify out the smallest particles

Rice
Press cooked potatoes through small holes for fluffy, lump-free texture

Mash
Crush soft cooked food into a rustic, creamy purée

Grind
Crush food into a coarse to fine texture, from spices to meat

Grate
Shred food into fine bits against a sharp-toothed surface