Prep & Assembly
Crumb Coating
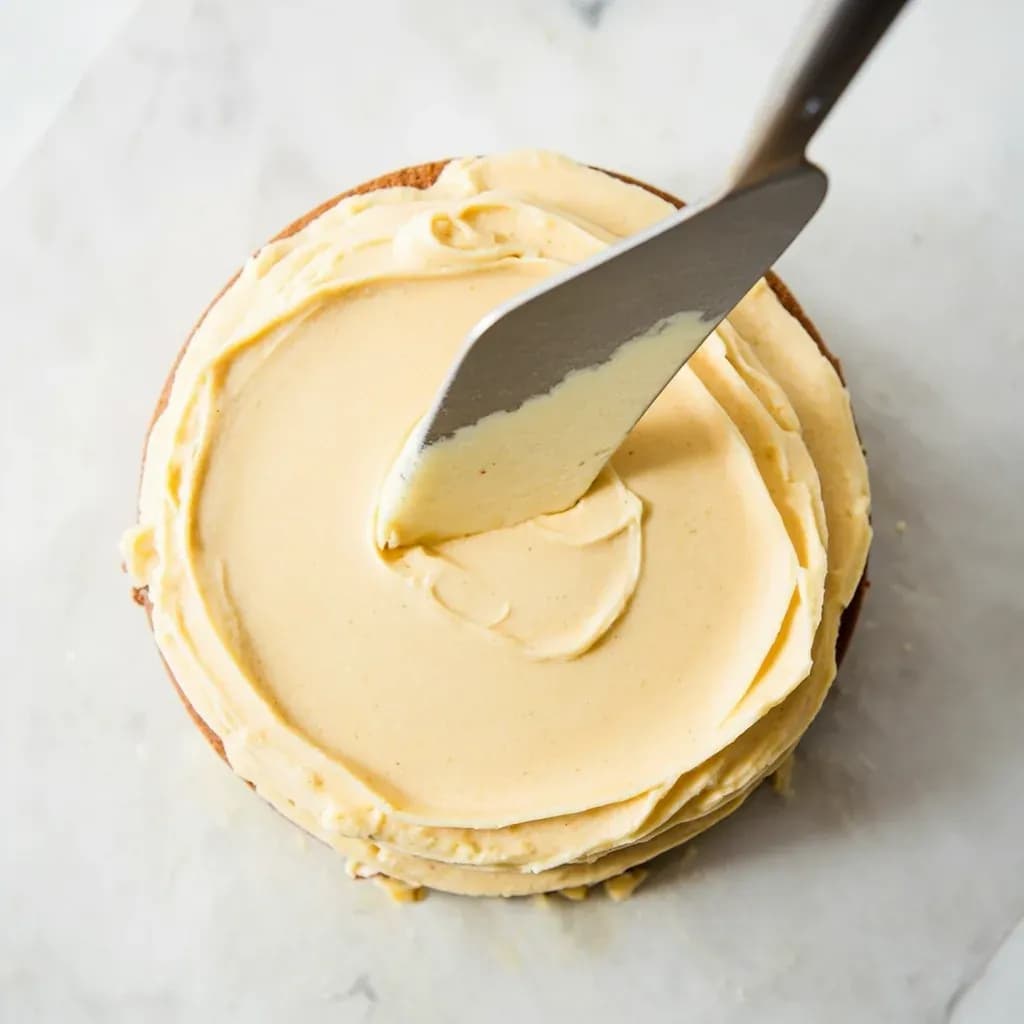
Spreading a thin first layer of frosting on a cake to trap loose crumbs before final icing.
Crumb coating applies a thin, initial layer of frosting over a cake to seal in stray crumbs and smooth the surface. After it chills and firms, a clean final coat of frosting can be applied without crumbs marring the finish. It is a standard step in cake decorating for achieving a crisp, professional-looking exterior.
The crumb coat is the unsung foundation of a clean, professional-looking cake. It is a deliberately thin first layer of frosting, usually buttercream, applied to the assembled cake and chilled until firm before the final decorative coat goes on. Its job is not to look good; it is to do the dirty work of trapping loose crumbs against the cake so they cannot migrate up into the topcoat, where they would mar what should be a smooth, even finish. The principle extends well beyond buttercream: the same idea — seal, chill, finish — applies to ganache under fondant, to cream cheese frosting on carrot cake, and even to a brush of simple syrup on a chiffon layer before its buttercream. In every case the goal is identical, a stable, sealed base that lets the visible coat go on with confidence.
This single habit is what most visibly separates a homemade cake from a bakery one. The crumbs on a tender cake such as red velvet, carrot, or devil's food are inevitable; they are shed by the knife as you level, by the spatula as you spread, and by gravity as the cake sits. A crumb coat glues them down with a thin film of fat and sugar, and once that film sets in the refrigerator, the final coat of frosting glides over a clean, slightly tacky surface the way paint glides over a primed wall.
- Difficulty
- Easy
Types & varieties
The most common form; a thin layer of American, Swiss, Italian, or German buttercream seals the cake before the final decorative coat.
Used under fondant or when a firmer, less sweet seal is desired; sets harder than buttercream and gives a very stable base.
Sometimes brushed onto sponge or chiffon cakes as a preliminary moistening before buttercream; treated by some decorators as the first step of the crumb-coating process.
Used for carrot cake, red velvet, and similar cakes; the slightly looser body is offset by thorough chilling before the final coat.
How to do it
- 1
Level and chill the layers
Trim domed tops with a serrated knife so each layer is flat. Stack with a thin layer of filling between tiers — that filling is part of the seal. Wrap and chill the assembled cake for 20–30 minutes, or 10 minutes in the freezer, until the exterior is cold and firm.
- 2
Set up a 'crumb coat' bowl
Scoop a few tablespoons of frosting into a small, separate bowl. Keep the main bowl clean and covered; it is reserved for the final decorative coat and must stay crumb-free.
- 3
Apply a thin coat to the sides
Hold an offset spatula flat against the side of the cake at the base. With a turntable spinning (or the spatula moving upward), press a thin band of frosting around the entire side. Rotate and add more, working upward, until the sides are covered. The cake should still be partially visible through the coat.
- 4
Coat the top
Place a dollop of frosting in the center of the cake and sweep it outward to the edges with a long spatula, holding the blade nearly flat. Do not worry about smoothness; that is the final coat's job.
- 5
Smooth and clean up
Lightly pass a clean bench scraper or the flat of a spatula over the sides to even out the thickness. Wipe the scraper between passes. Clean any excess from the cake board.
- 6
Chill until firm
Refrigerate the crumb-coated cake for 15–30 minutes, until the surface is set and no longer tacky to a light touch. The cake is now ready for its final layer of frosting or for fondant.
What a crumb coat is not
The crumb coat is regularly confused with a handful of adjacent finishes, and confusing them leads to mistakes in the kitchen.
- It is not a naked cake. A naked cake is a deliberately incomplete final finish where the cake shows through for rustic styling; a crumb coat is always covered.
- It is not the final layer. The visible coat is thicker, smoothed, and meant to be seen; the crumb coat underneath is functionally invisible.
- It is not a drip finish. A drip (typically ganache or glaze) is a decorative topcoat that runs over the edges; the crumb coat is hidden behind it.
- It is not a glaze. Glazes set with a shine and are usually the final coat; crumb coatings set matte and are always covered by something else.
Why pressing beats swiping
The single most useful physical habit in crumb coating is the difference between pressing and swiping.
- Pressing the spatula flat against the cake traps crumbs by pushing them into the surface.
- Swiping drags crumbs along the side, redepositing them where you have just cleaned.
- A turntable, when combined with a held-still spatula, makes the press almost automatic.
- On the top, the same logic applies: sweep outward from the center with the blade nearly flat, never digging the tip in.
Common uses
Tips & pitfalls
- Chill the assembled, leveled cake for 20–30 minutes (or 10 in the freezer) before crumb coating — a cold, firm cake sheds far fewer crumbs than one at room temperature.
- Reserve a small bowl of frosting specifically for the crumb coat so any picked-up crumbs do not contaminate the bowl used for the final finish.
- Apply the coat by pressing the spatula flat against the cake and rotating the turntable, rather than swiping — pressure, not scraping, is what traps crumbs.
- The crumb coat should be intentionally thin: if you can no longer see cake color through it, it is too thick and you have wasted frosting that belongs on the final layer.
- Chill until the coat is firm to the touch before applying the final frosting; a tacky crumb coat will pull and lift when you spread the topcoat.
- Wipe the bench scraper or spatula frequently with a damp paper towel to keep crumbs from being dragged back across the surface.
- For fondant work, the ganache or buttercream crumb coat must be fully set and only slightly tacky — too cold and the fondant will not bond; too soft and it bulges through the seams.
- Do not skip the crumb coat on 'sturdy' cakes either; even a pound cake sheds fine crumbs that ruin a glossy final finish.
- A turntable is not strictly required but is the single biggest ergonomic upgrade for a clean, even coat.
Good to know
- Also known as
- Dirty icing, base coat, first coat, seal coat
- Category
- Cake decorating / assembly technique
- Difficulty
- Beginner; one of the first skills taught in cake decorating
- Active time
- 5–10 minutes per cake for application
- Chill time
- 15–30 minutes in the refrigerator, or 5–10 minutes in the freezer
- Primary tools
- Offset spatula, bench scraper, turntable
- Typical medium
- Softened buttercream; ganache for fondant work
- Coat thickness
- Roughly 1/16 in (1.5 mm); thin enough that cake color still shows through
- Best on
- Tender-crumb cakes (red velvet, chocolate, carrot, vanilla butter) and any cake to be covered in fondant
- Origin
- Codified in 20th-century American cake-decorating curricula (Wilton, PME); the underlying sealing idea is implicit in classical European gateau work
Also called
Crumb Coat · Crumb Coating Cake
Related

Whisk
Beat ingredients smooth and aerated with a looping wire motion

Sift
Pass dry ingredients through mesh to aerate and remove lumps

Strain
Pour through mesh to separate solids from liquid for a smooth result

Filter
Pass liquid through fine material to clarify out the smallest particles

Rice
Press cooked potatoes through small holes for fluffy, lump-free texture

Mash
Crush soft cooked food into a rustic, creamy purée

Grind
Crush food into a coarse to fine texture, from spices to meat

Grate
Shred food into fine bits against a sharp-toothed surface