Prep & Assembly
Garnish Placement
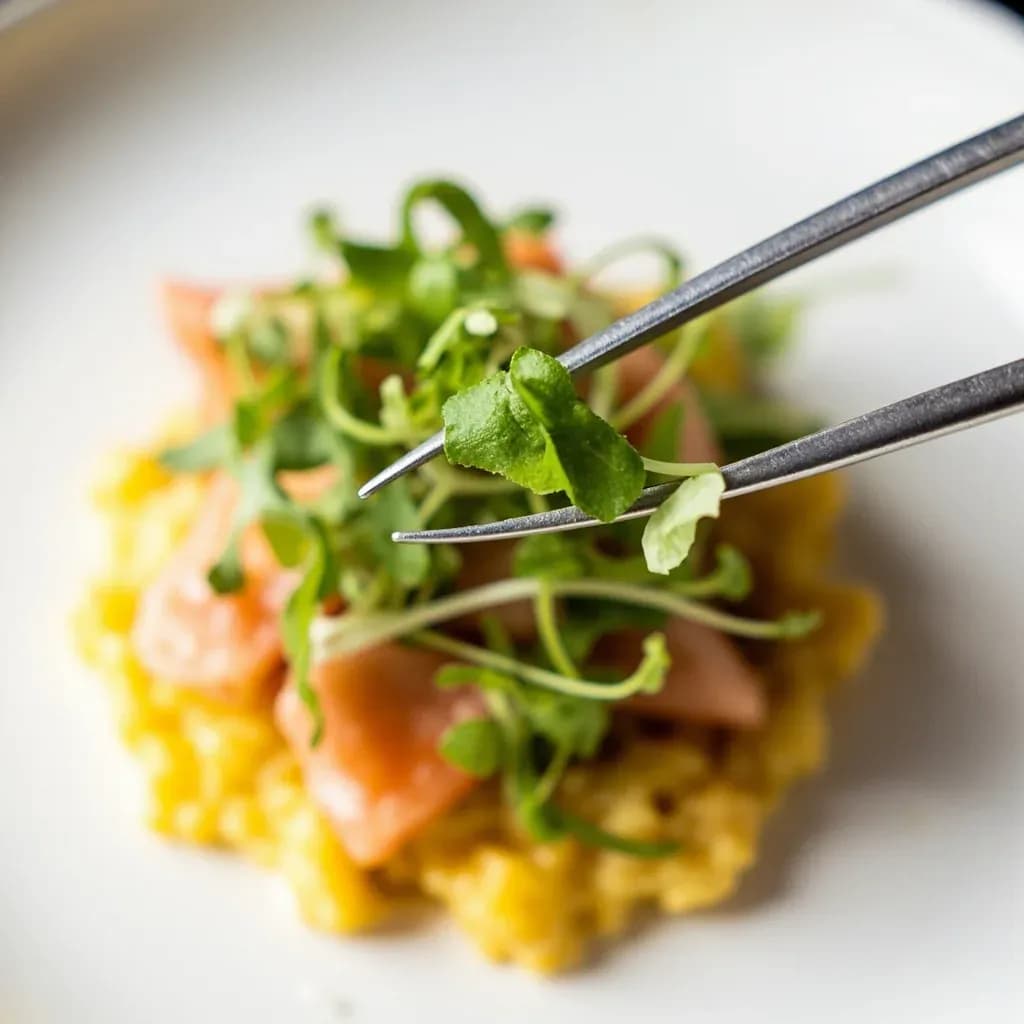
Precisely positioning final garnishes with tweezers for refined plating.
Garnish placement is the final plating step of arranging herbs, microgreens, sauces, and accents with precision, often using tweezers for control. It balances color, height, and negative space to guide the eye and signal the dish's flavors. In fine dining each element is placed intentionally so the plate reads as composed rather than scattered.
Garnish placement is the final, deliberately precise step of plating: the moment when microgreens, herb leaves, edible flowers, sauce dots, powders, and seeds are positioned one item at a time on an otherwise finished plate. It is not a casual flourish added at the end of cooking; it is a separate discipline that happens at the pass, after proteins, starches, and sauce work are already in place, and just before the dish leaves the kitchen. Almost everything in a professional kitchen is built so that this step can happen quickly, cleanly, and repeatably across a full service — small ramekins of pre-portioned garnishes sit on a garnishing tray, plating tweezers are wiped between every plate, and the cook works with both hands in a fixed position over a fixed plate.
The reason it gets its own technique is that it is the last reversible-looking step that is actually irreversible. A dropped leaf, a smeared dot, or a wilting microgreen cannot be un-placed; the plate has to start over. This is why garnish placement is taught as a sequence: stage first, plate the main canvas, identify the visual anchor, place large to small, dot and dust last, wipe the rim, and send the dish out the door. The aesthetic logic is older than the tools — odd-numbered clusters, the rule of thirds, restraint, and a clear focal point — but the modern precision style, using offset tweezers and squeeze bottles, was codified during the nouvelle cuisine movement of the 1970s and refined in the plating language of restaurants like The French Laundry and Noma.
In practice, garnish placement behaves like a controlled, timed gesture rather than an act of cooking. A practiced cook finishes a composed plate in 20 to 60 seconds; an elaborate design with dots, dusting, and a layered stack runs one to three minutes. The main challenges are steadiness, hygiene, and timing rather than any complex skill — and the difference between a home cook and a line cook is almost always wipe discipline, hand bracing, and the rule that garnishes go on at the very last second, never under a heat lamp.
- Difficulty
- Medium
Types & varieties
Single-item pinpoint positioning of leaves, petals, seeds, or small dots — the most precise style
Evenly spaced droplets of sauce, purée, or oil, usually from a squeeze bottle or pipette
A dragged line or arc of sauce or purée across the plate with the back of a spoon
Powders (dehydrated vegetable, mushroom, citrus) scattered from a fine strainer or pinched between fingers
Vertical layering of components (e.g. layered vegetable discs, stacked herbs) to add height
Loose placement of flexible items like herb sprigs, nasturtium petals, or shaved vegetables so they follow the contour of the food
Grouping multiple identical small items into a deliberate bunch to create a focal point
Powder or oil pressed through a stencil for a graphic, repeatable design
How to do it
- 1
Stage and pre-portion garnishes
Sort garnishes into small ramekins, cups, or on a half-sheet lined with a damp towel — one container per item, labeled by dish. Stage tweezers, a squeeze bottle, a small spoon, a fine strainer, and a clean wiping cloth within arm's reach of the pass. Pre-portioned garnishes are the difference between a 30-second plate-up and a 3-minute scramble.
- 2
Plate the main components first
Position proteins, starches, and any sauce work (smears, pools, swooshes) before touching garnishes. Garnish placement is correction, not construction — fix the canvas before adding the final marks.
- 3
Plan the visual anchors
Identify the focal point (typically the protein or the tallest element) and decide where the garnish cluster will sit — usually on or just in front of the focal point, with secondary accents placed along the rule-of-thirds grid. Squat briefly to plate height and check the composition from the diner's eye level before placing anything.
- 4
Place large elements with tweezers
Pick up the biggest garnish item (a herb sprig, a vegetable chip, a slice of cured fish) with offset tweezers, gripping the thickest part so it doesn't bruise. Lower it into position and release the grip just before contact so the item settles rather than drops. Gripping the delicate end crushes it.
- 5
Add medium accents
Place smaller leaves, petals, or microgreens in a loose odd-numbered cluster (3 or 5), letting them overlap slightly. Vary angles and orientations so the cluster reads as natural rather than radial. Build toward the focal point, not away from it.
- 6
Dot, dust, or sprinkle finishing details
From a squeeze bottle or pipette, apply sauce dots in a deliberate line or arc — 3 to 5 dots spaced about a thumb-width apart. Use a fine strainer or pinched fingers to dust powders over a defined area, not the whole plate. Powders spread further than you think; a light first pass is usually enough.
- 7
Wipe and inspect
Run a clean cloth around the plate rim to remove smudges. Squat to plate height and look across the dish from a low angle to confirm height, balance, and negative space before it leaves the pass. The single most common plating error is a smudged rim, and it is the easiest to fix at this step.
- 8
Serve immediately
Hand off the dish the moment the last garnish is placed. Microgreens wilt in 60–90 seconds under heat lamps; powders absorb moisture from sauced components and lose contrast. Garnish placement is the final beat of the ticket — after it, the plate is out of your hands.
The plating tweezer kit at the pass
Most professional stations keep a small, dedicated kit for garnish placement, separated from tasting and service tools. The core is a pair of offset plating tweezers — angled tips give a clear line of sight down to the plate, which straight tweezers block. A second pair of straight, fine-tipped tweezers handles dots and very small items. Alongside them sit a squeeze bottle (usually two: one for oil, one for purée or sauce), a small spoon for smears, a fine-mesh strainer for dusting, a pipette for single drops, a micro-spatula for adjusting sauce work, and a stack of clean, damp cloths. Garnishes themselves live in small cups or on a half-sheet lined with a damp paper towel; delicate leaves and microgreens are kept cool, often over crushed ice, so they stay turgid.
- Offset tweezers for placement, straight tweezers for dots and small items
- Two squeeze bottles is standard: one fat-based, one water-based
- Damp paper towel under greens keeps them crisp and cool
- A clean wiping cloth is a tool, not an accessory — it goes in the apron or on the rail
Visual grammar: odd numbers, thirds, and negative space
Most of what reads as 'chefly' plating is a few repeating rules, applied consistently. Odd-numbered clusters (3, 5, 7) avoid the symmetry that makes arrangements look mechanical. The rule of thirds — dividing the plate into a 3×3 grid and placing anchors near the intersections — gives compositions a sense of intention without obvious geometry. Negative space is the largest ingredient on the plate; it is what makes a single herb leaf look deliberate instead of lost. The focal point is almost always the protein or the tallest element, and the garnish cluster sits on or just in front of it, with secondary accents placed along the thirds grid.
- Place anchors at thirds intersections, not dead center
- Use odd numbers for clusters; even numbers read as constructed
- Negative space carries as much weight as any garnish
- Vary angles within a cluster so it looks grown, not arranged
Common uses
Tips & pitfalls
- Wipe the tweezer tips on a clean damp cloth after every single placement — oils and residue build up fast and ruin the next grip, and a single sticky tweezer drops whatever it picks up next.
- Keep delicate garnishes on a damp paper towel or in a small cup of cold water at the pass so they stay turgid and cool; limp microgreens are the most visible plating failure.
- Always place the largest garnish element first, then build smaller accents toward it — working big-to-small avoids re-grabbing fragile items and keeps the focal point intact.
- Chill tweezers briefly before plating hot food; warm metal can wilt a microgreen on contact and is uncomfortable to use over a hot plate.
- Rest the heel of your off-hand on the pass rail or plate edge to steady the working hand — plating tweezers amplify any tremor, and bracing removes most of it.
- Stand directly over the plate and sight down the vertical axis; angled views make asymmetric placement look symmetric and vice versa, and the diner will see it straight-on.
- Use odd numbers and follow the rule of thirds for placement coordinates — eyeballed 'looks right' is almost always a thirds grid that the cook has internalized.
- Avoid garnishes that don't echo a flavor or texture in the dish; a sprig of parsley on a chocolate dessert fails both visually and on the palate, and a garnish that doesn't belong is worse than no garnish.
- Wipe the plate rim with a clean cloth before the dish goes out — a single sauce smear undermines otherwise careful garnish work and is the most common professional plating miss.
- Don't add the garnish until the dish is ready to leave the pass; every extra minute under the heat lamp or in the window degrades color, crispness, and contrast.
Good to know
- Primary tool
- Offset plating tweezers, 12–16 cm (5–6 in) long, with straight tweezers and fine-tipped tongs as backups
- Also used
- Squeeze bottles, small spoons, pipettes, micro-spatulas, fine-mesh strainers, and tweezer-tip brushes
- Stage in workflow
- Final step of plating, performed after the main components are in position and just before the dish leaves the pass
- Difficulty
- Beginner to intermediate; the main challenges are steadiness, hygiene, and timing
- Preferred groupings
- Odd-numbered clusters (3, 5, 7) read more naturally than even-numbered ones
- Working posture
- Dominant hand holds tweezers while the off-hand wrist braces on the pass rail for stability
- Speed
- 20–60 seconds for a composed plate; 1–3 minutes for elaborate designs
- Hygiene
- Tweezers are wiped between every dish, usually with a clean damp cloth, and fully sanitized during service
- Historical origin
- Refined during the 1970s nouvelle cuisine movement in France; further codified in modern fine-dining plating
Also called
Tweezer Plating · Plating
Dishes that rely on it
Related

Whisk
Beat ingredients smooth and aerated with a looping wire motion

Sift
Pass dry ingredients through mesh to aerate and remove lumps

Strain
Pour through mesh to separate solids from liquid for a smooth result

Filter
Pass liquid through fine material to clarify out the smallest particles

Rice
Press cooked potatoes through small holes for fluffy, lump-free texture

Mash
Crush soft cooked food into a rustic, creamy purée

Grind
Crush food into a coarse to fine texture, from spices to meat

Grate
Shred food into fine bits against a sharp-toothed surface