Prep & Assembly
Larding
Threading strips of fat into lean meat to keep it moist while cooking.
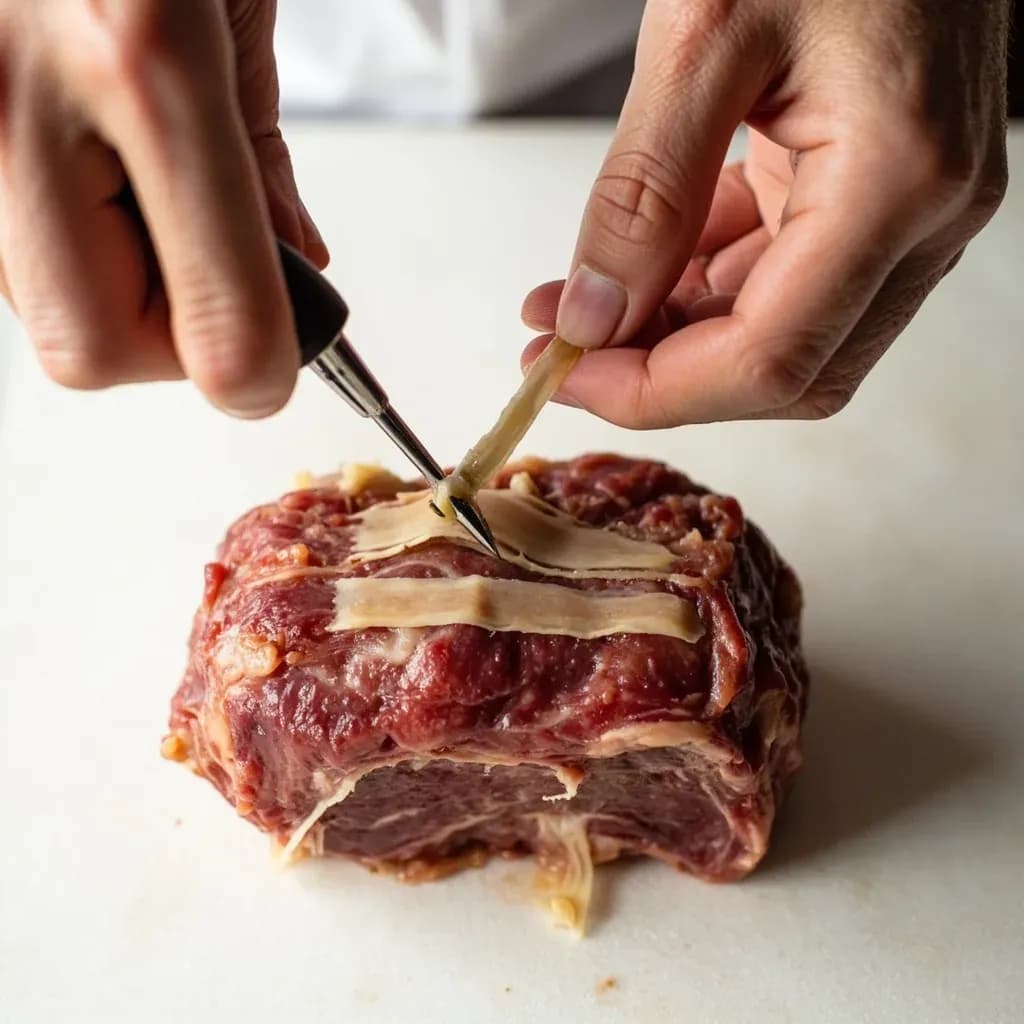
Larding inserts thin strips of fat, usually pork fatback, into lean cuts of meat using a larding needle. As the meat roasts or braises, the interior fat melts and bastes it from within, preventing dry, lean cuts from drying out. The related technique of barding wraps fat around the outside instead, and both were once standard for game and lean roasts.
Long before beef came pre-marbled and turkeys came pre-brined, cooks had a physical answer to the problem of dry, lean meat: larding. The technique threads strips of hard, chilled fat — almost always pork fatback in the classical French tradition — directly through a roast or cutlet, leaving them embedded inside the flesh. As the meat cooks, those embedded strips, the lardons, melt slowly, basting the muscle fibers from within and standing in for the intramuscular fat that a naturally well-fed animal would have provided.
Larding belongs to the same classical French triad as barding (wrapping a roast in a sheet of fat) and piquer (larding combined with studding the surface with bacon slivers and aromatics). All three share the same logic: a lean cut can be enriched with a fat that isn't part of the animal itself. In contemporary kitchens, larding has largely been edged out by brining, injection marinades, and the simpler expedient of buying better-marbled meat, but it remains standard in classical cookery and indispensable when working with the very leanest game — venison loin, saddle of hare, wild boar, and similar — where no other technique quite produces the same silkiness in the cooked flesh.
The technique is forgiving in principle and exacting in practice. Success depends less on the act of piercing the meat than on the temperature and shape of the fat: lardons must be frozen solid, cut to clean rectangles, and inserted in a regular, even pattern so the finished slices look uniform and the rendered fat distributes itself predictably. Get the temperature and the geometry right and the larding needle does the rest; get either wrong and the fat will smear, tear, or vanish into the meat before it ever reaches the oven.
- Difficulty
- Hard
Types & varieties
Lardons laid across the top surface of a roast just under the skin or crust, rather than threaded through
Needle passed fully through the meat so the fat is visible on both sides; the classic method for whole roasts
Cured, lightly smoked bacon used in place of plain fatback for added savoriness; common on venison and veal
Lardons rolled in chopped herbs, crushed garlic, or cracked pepper before insertion so the rendered fat carries flavor
Thin slivers of black truffle inserted alongside the fat; used in classical pâtés, ballotines, and other forcemeats
How to do it
- 1
Chill the fat and the meat
Place the pork fatback in the freezer for 1–2 hours until rock-hard. Chill the lean meat in the refrigerator until firm (around 4 °C). A cold, taut surface and a frozen fat are essential for clean insertion; if either is at room temperature, the fat will smear.
- 2
Cut uniform lardons
Trim the fatback into rectangular strips roughly 8–10 mm thick and 4–5 cm long. Match the lengths to the thickness of the roast so the lardons sit just below the surface at each end. Keep the cut lardons on a chilled plate or return them to the freezer until needed.
- 3
Season the lardons
If desired, roll the strips in coarse salt, cracked black pepper, finely chopped thyme, or a light coating of crushed garlic. Seasoning at this stage lets the rendered fat carry flavor deep into the meat as it cooks.
- 4
Load the larding needle
Slip a lardon into the slot of the larding needle; the hinged or spring-loaded style grips the strip with a single shutter. Some cooks thread two or three lardons at once to speed the work, especially on long roasts.
- 5
Pierce the meat
Hold the meat firmly on a board set on a damp towel to prevent slipping. Pass the needle straight through the meat, following the grain, at an even depth so the lardon will run through the center of the cut. Pull the needle out; the shutter holds the fat in place.
- 6
Build a regular pattern
Repeat at 2–3 cm intervals in parallel rows across the surface of the roast. Stagger the rows slightly so no two lardons sit on the same plane. Trim any lardon that protrudes flush with a sharp knife so the surface is even.
- 7
Rest before cooking
Return the larded roast to the refrigerator for at least 30 minutes so the fat firms up again and the meat relaxes. Pat the surface dry, season the outside, then roast or braise as the recipe directs. The lardons render during cooking and baste the interior from within.
The larding needle (lardoir)
The larding needle is a long, pointed steel tool with a slot or hinged shutter near the tip. The classic French model is a single piece of stainless or nickel-plated steel, about 20–25 cm long, with a sprung flap that grips a lardon while the needle is drawn through the meat. Simpler versions are little more than a tapered blade with an open slit; the cook holds the fat in the slit with a fingertip while pushing the needle through. Either style works, but a hinged shutter is far easier once the fat begins to warm and the lardons start to slide.
A serviceable needle is the only specialized piece of equipment the technique requires. Quality stainless versions with a sprung shutter are made by Matfer, de Buyer, and several other French cutlery houses; a well-cared-for one will last decades. Wooden-handled or composite needles should be soaked in ice water before use, since a warm handle softens the fat as it enters the meat. After use, wash and dry the needle immediately, oil the hinge lightly with a neutral oil, and store it dry — fat residue left in the shutter will turn rancid and taint the next batch of lardons.
Common uses
Tips & pitfalls
- Freeze the fatback solid (around -18 °C) for at least an hour before cutting; if it isn't firm enough to hold a clean rectangular edge, it will crumble in the needle.
- Cut lardons slightly longer than the depth of the meat so they sit flush at both ends — protruding fat causes flare-ups, weeping, and a greasy exterior.
- Insert lardons in a regular parallel pattern, about 2–3 cm apart, running with the grain of the meat for an even look once the roast is sliced.
- Soak wooden-handled or composite larding needles in ice water; a warm handle drags and partially melts the fat on entry.
- Common mistake: using room-temperature fat. It tears, smears, and produces an uneven, greasy result rather than clean, defined lardons.
- Common mistake: overloading the meat with lardons. A dense packing makes the finished dish flabby and heavy rather than moist — a modest, even pattern is more effective than a crowded one.
Good to know
- Technique family
- Classical French garde manger and charcuterie preparation
- Primary purpose
- Adds internal moisture and richness to lean cuts that would otherwise dry out during roasting or braising
- Traditional fat
- Pork fatback; sometimes smoked bacon or cured pork belly for added savoriness
- Lardon dimensions
- Rectangular strips roughly 8–10 mm thick and 4–5 cm long, sized to the thickness of the cut
- Primary tool
- Larding needle (lardoir) — a long, slotted steel needle with a sprung shutter or open slit
- Related techniques
- Barding (wrapping in fat) and piquer (larding combined with studding the surface with bacon and aromatics)
- Best cuts for larding
- Lean beef (eye of round, rump, tenderloin), venison, veal loin, rabbit saddles, and lean game birds
- Modern status
- Largely superseded by brining, injection, and the use of well-marbled meat, but still used in classical French service and game cookery
Also called
Larding (Špikovanie)
Dishes that rely on it
Related

Whisk
Beat ingredients smooth and aerated with a looping wire motion

Sift
Pass dry ingredients through mesh to aerate and remove lumps

Strain
Pour through mesh to separate solids from liquid for a smooth result

Filter
Pass liquid through fine material to clarify out the smallest particles

Rice
Press cooked potatoes through small holes for fluffy, lump-free texture

Mash
Crush soft cooked food into a rustic, creamy purée

Grind
Crush food into a coarse to fine texture, from spices to meat

Grate
Shred food into fine bits against a sharp-toothed surface