Heat & Fire
Sheet-Pan Cooking
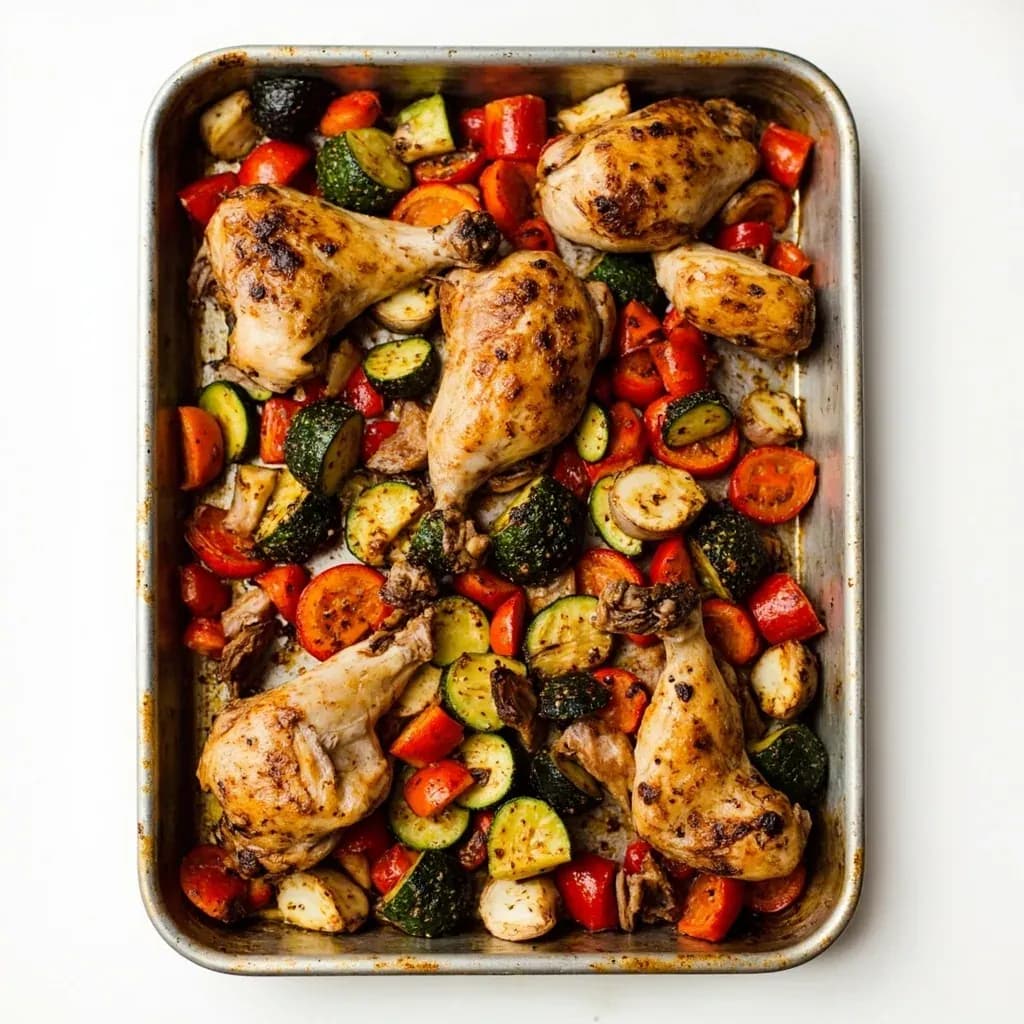
Roasting proteins and vegetables together on a single rimmed baking sheet for an easy one-pan meal.
Sheet-pan cooking spreads ingredients in a single layer on a rimmed baking sheet and roasts them in a hot oven, letting one tray deliver a complete meal with minimal cleanup. Success depends on cutting items to similar sizes, avoiding crowding so they brown rather than steam, and sometimes staggering when each ingredient is added. It is popular for weeknight dinners and large-batch vegetable roasting.
Sheet-pan cooking is less a single technique than a family of high-heat roasting methods united by one piece of hardware: a rimmed metal baking sheet. Food is spread in a single layer and cooked in a hot, dry oven so that moisture evaporates quickly, surfaces brown, and edges crisp — the opposite of the wet, gentle heat of a braise or stew. The format is brutally simple, which is exactly why it works: one pan, one oven, almost no babysitting, and a meal that goes from prep to plate in well under an hour.
The governing variables are temperature and density. Get those right — typically 425 to 450°F (220 to 230°C) and pieces cut to a uniform size that aren't packed shoulder-to-shoulder — and almost any combination of protein and vegetables can share the pan. Get them wrong, usually by crowding the pan or running the oven too cool, and the food steams in its own liquid instead of browning, which is the single most common failure of the method.
A half sheet pan (18 by 13 inches) is the practical home standard because it has enough surface area to roast a full meal in a single layer while still fitting comfortably in a standard oven. Anything smaller doesn't give food room to breathe; anything larger is awkward to handle and may block airflow. The pan itself matters: heavy-gauge aluminum heats evenly and browns well, while thin pans warp at high heat and create hot spots that scorch food on one side and undercook it on the other.
- Difficulty
- Easy
Types & varieties
Complete meal built around one or two proteins and two or three vegetables, all roasted on the same pan.
Vegetables only, tossed with oil and salt, roasted until caramelized — the classic preparation for broccoli, Brussels sprouts, cauliflower, carrots, and root vegetables.
Eggs, bacon or sausage, potatoes, and toast finished in a single oven pass; useful for feeding a crowd without juggling skillets.
Dough stretched onto an oiled sheet, topped, and baked at high heat for a rectangular grandma-style pie with extra-crisp edges.
Cookie bars, slab fruit crisp, brownies, or roasted stone fruit with crumble — all baked and served from the same pan.
Rolls assembled with fillings, topped, and baked covered until the cheese melts and the bread toasts; ideal for parties.
How to do it
- 1
Heat the oven and the pan
Set a rack in the center (or upper third for vegetables) and preheat the oven to 425–450°F (220–230°C). Place the empty rimmed sheet pan inside during preheat so it is hot when the food goes on — this jump-starts browning on contact.
- 2
Group ingredients by cook time
Pick one or two proteins and two to four vegetables. Sort them into three groups: long (potatoes, carrots, butternut squash, whole bone-in chicken thighs), medium (broccoli, cauliflower, Brussels sprouts, sausages, bone-in chicken pieces), and short (asparagus, zucchini, peppers, shrimp, fish fillets).
- 3
Prep to a uniform size
Cut vegetables into even, bite-sized pieces so they finish together. Pat proteins completely dry with paper towels — surface moisture is the enemy of browning. Leave a little space around bone-in chicken and sausages so air circulates.
- 4
Season and oil
Toss the long-cooking vegetables with oil, salt, and pepper in a large bowl first, then the medium group in the same bowl. Oil proteins separately. Use just enough oil to coat — about 1 to 1.5 tablespoons per pound of vegetables; too little leaves food dry and pale, too much makes it greasy and limp.
- 5
Arrange in a single layer
Pull the hot pan from the oven. Spread the long-cooking items cut-side down with breathing room around each piece. If anything has to overlap, use a second pan. Add the medium group now, leaving space for the short group to come in later.
- 6
Roast, then add the short group
Roast on the center rack. At the two-thirds mark, flip or stir everything and slide in the quick-cooking vegetables, fish, or shrimp. Fish fillets need roughly 8–10 minutes more, shrimp only 4–6 minutes.
- 7
Glaze or finish (optional)
In the last 5–10 minutes, brush proteins with a sugar- or honey-based glaze if using. In the last 2 minutes, scatter minced garlic, fresh herbs, lemon zest, or a pat of butter over the vegetables.
- 8
Check doneness and rest
Test proteins with an instant-read thermometer: 165°F (74°C) for poultry, 145°F (63°C) for fish and pork, 160°F (71°C) for beef. Vegetables should be deeply browned and tender at the edges. Let proteins rest 3–5 minutes on the pan.
- 9
Finish and serve
Hit the whole pan with a squeeze of lemon or a splash of vinegar, flaky salt, and torn fresh herbs. Serve straight from the pan or slide onto a platter.
Why crowding kills the method
A sheet-pan meal depends on hot, dry air hitting the food, surface water evaporating, and Maillard browning taking over. That process needs airflow and contact with hot metal. The moment pieces touch or overlap, the food traps its own steam, the surface temperature drops, and you end up with limp, pale vegetables and leathery chicken skin. Two pans are always better than one crowded pan, and a crowded pan is the most common reason home cooks decide they don't like sheet-pan cooking.
- Each piece should have at least a finger-width of space around it.
- If juices pool in the pan, food is too crowded or too wet — drain off excess and finish under the broiler.
- A dark nonstick sheet browns faster than shiny aluminum; lower the oven by 25°F (about 15°C) to compensate.
Matching cook times across one pan
The art of a sheet-pan dinner is grouping ingredients by how long they need and staggering their entry into the oven. Dense items — potatoes, carrots, butternut squash, whole bone-in chicken thighs — go in first. Medium items — broccoli, cauliflower, Brussels sprouts, sausages, bone-in chicken pieces — join 10 to 15 minutes later. Fast items — asparagus, zucchini, peppers, shrimp, fish fillets — go in during the final stretch. Cutting denser vegetables into smaller pieces and quick-cooking ones into larger pieces is the simplest way to bring everything to the table at the same moment.
- Stagger fish fillets in with 8–10 minutes left; shrimp with 4–6 minutes left.
- Cut potatoes, carrots, and squash into 3/4- to 1-inch pieces; leave broccoli and cauliflower in larger florets.
- Sausages are forgiving enough to go in at the start with the roots; delicate fish and shrimp wait.
Liners, glazes, and finishing touches
Parchment and silicone mats make cleanup easier and prevent sticking, but they also insulate the food from direct contact with the hot metal, which slows browning on the underside. For maximum color, slide the liner out for the final 3 to 5 minutes of cooking, or skip the liner entirely for naturally nonstick items like well-oiled vegetables and fatty proteins. Sugar-based glazes (honey, maple syrup, brown sugar, balsamic reduction) burn fast at high heat; brush them on only in the last 5 to 10 minutes.
- A squeeze of lemon, a splash of sherry or red wine vinegar, and flaky salt added right out of the oven brightens everything.
- Fresh herbs, minced garlic, and citrus zest should be added in the last 1–2 minutes — they scorch quickly.
- A pat of butter tossed with hot roasted vegetables adds gloss and richness without weighing them down.
Common uses
Tips & pitfalls
- Don't crowd the pan — air needs to circulate for browning; if pieces touch, they will steam. Use two pans rather than one packed pan.
- Cut vegetables to a uniform size so they finish at the same time; cut denser items (carrots, potatoes, squash) smaller than quicker-cooking ones (zucchini, peppers, cherry tomatoes).
- Pat proteins completely dry with paper towels before oiling — surface moisture prevents browning.
- Preheat the pan along with the oven, or briefly heat the oiled pan on the stovetop, for an immediate sear when food hits the metal.
- Use enough oil to coat but not pool — typically 1 to 1.5 tablespoons per pound of vegetables.
- Stagger additions: add quick-cooking items (asparagus, shrimp, fish) partway through so they don't overcook.
- Flip or toss everything once at about the two-thirds mark for even browning on more than one side.
- Hold off on garlic, fresh herbs, lemon zest, and delicate greens until the last 1–2 minutes — they burn fast at high heat.
- Don't add sauces or glazes at the start — sugar-based glazes burn; brush them on in the last 5–10 minutes instead.
- Line the pan with parchment for easier cleanup, but pull the liner out for the final 3–5 minutes if you want crisper bottoms.
- Avoid very low oven temperatures (below 375°F / 190°C) for vegetables — you will dry them out before they brown.
- Finish with an acid (lemon, sherry vinegar) and flaky salt right out of the oven to brighten the flavors.
Good to know
- Also called
- Sheet-pan dinner, sheet-pan meal, one-pan roast
- Standard pan size (home)
- Half sheet pan, 18 × 13 in (45 × 33 cm) with a ~1 in (2.5 cm) rim
- Standard pan size (commercial)
- Full sheet pan, 26 × 18 in (66 × 46 cm)
- Best material
- Heavy-gauge aluminum (heats evenly, browns well); dark-coated steel browns faster; avoid thin pans that warp
- Typical oven temperature
- 425–450°F (220–230°C); up to 475°F (245°C) for high-heat roasting
- Active hands-on time
- 10–15 minutes
- Total time
- 25–45 minutes depending on ingredients
- Yield
- One half sheet pan serves 3–4 as a main, 6 as a side
- Origin of the trend
- Concept long predates it; the modern American sheet-pan dinner cookbook wave took off in the early-to-mid 2010s (e.g., Rachael Ray's Sheet Pan Suppers, 2014)
- Key principle
- Single layer, high heat, dry surface — so food roasts and browns rather than steams
Also called
Tray Bake · One-Pan Roasting
Related

Sear
Blast the surface hot for a deep-browned, savory crust

Sauté
Cook quickly in a little fat over lively heat, tossing as you go

Stir-Fry
Toss bite-sized pieces over roaring heat for fast, smoky cooking

Pan-Fry
Crisp food in a shallow layer of hot fat, turning once or twice

Deep-Fry
Submerge in hot oil for an all-over crackling crust

Roast
Cook uncovered in dry oven heat for browned edges and tender centers

Bake
Cook with steady, surrounding oven heat — the soul of bread and pastry

Broil
Hit food from directly above with fierce overhead heat