Knife Skills
Cutting the Curd
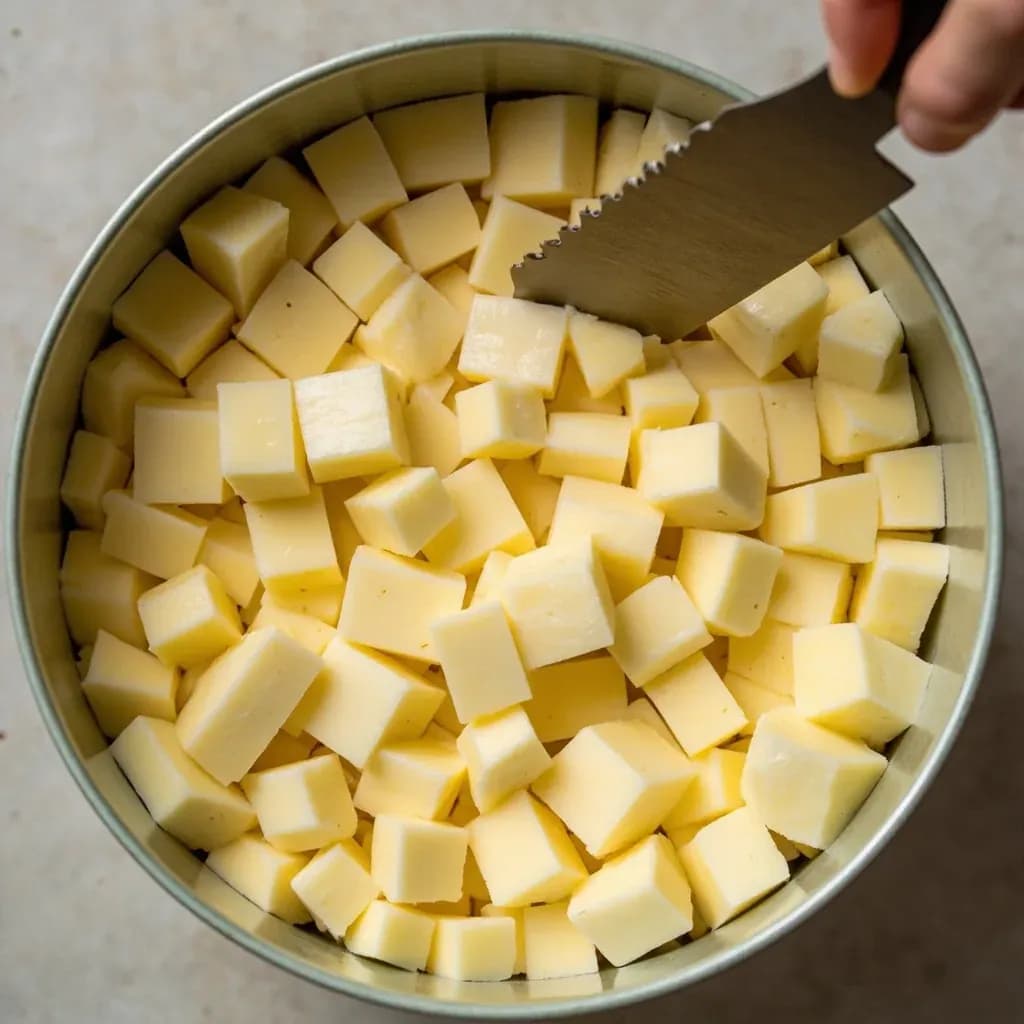
Slicing set milk curd into uniform pieces to release whey during cheesemaking.
Cutting the curd is the cheesemaking step where coagulated milk is sliced into a grid of even cubes using a long knife or curd harp. The size of the cut controls moisture: small cubes expel more whey and yield firmer, harder cheeses, while larger pieces retain moisture for softer styles. After cutting, the curds are gently stirred and often heated to firm up before draining.
Cutting the curd is the pivotal moment in cheesemaking when a single, gel-like slab of set milk is transformed into thousands of small cubes, each one a working unit that will slowly give up its whey. The act looks simple — a few passes with a knife or a wire harp — but it determines nearly every downstream quality of the cheese: final moisture, body, texture, and even the speed of acidification. Smaller cubes shed whey quickly and produce a dense, hard wheel; larger, gentler cuts retain moisture and yield a softer, creamier paste. Once the curds are cut, the cheesemaker's main job becomes managing the rate at which those cubes dry out.
The cut is timed to a precise stage of coagulation. Too early, and the curd smears and shreds; too late, and the gel is so firm it fractures raggedly, trapping moisture inside uneven chunks. The standard test is the clean break: lift the curd gently with a knife or finger and the fissure should fill instantly with clear greenish whey, with no milky run in the gap. After cutting, the cubes are typically left to rest for several minutes so their exposed surfaces firm up — cheesemakers call this the 'heal' — which prevents the pieces from dissolving into fines when stirring begins.
Beyond moisture control, cutting sets the geometry for everything that follows: stirring, cooking, salting, and molding. Uniform cubes drain and acidify at the same rate; irregular ones create pockets of wet and dry curd that ripen unevenly. It is, in effect, the foundation of cheese architecture — the moment raw milk becomes cheese.
- Difficulty
- Medium
Types & varieties
Long, thin, sharp blade used for the first two sets of cuts
Right-angled blade slid under the curd slab for the third (horizontal) cut
Frame strung with parallel vertical wires for fast, uniform vertical cuts
U-shaped frame with both vertical and horizontal wires for one-pass cross-hatching
Traditional farmhouse tool; used in a careful grid by hand, common in Alpine and farmhouse traditions
How to do it
- 1
Confirm the curd is ready
Test with a clean knife or your finger — the curd should split with a clean break and whey should fill the crack with no soft, custardy run of uncut milk. If the surface is still glossy and the fissure closes behind the blade, wait 5–10 more minutes. Cutting a soft, under-set curd shreds it and ruins the cube geometry.
- 2
Cut vertical lines in one direction
With a long curd knife or a vertical harp, slice the curd slab into parallel strips at the target spacing — commonly 6–13 mm for pressed cheeses, larger for soft styles. Work steadily across the surface; do not saw or press down. Long, smooth strokes give the cleanest walls.
- 3
Cut vertical lines in the perpendicular direction
Repeat the cuts at 90° to the first set so the curd is divided into uniform vertical columns. Dip the blade in warm whey or water if it begins to drag — a sticky blade smears rather than slices, sealing the cut surfaces and trapping moisture.
- 4
Cut horizontally under the curd
Slide a horizontal curd knife (or rotate a harp with a horizontal frame) under the slab and cut parallel to the surface, completing the cubes. For soft curds, tilt the vat slightly so the horizontal blade can enter without cracking the slab.
- 5
Let the curds rest and 'heal'
Leave the cut curds undisturbed for roughly 5–10 minutes. The cut surfaces firm over, fines settle, and clear whey pools between the pieces. Skipping this rest causes heavy curd loss when stirring begins.
- 6
Begin gentle stirring and cooking
Start with slow, careful stirring to prevent the cubes from matting together, then gradually increase speed and begin the recipe's cooking or scalding step to drive off additional whey. The size of the cubes you cut will now dictate how quickly the curd dries down.
Cut size and cheese style
The single most important decision a cheesemaker makes at the cut is how big the cubes will be. As a rule of thumb, the smaller the cube, the more surface area is exposed, the faster whey drains, and the firmer and drier the resulting wheel. Hard grating cheeses such as Parmigiano-Reggiano and aged Pecorino are cut very small — often well under 1 cm, traditionally down to rice-grain size — and cooked for a long time, driving moisture down to the bone-dry levels needed for years of aging. Pressed table cheeses like cheddar and Gouda are usually cut at 6–13 mm, a sweet spot that yields a sliceable but still moist wheel.
At the other end of the spectrum, bloomy-rind and lactic cheeses often skip the traditional cross-cut entirely. Brie, Camembert, and many fresh lactic styles are ladled directly into molds with no cutting at all, so the delicate curd structure stays intact. Halloumi and similar brined cheeses cut larger (around 2–2.5 cm) and then poach the cubes directly in hot whey, which sets the outside of each piece before much moisture can escape — a different path from pasta filata styles, which stretch the heated curd into strings rather than leaving it as firm cubes.
- Hard grating cheeses (Parmesan, aged Pecorino): under 1 cm cubes, often rice-grain size, long cook
- Pressed table cheeses (cheddar, Gouda, Swiss): 6–13 mm cubes, moderate cook
- Semi-soft brined cheeses (feta, halloumi): 1.5–2.5 cm cubes, gentle cook
- Soft lactic and bloomy-rind cheeses: often not cut; curds are ladled into molds
Common patterns and traditions
Most recipes call for three sets of cuts: vertical in one direction, vertical at 90° to that, then horizontal underneath. The first two divide the slab into columns; the third frees the columns from the bottom of the vat so the cubes float freely in the whey. The horizontal pass is the trickiest because the knife must enter the vat cleanly without cracking the slab, and many farmhouse recipes have evolved small workarounds — tilting the vat, using a thin right-angled blade, or rotating a harp frame beneath the curd.
Industrial and larger farmhouse vats typically use a wire harp or lyre drawn through the curd mechanically. The harp makes vertical cuts at fixed spacing, and the lyre adds horizontal wires so the entire grid is cut in a single pass. Some Alpine farmhouse traditions use a coarser manual cut with a long single blade, then stir and cook the curd as larger pieces rather than uniform cubes — a method suited to slow, gentle heating in copper vats.
- Three-cut pattern: vertical, vertical-perpendicular, horizontal under
- Manual single-blade method: traditional in Alpine farmhouse cheesemaking
- Mechanical harp: parallel vertical wires on a frame, drawn through curd by hand or power
- Lyre: U-shaped harp with horizontal wires for a complete one-pass grid
- Horizontal cut: often the trickiest step; vat tilted or right-angled blade used to free cubes from the bottom
Common uses
Tips & pitfalls
- Always cut on a flat, level curd surface; an uneven vessel gives uneven cubes that drain unevenly.
- Use long, smooth strokes — sawing or tearing shreds the curd and traps moisture in ragged pockets.
- Stop and let the curds 'heal' for 5–10 minutes after cutting before stirring; this lets the cut surfaces firm up and reduces fines (lost curd dust).
- Match cut size to cheese style: aim for roughly 6 mm cubes for hard cheeses like cheddar, 12 mm or larger for softer styles.
- Wet or dip the knife or harp in warm whey between passes to prevent dragging and curd smear.
- Avoid cutting before the clean break — a soft, custard-like set will shred rather than slice cleanly.
- When using a harp, draw it slowly and straight down through the curd in one motion; tilting the frame shears the cubes.
- Keep the knife perpendicular to the curd surface so cubes are uniform top to bottom, not wedges.
Good to know
- Stage in cheesemaking
- Performed after coagulation and before cooking/stirring the curds
- Purpose
- Increases surface area so whey can escape from the curd matrix
- Primary tools
- Vertical curd knife, horizontal curd knife, wire harp, or wire lyre
- Typical cut size
- Roughly 6–13 mm (¼–½ in) cubes for most pressed cheeses; 1.5–2.5 cm for soft, high-moisture cheeses
- Effect of cut size
- Smaller cuts expel more whey → drier, harder cheese; larger cuts retain moisture → softer cheese
- Readiness test
- Clean break — a knife or finger lifts the curd and whey fills the fissure cleanly
- Rest period after cutting
- Curds typically rest undisturbed 5–10 minutes to 'heal' before stirring
- Common pattern
- Vertical cuts in one direction, vertical cuts perpendicular, then horizontal cuts (if using a harp)
- Difficulty
- Moderate — requires a fully set curd, level vessel, and steady even strokes
Also called
Cutting the Curd · Curd Cutting
Related

Chop
Cut into rough, irregular pieces — the everyday workhorse cut

Dice
Cut into uniform cubes for even cooking and a tidy look

Mince
Cut as fine as possible so flavor melts evenly into the dish

Slice
Cut into even, flat pieces for consistent cooking and presentation

Julienne
Cut into thin matchsticks for fast cooking and elegant garnish

Brunoise
Cut into tiny, precise cubes — the finest dice in the kitchen

Chiffonade
Roll and slice leafy greens into delicate ribbons

Batonnet
Cut into tidy sticks, thicker than julienne — think classic fries