Heat & Fire
Direct Grilling
Cooking food directly over hot coals or flame for fast searing and char on quick-cooking cuts.
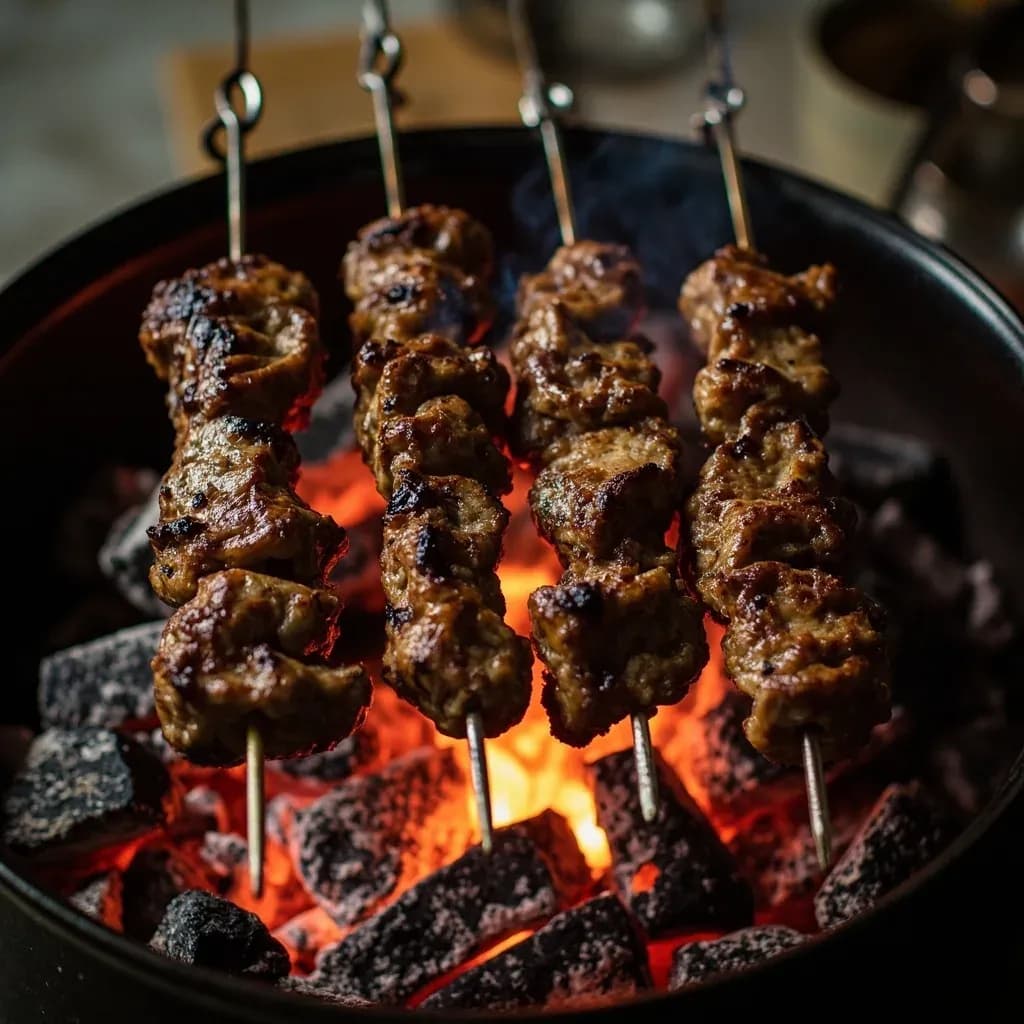
Direct grilling places food right above the heat source, exposing it to intense radiant and conductive heat. It is best for thin, quick-cooking items like steaks, burgers, vegetables, and seafood that benefit from fast searing and grill marks. Because the heat is so high and immediate, the cook must turn food often to char the surface without burning before the interior cooks.
Direct grilling places food directly above a hot heat source — glowing coals, hardwood embers, or an open gas flame — so the cooking grate delivers intense radiant heat from below. It is the default mode of a backyard grill and the workhorse method for anything that cooks in minutes: steaks, chops, burgers, sausages, seafood, vegetables, and fruit. What the method gives up in low-and-slow tenderness it more than returns in speed, in the deep browning of the Maillard reaction, and in the smoky kiss of fat meeting fire.
The technique is as old as cooking over an open hearth, but the modern covered kettle grill — George Stephen's 1952 Weber — turned direct grilling into a backyard ritual across the world. Done well, it produces a crusty, caramelized exterior and a juicy, properly cooked interior in minutes. Done poorly, it produces a charred outside and a raw or overcooked inside, usually because the cook fiddled too much, didn't preheat the grate, or didn't build a safety zone for flare-ups.
The single most important habit is to set up a two-zone fire, then leave the food alone long enough for a real crust to form. A two-zone setup is also how direct grilling pairs with indirect grilling on the same cook: sear hard over the flame, then move aside, close the lid, and let the grill act as a convection oven for thicker items that need a gentler finish.
- Difficulty
- Easy
Types & varieties
Cooking over glowing briquettes or lump charcoal; deepest char and smoke flavor; temperature is harder to control than gas.
Cooking over an open gas flame or heated lava/ceramic briquettes; fast to ignite, easy to adjust, slightly less smoky.
Cooking directly over split hardwood embers such as oak, hickory, or mesquite; the traditional fire for Argentine asado and Uruguayan parrilla.
A small, intense charcoal grid lifted close to the food, as in the Japanese shichirin used for yakiniku and yakitori.
Searing on a solid hot steel plate rather than open grates; gives an even crust without flare-ups, common in Spanish cooking.
A ceramic or radiant burner delivering 700 °F+ for an extreme sear with minimal flare-ups.
Food cooked directly over the visible gas flame rather than over flavorizer bars or briquettes; produces pronounced charring.
How to do it
- 1
Prepare the grill
Light the fuel 20–30 minutes ahead. For charcoal, burn until the coals are mostly gray with a red glow and a thin coat of white ash. For gas, ignite on high, close the lid, and preheat 10–15 minutes. Target 450–550 °F on the cooking grate.
- 2
Set up zones
Bank all coals to one side (or leave one burner off) so you have a hot direct zone and a cooler safety zone for flare-ups or for finishing thicker pieces.
- 3
Clean and oil the grates
Scrub the hot grates with a stiff wire brush. Using long tongs, wipe them with a folded paper towel dipped in high-smoke-point oil such as grapeseed, canola, or avocado so the food releases cleanly.
- 4
Prepare the food
Pat proteins completely dry. Season simply with salt and pepper just before grilling, or dry-brine 40-plus minutes ahead. Thread kebabs tightly, and lightly oil vegetables and fish so they don't stick to the bars.
- 5
Lay food on the hot grate
Place items at a 45° angle to the grate bars to start classic diamond grill marks. Leave space between pieces so air can circulate and your tongs can get in.
- 6
Sear undisturbed
Close the lid only when you want oven-like top heat (gas grills); leave it open for maximum char. Resist flipping until the food naturally releases from the grate and a visible crust has formed.
- 7
Flip once
Turn with tongs or a thin spatula, rotating 90° on the first flip for crosshatch marks. Shift pieces to hotter or cooler zones as fat renders and flare-ups rise.
- 8
Check doneness
Use an instant-read thermometer: 125 °F for rare steak, 135 °F medium-rare, 145 °F medium, 160 °F well; 145 °F for pork chops; 165 °F for poultry; fish to 125–130 °F until just flaky.
- 9
Rest and serve
Move meat to a warm platter or board, tent loosely with foil, and rest 5 minutes for steaks, 8–10 minutes for larger or bone-in cuts. Vegetables and seafood can be served right off the grate.
Building a Two-Zone (or Three-Zone) Fire
The single most useful setup for direct grilling is a two-zone fire: hot coals or lit burners on one side, nothing on the other. Sear and char over the hot zone, then slide food to the cool side if flames get out of hand or if a piece finishes faster than its neighbors. A three-zone fire — hot, medium, and cool — adds a middle option for thicker cuts or vegetables that need gentler radiant heat. This is also how direct grilling pairs with indirect grilling on the same cook.
- Bank all coals to one side, or light only some burners, to create a hot zone and a cool zone.
- Use the cool zone as a safety valve for flare-ups and to hold finished food warm without overcooking.
- Add a third middle zone when cooking mixed items that need different intensities at once.
- On a gas grill, simply leaving one burner off gives you the same effect in seconds.
Direct Grilling vs. Broiling
Direct grilling and oven broiling are the same physical process — close, intense heat striking the food from one side — but they diverge in flavor. Broiling in an oven uses clean radiant heat from a top element and produces a pure Maillard crust. Grilling adds the taste of smoke from dripping fat, the mineral note of a hot grate, and the visual drama of an open flame. When weather, fire codes, or apartment rules rule out an outdoor grill, a screaming-hot cast-iron pan or a broiler preheated for 10 minutes on high is the closest substitute.
- Both rely on radiant heat 3–6 inches from the food's surface.
- Grilling adds smoke and drippings; broiling is cleaner and more controlled.
- A cast-iron skillet delivers the same sear indoors with no smoke management.
Common uses
Tips & pitfalls
- Build a two-zone fire so flare-ups have somewhere to go — moving a steak 6 inches off the flame often saves it from burning.
- Preheat the grate for at least 10 minutes and oil it just before cooking by dragging a folded, oil-soaked paper towel with tongs; cold grates stick and tear the crust.
- Pat food completely dry and season right before it hits the heat; surface moisture steams the food and blocks browning.
- Leave food alone until it releases on its own — a proper sear pulls free from the grate when the crust has set; pulling early rips the meat and sticks the crust to the bars.
- Never press or squeeze meat with a spatula; the pressure squeezes out juices onto the coals and causes flare-ups without speeding the cook.
- Flip only once (or twice for a steak) using long tongs or a spatula; never stab meat with a fork, which releases juices onto the coals.
- Use the hand test for heat: hold your palm 5 inches above the grate — 2 seconds is very hot, 4 seconds medium-hot, 6 seconds medium.
- Let meat rest 5–10 minutes after grilling so the juices redistribute; cutting too soon pours them onto the board instead of into the bite.
- Clean grates while still hot with a stiff wire brush; leftover carbon from last week's cook ruins the next sear.
Good to know
- Heat Source
- Live coals, wood embers, or an open gas flame
- Typical Temperature
- 400–550 °F (200–290 °C); can exceed 600 °F over fresh coals
- Best For
- Quick-cooking foods under ~1.5 in (4 cm) thick: steaks, burgers, chops, kebabs, sausages, seafood, vegetables, fruit
- Heat Transfer
- Conduction from the grate plus intense radiant heat from below
- Time Range
- 2–8 minutes total for most items
- Fuel Options
- Charcoal briquettes, lump charcoal, hardwood, propane, or natural gas
- Key Equipment
- Grill with grates, long-handled tongs or spatula, instant-read thermometer, stiff wire brush
- Related Method
- Often paired with indirect grilling on a two-zone fire
Also called
Open-Flame Grilling
Dishes that rely on it
Related

Sear
Blast the surface hot for a deep-browned, savory crust

Sauté
Cook quickly in a little fat over lively heat, tossing as you go

Stir-Fry
Toss bite-sized pieces over roaring heat for fast, smoky cooking

Pan-Fry
Crisp food in a shallow layer of hot fat, turning once or twice

Deep-Fry
Submerge in hot oil for an all-over crackling crust

Roast
Cook uncovered in dry oven heat for browned edges and tender centers

Bake
Cook with steady, surrounding oven heat — the soul of bread and pastry

Broil
Hit food from directly above with fierce overhead heat