Prep & Assembly
Stuffing Pupusas
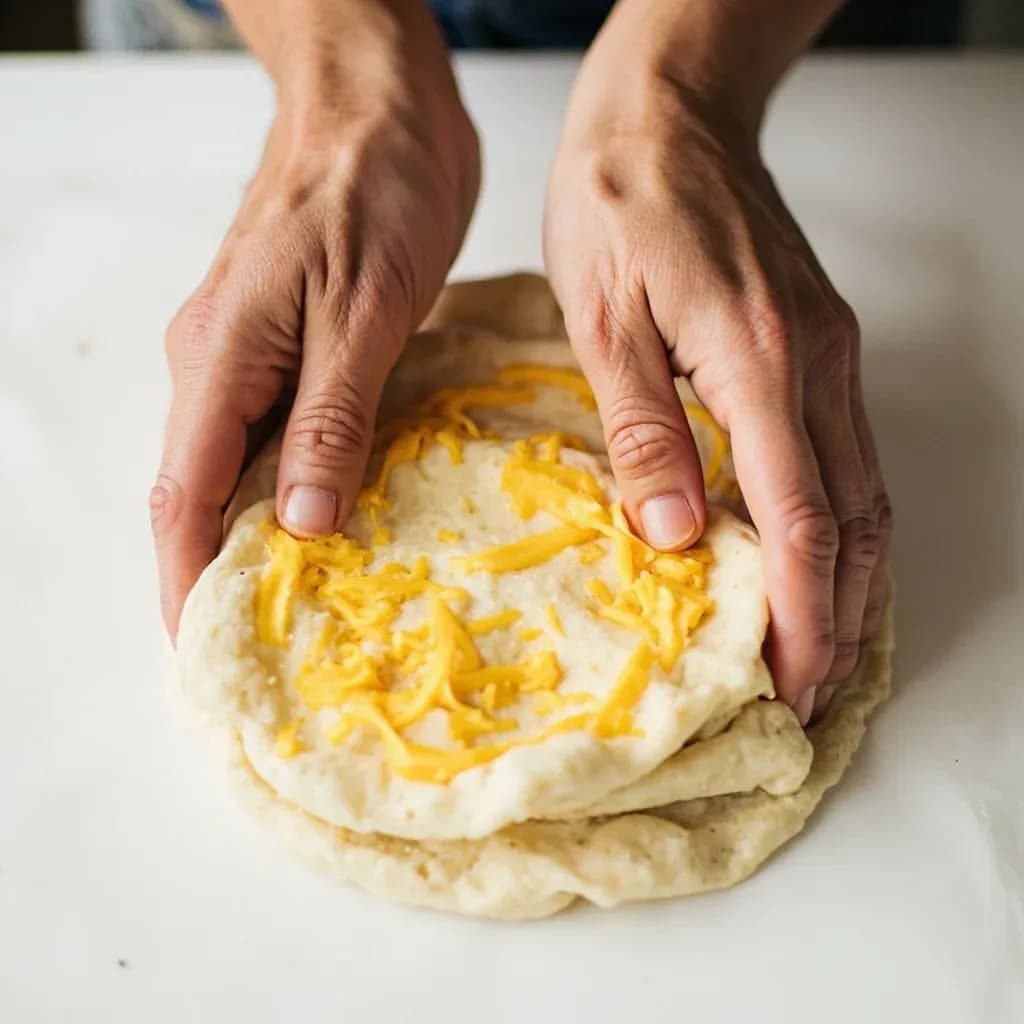
Sealing a filling inside a masa disc to form a Salvadoran stuffed griddle cake.
Stuffing pupusas is the Salvadoran technique of pressing a ball of masa into a cup, adding a filling of cheese, refried beans, or chicharrón, then folding the masa over and patting it back into a smooth flat disc. The trick is sealing the edges fully so the filling does not leak while griddling. The finished pupusa is cooked on a hot comal until spotted golden.
Stuffing pupusas is the defining hand-skill of Salvadoran cocina: pressing a well into a wet nixtamalized masa ball, dropping in a tablespoon or so of filling, then pinching the dough closed and flattening the sealed ball into a thick disc that will hold together on a dry comal. Unlike the dry-masa patty pressed for a Colombian arepa, a pupusa must be fully enclosed — any seam, thin patch, or trapped air pocket will rupture the moment it hits the griddle. The technique rewards feel over precision: a properly hydrated masa should feel like wet beach sand that holds its shape when squeezed, and the cook's hands stay wet throughout so the dough glides instead of grabs.
Success lives in three details most beginners miss: hydration, seal, and weight. Hydration governs whether the disc flexes or fractures; the seal determines whether the filling stays inside during the two to three minutes per side on the comal; and getting the dough-to-filling ratio right (roughly three parts dough to one part filling by volume) prevents blowouts that turn a pupusa into a quesadilla with masa on the side. Once those are in hand, the method scales to any of the classic fillings and to improvised ones, because the hand movements do not change.
The technique is also a useful teaching tool. The same pinch-and-rotate-then-flatten motion appears across Mesoamerican masa cookery, from Guatemalan dobladas to Mexican gorditas, and translates to other stuffed griddle breads with minor hydration tweaks. Learning to read the dough — when it wants more water, when a crack means the seal failed, when a soft spot on the finished disc means trapped air — is the foundation for working with nixtamal at all.
- Difficulty
- Medium
Types & varieties
Cheese-only filling, traditionally quesillo or a mild melting cheese such as mozzarella
Refried red or black beans, sometimes layered with cheese
Seasoned minced pork crackling, traditionally ground with tomato and chile
The Salvadoran classic: cheese, beans, and chicharrón combined in one disc
Cheese combined with loroco flower buds (Fernaldia pandurata), a signature Salvadoran variety
Cheese with shredded calabaza squash, slightly sweet
Wilted spinach with cheese
Pickled or fresh jalapeño with cheese, a sharper, spicier variation
How to do it
- 1
Portion and rest the masa
Scoop roughly 50–80 g of hydrated masa and roll it between wet palms into a smooth, crack-free ball. Keep the remaining masa covered with a damp cloth so it does not skin over while you work.
- 2
Open a pocket in the dough
Cup the ball in one hand. With the thumb of the other, press into the center while slowly rotating, pushing the dough outward and up the sides to form a thick-walled cup about 4–5 cm across. Check that the walls are even with no thin spots — thin patches will split on the comal.
- 3
Add the filling
Spoon 1–1.5 tablespoons (15–25 g) of filling into the pocket. Stay well under a third of the dough ball's volume; overfilling is the most common reason pupusas burst. Keep a clear border of masa all the way around the filling.
- 4
Seal the opening
Pinch the rim of dough closed over the filling, working around the cup until the opening is fully shut. Tuck the seam underneath and rotate the ball seam-side-down between cupped palms until the surface is smooth and the filling is fully enclosed. The ball should feel uniformly firm.
- 5
Flatten into a disc
Place the ball between two sheets of plastic (a cut zip-top bag works perfectly) or wax paper. Press gently with the palm or a tortilla press to a 10–13 cm disc about 1.25 cm thick. Flip once and press again to keep it round and even. Direct hand-pressing tends to break the seal, so always use a barrier.
- 6
Griddle immediately
Transfer to a preheated comal or dry cast-iron skillet over medium heat (about 180–200°C / 350–400°F). Cook 2–3 minutes per side until speckled brown and the disc is set; flip when the underside releases cleanly from the surface. Do not oil the griddle — the masa releases on its own when it is ready to turn.
- 7
Rest and serve
Stack cooked pupusas and keep covered with a clean cloth so they stay pliable and steamy. Serve with curtido (fermented cabbage slaw) and salsa roja on the side.
Why the seal matters more than the filling
A pupusa is only as good as its closure. The griddle delivers dry heat at 180–200°C to a disc whose interior is full of cold, wet, often fatty filling — that filling expands as it heats, and the only thing keeping it contained is a continuous wall of masa roughly half a centimeter thick all the way around. Any gap becomes a blowout well before the first flip, and the result is a split open cake with cheese welded to the iron. Most pupusa failures are not recipe failures; they are seal failures. Press the pocket deep and wide, leave a clean border around the filling, pinch the rim closed in one motion, and rotate seam-side-down between cupped palms until the ball feels uniformly firm before you ever flatten it.
- A properly sealed pupusa has no visible seam and no soft or hollow spots when pressed flat.
- Soft spots on the finished disc mean air or filling is sitting too close to the surface — it will split on the griddle.
- If masa cracks while shaping, spritz with water and knead briefly; do not patch with dry dough, which creates a weak seam line.
Reading masa hydration
Hydration is the variable that ties every other step together. Too dry and the disc fractures when you flatten it; too wet and the ball slumps in your hand and the seal never holds. The standard test: squeeze a ball of masa in your fist. It should keep its shape, hold a thumbprint without crumbling, and feel slightly tacky but not sticky. Adjust in small splashes of water, kneading between additions, until the dough passes the test. Most store-bought masa arrives usable but compacted; the first few minutes of kneading with a little water usually restores the right texture.
- Cover the working masa with a damp cloth at all times; a surface skin is the leading cause of cracking during sealing.
- Wet or lightly oil your hands before every pupusa — the dough should glide, not stick.
- Rice flour is often added in modest proportions to stiffen the dough and make a less crumbly disc, especially when the masa is wet.
Common uses
Tips & pitfalls
- Keep the masa covered with a damp cloth between pupusas — a skin on the surface is the first step toward a cracked seal.
- Wet your hands before every pupusa; the dough should glide against your palm, not grab.
- Press the well deep enough that the filling sits in a true pocket with at least a ½ cm wall of masa on every side.
- Close the opening in a single smooth pinch, then rotate seam-side-down between cupped palms until the ball is perfectly round and feels firm throughout.
- Flatten between two sheets of plastic or wax paper; pressing by hand usually breaks the seal and pushes filling to the edge.
- A burst pupusa on the comal almost always means overfilling, too-dry masa, or walls that were pressed too thin.
- Patch a cracking masa with a spritz of water and a brief knead — never with a dry dough ball, which leaves a weak seam.
- Cook the disc the moment it is shaped; resting a raw pupusa lets the filling migrate to the surface and weakens the seal.
Good to know
- Origin
- El Salvador, where pupusas are the national dish (also popular in Honduras)
- Masa type
- Nixtamalized corn masa, often blended with rice flour for a sturdier, less crumbly disc
- Dough hydration target
- Soft, pliable, slightly tacky — the texture of firm modeling clay or wet beach sand that holds its shape when squeezed
- Dough portion per pupusa
- Roughly 50–80 g (2–3 oz), the size of a golf ball or small lemon
- Filling portion
- About 1–1.5 tablespoons (15–25 g); under a third the volume of the dough ball
- Finished dimensions
- 10–13 cm (4–5 in) wide, about 1.25 cm (½ in) thick
- Griddle
- Comal or dry cast-iron skillet over medium heat (~180–200°C / 350–400°F); no oil on the cooking surface
- Cook time
- 2–3 minutes per side, until golden speckles appear and the disc is set
- Hand treatment
- Wet hands (or lightly oiled) between each pupusa to keep the dough from sticking
- Shelf life (uncooked)
- Best cooked within 30 minutes; covered with a damp cloth for up to 1 hour
- Freezing
- Uncooked stuffed discs freeze well on a sheet pan, then bagged, for 1–2 months
Also called
Stuffing Pupusas · Filling Pupusas
Related

Whisk
Beat ingredients smooth and aerated with a looping wire motion

Sift
Pass dry ingredients through mesh to aerate and remove lumps

Strain
Pour through mesh to separate solids from liquid for a smooth result

Filter
Pass liquid through fine material to clarify out the smallest particles

Rice
Press cooked potatoes through small holes for fluffy, lump-free texture

Mash
Crush soft cooked food into a rustic, creamy purée

Grind
Crush food into a coarse to fine texture, from spices to meat

Grate
Shred food into fine bits against a sharp-toothed surface