Prep & Assembly
Removing Rib Membrane
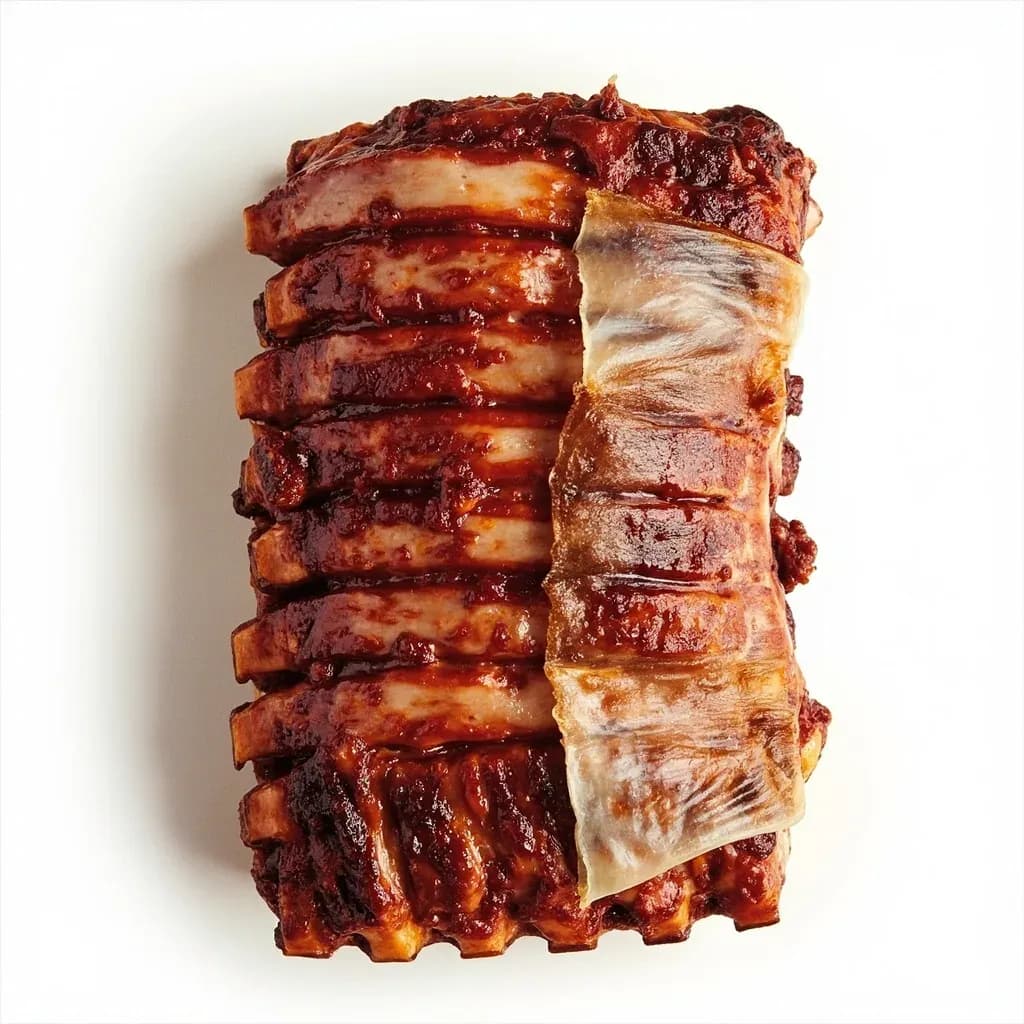
Peeling the tough silverskin off the back of a rack of ribs before cooking.
Removing the rib membrane means peeling away the thin, papery silverskin on the bone side of a rack of pork or beef ribs. You slip a knife under one corner, lift it, then grab it with a paper towel and pull the whole sheet off in one piece. Doing this lets rubs and smoke penetrate the meat and keeps the ribs from curling or staying chewy during a long cook.
The rib membrane is the thin, translucent layer of connective tissue — technically the parietal pleura — that clings to the bone side of every pork and beef rib rack. It looks almost like a piece of cellophane stretched over the bone tips, and it is one of the few parts of a rib that will not render, soften, or break down no matter how long or how hot you cook it. Left in place, it turns leathery and chewy between the meat and the bone, and because it is largely impermeable it also blocks smoke, dry rubs, and marinades from reaching the meat directly underneath. For these reasons, removing the membrane before seasoning is one of the most consistently recommended prep steps in American barbecue.
The good news is that the job takes only a minute or two per rack and requires no special equipment. A paring knife, a butter knife, or even a spoon is enough to slip under a corner of the membrane, after which the entire sheet peels off in one piece if you keep your angle low and your tension steady. The technique is the same in principle for pork spare ribs, St. Louis-cut ribs, baby back ribs, and beef back ribs, though beef ribs carry a thicker, more stubborn version that benefits from a wider blade and a little more patience. There is a small minority view that the membrane helps retain moisture on thinner baby backs, but in practice most cooks find the texture and flavor gains from removal far outweigh any modest moisture loss.
The membrane is sometimes confused with the silverskin — the separate, paper-thin connective-tissue sheath that runs across the meaty side of a rack — but the two are different structures. Silverskin is removed separately, when it is removed at all; the pleura is the smooth, shiny sheet you see only when you flip the rack bone-side up.
- Difficulty
- Easy
Types & varieties
Slide a paring knife or butter knife under a corner of the membrane to loosen a flap, then grip and pull. The most common and reliable approach.
Use the tip of a spoon to work under the membrane. The rounded edge is less likely to puncture the meat than a knife, and many pitmasters prefer it.
Work a thumbnail under the membrane and pull without a tool. Works on thinner membranes, but bare fingers slip on the slick tissue, so a paper towel is almost always added for grip.
How to do it
- 1
Position the rack
Place the rack bone-side up on a clean cutting board or sheet pan. The membrane is the shiny, translucent skin stretched across the bones and is most visible at the edges of the rack.
- 2
Identify the starting point
Choose the narrow, thinner end of the rack where the bones are smallest. The membrane lifts most easily there because it anchors around the last rib bone.
- 3
Lift a corner
Slide the tip of a paring knife, butter knife, or spoon handle under the membrane at that end. Work it gently side to side to free a flap roughly the size of a quarter that you can pinch.
- 4
Get a grip
Pinch the loosened flap with a folded paper towel. The towel's texture holds the slick tissue far better than bare fingers and tears off cleanly when you are done.
- 5
Pull steadily across the rack
Pull the membrane low and parallel to the bones, working slowly from one end to the other. Keep steady tension rather than jerking; an upward angle is what causes the sheet to tear partway across.
- 6
Recover from a tear
If the membrane rips partway across, stop immediately. Reinsert your knife or spoon and lift a fresh flap adjacent to the torn edge, then resume pulling from there until the whole sheet is off.
- 7
Inspect and clean up
Run your fingers across the bone side of the rack to confirm the entire membrane is gone. Scrape off any small remaining pieces with the back of your knife, then pat the rack dry so the rub will adhere.
Why the membrane matters
The pleura on a rib rack is built from dense fibrous connective tissue designed to line the body cavity, not to dissolve in heat. It is largely collagen and elastic fiber, but the structure is cross-linked and dense, so very little of it converts to gelatin during cooking. It stays intact and chewy through hours of smoking, braising, or grilling, and that chew is the texture most people mean when they say a rack of ribs was 'tough between the bones.'
- It blocks smoke penetration, so the meat on the bone side never picks up the same bark as the rest of the rack.
- It blocks dry rub and marinade, leaving a noticeably less seasoned band of meat right against the bones.
- It traps rendered fat against the bone, which can feel greasy rather than unctuous on the finished plate.
- It is the layer that, when left on, often causes people to overcook ribs trying to tenderize something that will not tenderize.
When you might leave it on
The case for keeping the membrane is narrow but real. On a small rack of baby back ribs that will be cooked for a long time at lower heat, the membrane may soften enough to be unnoticeable, and its slight moisture-retaining effect can offset the leanness of the loin meat. A few competition teams leave it on for that reason. For most home cooks, and for any spare rib or beef rib, removal is the stronger choice.
Common uses
Tips & pitfalls
- Always grip the membrane with a dry paper towel — bare fingers slip on the slick tissue, and the towel tears off cleanly when you are done.
- Pull the membrane low and parallel to the bones, not straight up; an upward angle is what makes it tear partway across.
- If it tears, stop and re-lift a fresh section with your knife rather than yanking harder — yanking almost always makes the problem worse.
- Work on cold or just-thawed ribs; the membrane separates more cleanly when the underlying fat is firm.
- Score the membrane in a shallow crosshatch with a knife before pulling if it is unusually thick or stubborn — this gives the pull a place to start on every strip.
- Do not skip the step on thick spare ribs: the membrane is genuinely tough and will not break down even after 6 hours of smoking.
- A bone-side membrane that comes off in one continuous sheet means you have gotten under the right layer; a membrane that comes off in shreds usually means you are only pulling the surface film.
- Pat the rack dry with paper towels after removal so the rub adheres properly.
Good to know
- Applies to
- Pork spare ribs, St. Louis-cut ribs, baby back ribs, and beef back ribs
- Membrane type
- Parietal pleura — a thin, translucent, tough connective-tissue layer on the bone side of the rack
- Time required
- 1–2 minutes per rack
- Difficulty
- Easy to moderate; mainly a matter of grip and patience
- Tools
- Paring knife, butter knife, or spoon; paper towel for traction
- When to do it
- After rinsing and patting the rack dry, before applying dry rub, marinade, or smoke
- Safe to skip on
- Some baby back ribs, where the membrane is paper-thin and may soften during long cooks
- End result
- A clean, bone-side surface ready to absorb rub and smoke; a tender bite all the way to the bone
Also called
Removing Silverskin · Peeling Rib Membrane
Related

Whisk
Beat ingredients smooth and aerated with a looping wire motion

Sift
Pass dry ingredients through mesh to aerate and remove lumps

Strain
Pour through mesh to separate solids from liquid for a smooth result

Filter
Pass liquid through fine material to clarify out the smallest particles

Rice
Press cooked potatoes through small holes for fluffy, lump-free texture

Mash
Crush soft cooked food into a rustic, creamy purée

Grind
Crush food into a coarse to fine texture, from spices to meat

Grate
Shred food into fine bits against a sharp-toothed surface