Heat & Fire
Toasting Nuts & Seeds
Heating nuts and seeds in a dry pan or oven to deepen flavor and crunch.
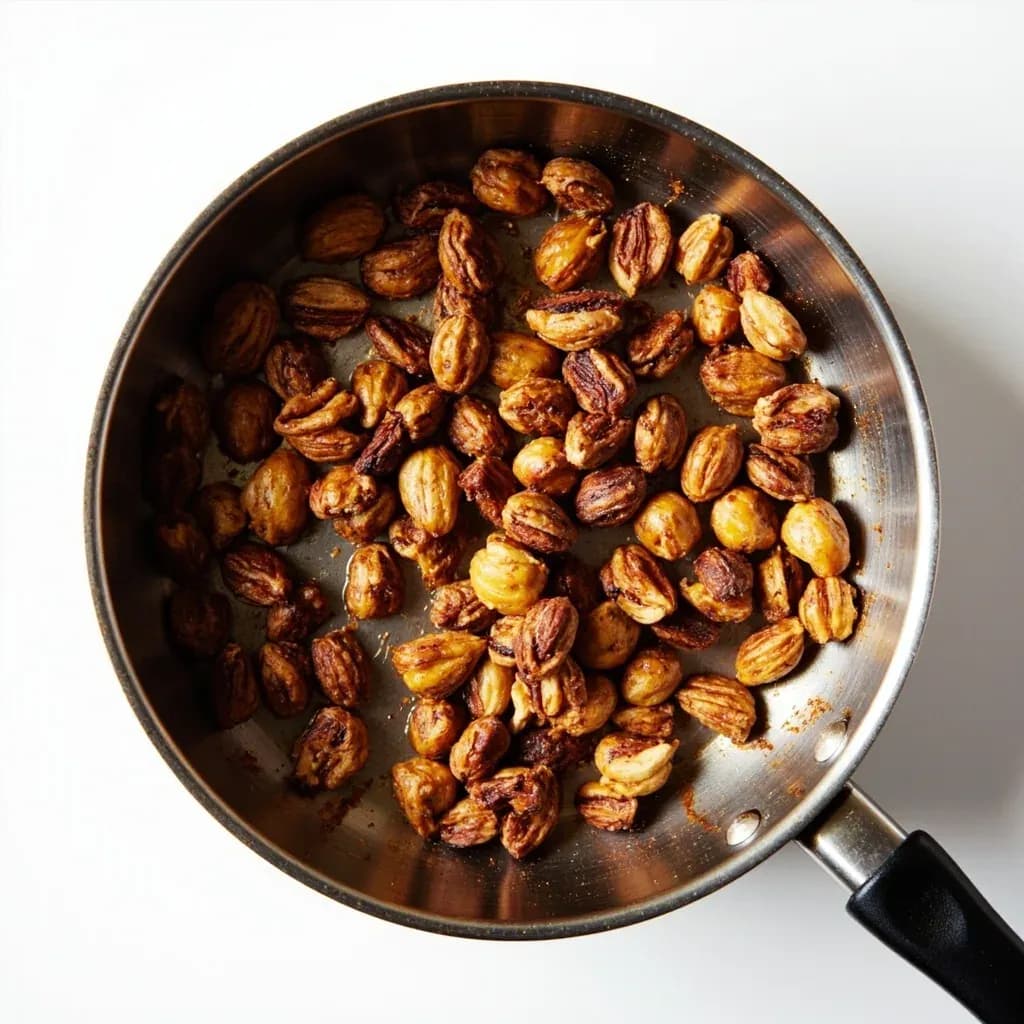
Toasting nuts and seeds heats them in a dry skillet or oven until golden and fragrant, drawing out their oils for richer, nuttier flavor and a crisper bite. It is a quick finishing step for garnishes, salads, pestos, and baked goods. Nuts go from perfect to burnt fast, so cooks toss them often and pull them just as the aroma blooms, since they keep cooking off the heat.
Toasting nuts and seeds is one of the highest-return techniques in a working kitchen: a few minutes of dry heat transforms pale, somewhat raw-tasting ingredients into deeply aromatic, savory elements that can carry an entire dish. The browning is a combination of Maillard reactions between amino acids and reducing sugars, plus gentle caramelization of the natural sugars already present—chemistry that produces hundreds of new volatile compounds, including the pyrazines and furans responsible for warm, almost-butterscotch aromas. Because nuts and seeds carry very little water to buffer heat, the difference between perfectly toasted and acridly burnt is often less than a minute, and the residual heat of the pan keeps working for another 30–60 seconds after the flame is off.
The method itself is nothing more than heating them in a dry skillet or a low oven until they smell done, but the craft lies in three habits: keeping them in a single layer, stirring often, and pulling them before they look finished. The same principles apply whether you are finishing a small handful of pine nuts for pesto, blooming cumin seeds for a curry paste, or running a sheet pan of almonds for granola. Once you internalize that the pan is still "cooking" the food after it leaves the heat, the technique becomes nearly foolproof.
- Difficulty
- Easy
Types & varieties
Whole or slivered; 8–12 min at 350°F; skins slip off readily after a 1-min steam and a rub in a towel.
Halves or pieces; 8–10 min at 350°F; the aroma shift from raw to toasty is the most reliable cue.
10–15 min at 350°F; almost always skinned afterward by rubbing in a clean towel.
Shelled or in shell; 6–8 min at 325°F; lower heat because of their relatively high oil content.
8–10 min at 325°F; scorch easily—watch closely and stir often.
3–5 min in a skillet over medium-low or 5–7 min at 325°F; among the most delicate of all nuts.
8–12 min at 325°F; rich and oily, prone to bittering if pushed past golden.
Technically legumes; 8–12 min at 350°F in shell or shelled.
2–4 min in a dry skillet, stirring constantly; a matter of seconds once they start to color.
10–15 min at 325°F, ideally tossed with a touch of oil and salt for even color and crunch.
8–12 min at 325°F; soaking and drying them first yields a snappier, less chewy texture.
2–3 min in a skillet; tiny and burn in a flash.
1–3 min in a dry skillet; bloomed whole or crushed for curry powders, dukkah, and dry rubs.
5–8 min at 300°F, stirred often; treat like a seed rather than a nut.
How to do it
- 1
Decide on the method
Use a skillet for small batches of nuts, all seeds, and quick jobs—it is faster and gives more control through frequent stirring. Use the oven for sheet-pan quantities, larger pieces, or hands-off cooking alongside other prep.
- 2
Preheat correctly
Oven: 325°F (150°C) for seeds, pistachios, cashews, and coconut; 350°F (175°C) for most other nuts. Skillet: set over medium or medium-low heat for 1–2 minutes until warm but not smoking. A cold pan lets the nuts sit and stick.
- 3
Measure and arrange in a single layer
For a 12-inch skillet, use no more than 1 cup (about 140 g) of nuts or 2–3 tablespoons of small seeds. On a sheet pan, keep to a single layer with space between pieces; reach for two pans rather than crowding one.
- 4
Toast, stirring often
Stir or shake every 30–60 seconds so the pieces turn over and color evenly. Skillet nuts typically finish in 5–10 minutes; oven nuts in 8–15. Small seeds—sesame, poppy, spice seeds—can finish in 1–4 minutes, often in well under 3.
- 5
Watch and smell
Look for a light golden tone, just a few shades darker than the raw color. The stronger signal is aroma: a warm, toasty, almost bread-like scent. Seeds will start to pop or jump in the pan when they are nearly there.
- 6
Pull early and transfer
Remove from the heat 30–60 seconds before they look done, then immediately move to a cool plate, sheet pan, or mixing bowl. Never leave them on the hot cooking surface; residual heat will scorch them.
- 7
Cool, then use or store
Let cool 5–10 minutes for full crunch to develop. Use right away, or once completely cool, store in an airtight container at room temperature up to 1 week, or frozen up to 6 months.
Why You Always Pull Early
Carryover heat is the single concept that separates cooks who toast successfully from those who scorch batches. A hot cast-iron skillet or a sheet pan straight from the oven holds enough residual energy to continue browning the food for another 30–60 seconds after it has left the heat source. That means the color and aroma you perceive at the moment of pulling should still be slightly under-done compared with your target. The practical rule: as soon as the smell shifts from raw or starchy to warm and bread-like, transfer to a cool plate or mixing bowl. Leaving the nuts on the hot sheet pan while you fetch the salt is the most common reason a good batch turns bitter.
- Pull when the nuts smell toasted, not when they look toasted.
- Move immediately to a room-temperature surface—never let them sit on the hot pan.
- A minute of carryover is roughly equivalent to another minute of active cooking.
Nuts vs. Seeds: Two Different Animals
Treating every nut and seed the same way is the easiest path to a burnt pan. Larger nuts (almonds, hazelnuts, walnuts) have thicker mass and a longer thermal runway, so they tolerate and indeed benefit from the full 8–15 minutes at 325–350°F. Small seeds and delicate nuts (sesame, poppy, pine nuts, spice seeds) are thin and oily; they reach 350°F internal temperatures within a couple of minutes and burn in seconds. The practical move is to treat small seeds like a pan of spices—medium-low heat, constant motion, eyes on the pan—and treat large nuts like bread crumbs being sautéed, with steady heat and patience.
- Oils oxidize quickly at high heat; lower temperature for high-oil items (pine nuts, pistachios, sesame).
- A teaspoon of oil on pumpkin or sunflower seeds helps even browning and seasoning adhesion.
- Skillet toasting is generally better than oven toasting for anything under ½ cup.
Common uses
Tips & pitfalls
- Start with raw, unsalted nuts—pre-roasted or salted ones scorch and over-season in seconds.
- Spread in a single layer; piling causes uneven browning and trapped steam.
- Warm the pan before adding the nuts—a cold skillet lets them stick and stall.
- Stir or shake every 30–60 seconds; the gap between perfect and burnt is often under a minute.
- Pull 30–60 seconds before they look done and transfer to a cool surface to stop carryover cooking.
- Trust smell over color: a toasted, bread-like aroma is the true signal; sharp or acrid means it has gone too far.
- To skin warm hazelnuts or almonds, wrap in a clean kitchen towel and rub—loose skins fall away cleanly.
- Toast large batches at 300°F for longer rather than cranking the oven to 400°F; rushing burns the outside before the inside warms through.
Good to know
- Category
- Dry-heat flavor technique
- Primary methods
- Skillet (stovetop) or rimmed sheet pan (oven)
- Oven temperature range
- 300–350°F (150–175°C); lower end for seeds, pistachios, cashews, and coconut
- Skillet heat level
- Medium to medium-low; never high
- Typical timing
- 5–15 minutes for nuts; 1–4 minutes for small seeds; large nuts up to 15 minutes
- Underlying chemistry
- Maillard browning plus gentle caramelization of natural sugars and amino acids
- Carryover cooking
- Nuts and seeds continue to darken 30–60 seconds after leaving the heat
- Storage after toasting
- Cool fully, then airtight at room temperature up to 1 week, or frozen 3–6 months
Also called
Toasting Nuts · Toasting Sesame Seeds · Toasting Nori
Dishes that rely on it
Related

Sear
Blast the surface hot for a deep-browned, savory crust

Sauté
Cook quickly in a little fat over lively heat, tossing as you go

Stir-Fry
Toss bite-sized pieces over roaring heat for fast, smoky cooking

Pan-Fry
Crisp food in a shallow layer of hot fat, turning once or twice

Deep-Fry
Submerge in hot oil for an all-over crackling crust

Roast
Cook uncovered in dry oven heat for browned edges and tender centers

Bake
Cook with steady, surrounding oven heat — the soul of bread and pastry

Broil
Hit food from directly above with fierce overhead heat