Transform & Preserve
Waxing
Sealing cheese, fruit, or preserves with an edible wax coating to lock out air and moisture.
Waxing coats a food in a thin layer of food-grade wax to slow moisture loss and block air and mold. It is most associated with hard cheeses aged for months and with sealing the tops of preserves and produce. The wax forms a flexible rind-like barrier that protects the food while it ages or stores.
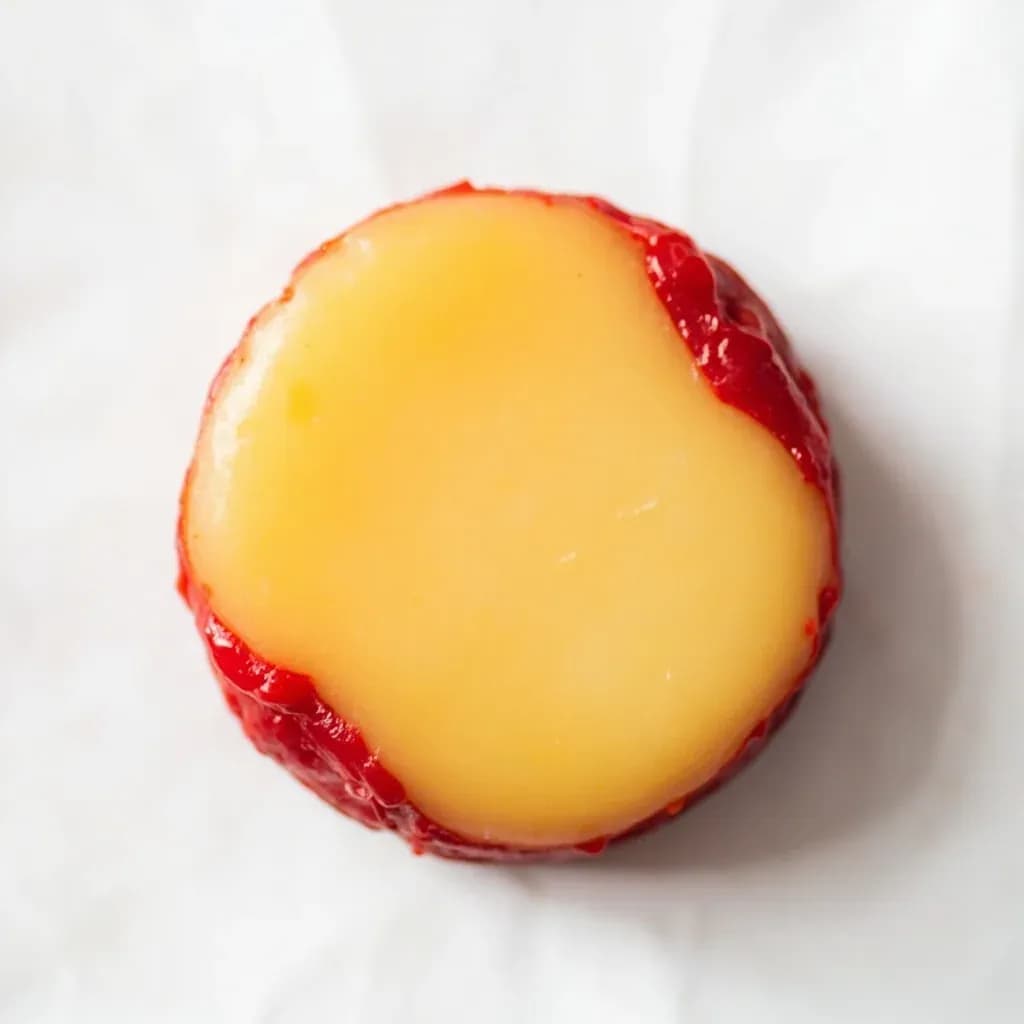
Waxing is a barrier-preservation technique in which a thin shell of melted, food-grade wax is applied to the surface of a food — most often a wheel of cheese, but also whole fruit — to seal out oxygen and ambient moisture. Unlike brining, smoking, or vacuum-sealing, waxing neither flavors nor chemically alters what it covers; it works purely as a physical membrane, slowing the gas exchange that drives mold growth and rind desiccation during long storage. The wax sets into a flexible, opaque skin that protects the food underneath for months, sometimes well over a year, when held under proper conditions.
The technique is most associated with the red- and yellow-coated wheels of Gouda and Edam that line Dutch cheesemonger counters, but it has been used for centuries on farmhouse cheeses across Europe and, in a much thinner and often invisible form, on commercial apples, pears, and citrus. Cheese wax is melted to roughly 200°F / 93°C and applied by dipping or brushing in one or two coats; once cooled, it forms a continuous rind that replaces — rather than allows — the natural rind an aging cheese would otherwise develop.
What waxing does not do is ripen or cure. It is reserved for foods that already age well without intervention — semi-hard and hard cheeses with low moisture, or firm fruit with a robust skin — and it works best in a cool, humid cellar rather than on a warm pantry shelf. Used on the wrong food, or applied to a wet or contaminated surface, it will trap problems in rather than keep them out.
- Difficulty
- Medium
Types & varieties
The standard; food-grade paraffin blended with microcrystalline wax for flexibility and crack resistance.
Traditional, natural option used historically; softer and more aromatic — preferred by some farmhouse cheesemakers.
Hard, high-melt plant wax derived from the Brazilian carnauba palm; used in fruit coatings for a glossy finish.
Resin secreted by the lac bug; widely used on commercial apples, citrus, and candies for a bright sheen.
Soy, sunflower, or candelilla wax used in vegan and organic produce coatings as alternatives to paraffin and shellac.
How to do it
- 1
Prepare the cheese
Choose a semi-hard or hard wheel that has been dried and salted. Press or air-dry the surface for 1–2 days so it is dry to the touch and slightly tacky. Wrap the sides in cheesecloth or plastic and leave the top and bottom exposed if you want a partial wax, or have the whole wheel ready for full dipping.
- 2
Melt the cheese wax
Fill the bottom of a double boiler or wax pot with water and bring to a gentle simmer. Add cubed food-grade cheese wax to the top pan and stir as it melts. Heat to 195–210°F / 90–99°C and hold at that temperature — use a candy thermometer, as the wax will not look visually different between safe and scorched.
- 3
First dip (top)
Lower the cheese top-down into the melted wax in one smooth motion. Count 3–5 seconds, then lift straight out without rotating. Excess wax will run off; do not wipe. Place the wheel on a parchment-lined tray to set, top-side up, for about 1 minute.
- 4
First dip (bottom and sides)
Once the top is set, flip the wheel and dip the bottom. Then use a ladle or natural-bristle brush to coat the curved sides, working in overlapping strokes from the bottom up so any drips run down and self-level.
- 5
Second dip for a complete seal
After 1–2 minutes, when the first coat feels firm, repeat the process — top, bottom, then sides. A second coat fills pinholes and gives a uniform, opaque, crack-resistant shell.
- 6
Cool and store
Let the wheel rest at room temperature for 15–30 minutes until the wax is fully hard. Transfer to a cheese cave or refrigerator set to 50–55°F / 10–13°C with 80–85% humidity. Store on a clean wood board, not plastic.
- 7
To open and re-use wax
Score the wax around the equator with a paring knife and peel it off in two halves. Wipe the cheese with a dry cloth; the rind underneath is usually clean and edible. Save the wax shavings, re-melt, and strain through cheesecloth to reuse.
Choosing the right wax
Not every wax is food-safe, and confusing the wrong product is the single most common mistake home waxers make. Paraffin sold for candles, for example, is often loaded with fragrance oils and colorants not approved for ingestion, and it may have a higher oil content that causes it to sweat or crack against cheese. Always buy wax labeled specifically for cheese, or for produce, from a cheesemaking or candlemaking supplier that lists its ingredients and a food-grade certification.
- Cheese wax is sold in 1 lb / 500 g blocks and is almost always a paraffin–microcrystalline blend engineered to flex with the cheese as it ages and as temperatures fluctuate.
Troubleshooting common problems
Most waxing failures come down to surface moisture, wrong temperature, or a single coat applied too thickly. A cracked or beaded surface almost always means the cheese was dipped while damp; a brittle, flaky coat means the wax was overheated; a wax that pools or runs off in sheets means it was too cool. Pinholes in the first coat are normal and are exactly why a second dip is standard practice.
- If the wax smokes or yellows, it has exceeded 250°F / 120°C — discard it, as scorched paraffin will not adhere properly and may impart off flavors.
- If the first coat shows pitting or fish-eyes, wipe the cheese with a dry cloth and dip again once the first layer is fully set.
Common uses
Tips & pitfalls
- Pat the cheese surface completely dry before dipping — even a thin film of moisture will cause the wax to crack, bead, or trap steam and spoil the rind.
- Use a dedicated wax pot, not a saucepan you cook in; paraffin is very difficult to fully remove and can scorch or flash at high heat.
- Dip twice: the first coat seals but often shows pinholes; a second dip after 1 minute creates a continuous, airtight skin.
- Keep the wax at 195–210°F / 90–99°C — too cool and it thickens unevenly, too hot and it scorches and thins out the coating.
- Work in a ventilated space; melted paraffin produces fumes that can irritate eyes and lungs.
- Store waxed wheels rind-side down on a clean wooden board; never plastic-wrap a waxed cheese, as trapped moisture will undermine the seal.
- Always use food-grade wax; paraffin sold for candles may contain dyes, fragrances, or higher oil content not approved for food contact.
- For fruit, a thin, even coat is the goal — heavy waxing seals in CO₂ and accelerates anaerobic spoilage rather than preventing it.
Good to know
- Primary purpose
- Creates a physical barrier against oxygen and moisture exchange, suppressing mold growth and preventing rind desiccation during long aging or storage.
- Common wax types
- Food-grade paraffin (often blended with microcrystalline wax) for cheese; carnauba, shellac, beeswax, and vegetable-oil-based coatings for fruit.
- Melting point (cheese wax)
- Approximately 180–200°F / 82–93°C; do not exceed ~250°F / 120°C.
- Working temperature for dip
- Hold melted cheese wax at 195–210°F / 90–99°C during dipping for a smooth, even coat.
- Best-suited cheeses
- Semi-hard and hard cheeses destined for long aging — Gouda, Edam, aged Cheddar, Cheshire, Leyden, and Parmesan-style wheels.
- Wax-to-cheese ratio
- Roughly 200–300 g of cheese wax per 1 kg (2.2 lb) wheel for a two-coat dip.
- Storage after waxing
- Aged at 50–55°F / 10–13°C with 80–85% humidity; unopened waxed wheels can keep many months to over a year.
- Origin
- Waxed cheese (notably Edam) has roots in the Dutch cheesemaking tradition from at least the 17th century; commercial edible wax coatings on apples and other produce became widespread in the mid-20th century.
Also called
Cheese Waxing
Dishes that rely on it
Related

Confit
Cook slowly submerged in fat for silky tenderness and keeping

Cure
Draw out moisture with salt and time to preserve and concentrate

Pickle
Steep in acidic brine for bright, tangy, crunchy preservation

Ferment
Let friendly microbes transform food into tangy, complex flavor

Marinate
Soak in a seasoned mix to flavor and tenderize before cooking

Brine
Soak in salt water so meat stays juicy and seasoned throughout

Dehydrate
Slowly dry out moisture to concentrate flavor and extend shelf life

Cold-Smoke
Perfume cured food with smoke without cooking it through