Prep & Assembly
Kneading Dough
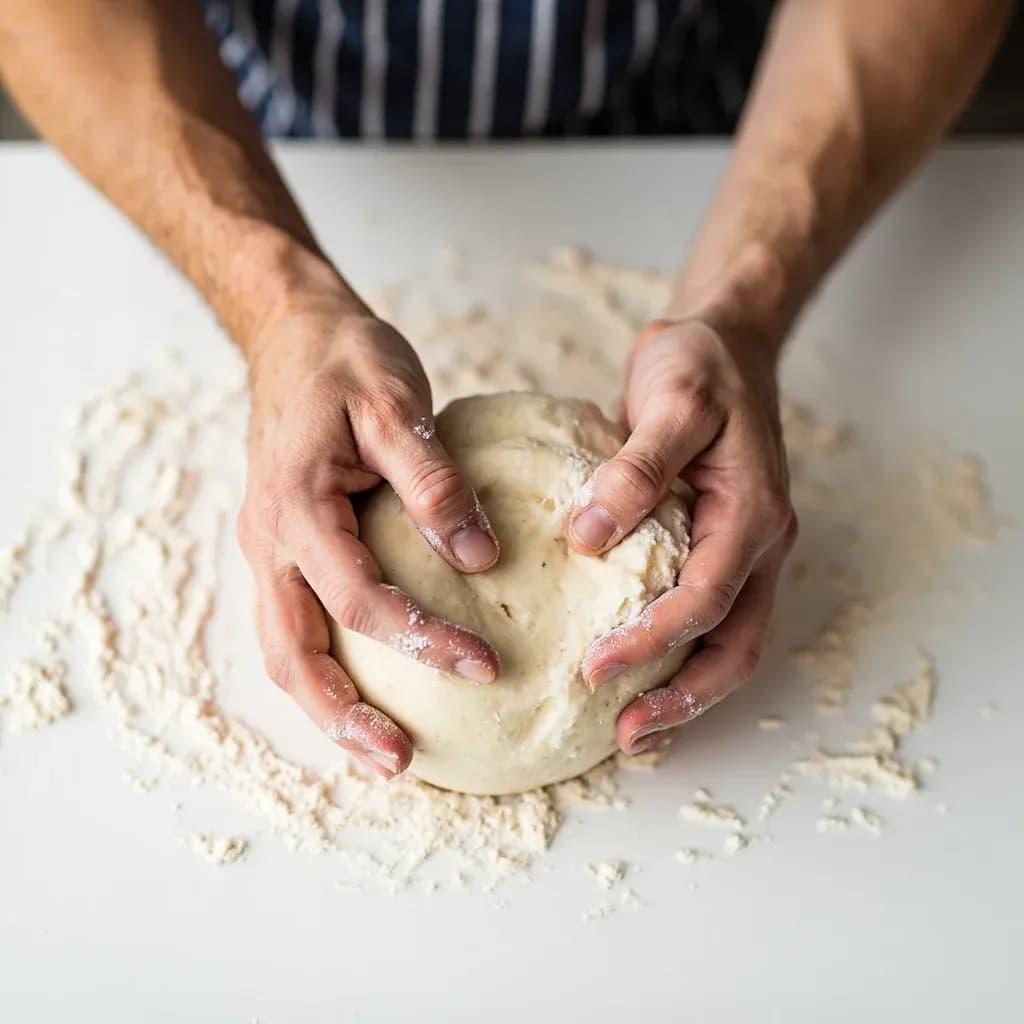
Working dough by stretching and folding to develop gluten for elastic structure and texture.
Kneading repeatedly stretches, folds, and presses dough to align and develop its gluten network, giving bread its elastic structure and chewy crumb. It is done by hand or machine until the dough turns smooth, springy, and passes the windowpane test. Across cuisines the same motion shapes everything from atta for flatbreads to masa and delicate chhena for sweets.
Kneading is the working of a dough by repeated pressing, folding, and turning to align and strengthen the gluten proteins (glutenin and gliadin) that form when wheat flour is hydrated and agitated. As the network develops, the dough transforms from a shaggy, tear-prone mass into something smooth, elastic, and springy — able to trap the carbon dioxide produced by yeast and hold its shape through long fermentation and oven spring. Done properly, kneading is what gives bread its open, chewy crumb and pizza its stretch; skipped or botched, it produces dense loaves with a gummy interior and poor volume.
The technique is far more nuanced than the old "10 minutes of pushing" routine suggests. Hydration, flour strength, enrichment, and ambient temperature all change what the dough needs — a stiff bagel dough rewards vigorous traditional kneading, while an 80% hydration sourdough is far better developed through gentle folds during bulk fermentation. Knowing when to knead hard, when to fold softly, and when to stop is what separates a confident baker from one who fights the dough. A well-kneaded dough should feel alive under the hands: cohesive, supple, and just slightly tacky, never sticky or tight.
Modern practice has also reframed kneading's role. The autolyse rest — a simple pause after mixing flour and water — does a surprising amount of gluten development on its own, and time-based folding methods like stretch-and-folds or coil folds build strength without deflating the air the yeast has already produced. The result is that today's baker uses traditional kneading selectively, choosing the method that matches the dough rather than following a single universal routine.
- Difficulty
- Easy
Types & varieties
Classic press-fold-turn method on a lightly floured or un-floured work surface; the standard for most home bakers.
Dough hook on low to medium speed; faster and more consistent, with a real risk of over-kneading and overheating.
Gentle technique performed during bulk fermentation, usually every 30–45 minutes; builds strength without deflating.
Lifts the dough from underneath and lets it fold under its own weight; favored in sourdough and high-hydration baking.
Aggressive method for very wet doughs like ciabatta, where the dough is lifted, slapped on the counter, and folded.
Quick method using a metal blade; dough comes together in 30–60 seconds but generates heat quickly.
How to do it
- 1
Prepare the workspace
Clear a large, clean work surface. Have a bench scraper and a small bowl of flour or water within reach. For very wet doughs, lightly oil the surface rather than flouring.
- 2
Bring the dough together
Tip the just-mixed shaggy dough onto the surface. It will look rough with dry patches — that's expected. Let it rest 5 minutes so the flour can fully hydrate (this is a mini-autolyse and makes the next steps much easier).
- 3
Press and push
With the heels of both hands, press the dough down and forward, away from you. Use your body weight, not just arm strength, to compress the mass. The dough should flatten out under the pressure rather than slide around the counter.
- 4
Fold and turn
Use the bench scraper or your hands to fold the far edge of the dough back toward you, then give the dough a quarter turn. The bench scraper also lifts any stuck dough off the surface cleanly so you can fold it back in.
- 5
Repeat the cycle
Continue the press, fold, turn rhythm for 8–12 minutes, keeping the motion even and rhythmic rather than jerky. The dough will progress from rough and tearing to smooth, cohesive, and elastic.
- 6
Check development
Pause around the 8-minute mark and do a windowpane test: pinch off a golf-ball-sized piece and gently stretch it with your fingers from all sides. If it stretches thin enough to see light through without tearing, gluten is ready. If it tears, knead 1–2 minutes more and retest.
- 7
Shape into a ball and rest
Form the kneaded dough into a tight round. Place in a lightly oiled bowl, cover, and let rise as the recipe directs. The dough should feel pillowy, slightly tacky, and spring back slowly when poked.
Reading the dough
Recipes give times, but dough gives the truth. Early in kneading, the mass will feel lumpy and may tear as you stretch it — that is normal and does not mean the dough is broken. Somewhere between the 6- and 10-minute mark it usually passes an inflection point: the surface smooths, the dough holds together as a single piece, and small bubbles begin to appear just under the skin. Trust that visual and tactile feedback over a stopwatch.
- A properly developed dough springs back slowly when poked with a floured finger, not instantly.
- It should feel cool to the touch and slightly tacky — never warm, sticky, or glossy-tight.
- If the dough is fighting you, let it rest 5–10 minutes; relaxed gluten is far easier to work than tense gluten.
The windowpane test
The most reliable indicator of gluten development is also the simplest. Pinch off a piece roughly the size of a golf ball and gently stretch it outward from all four sides with your fingers, working slowly so the dough has time to give. A well-developed dough will stretch thin enough to see the shadow of your hand through it — almost translucent — without tearing or breaking at the edges. If it tears while still thick and opaque, knead another minute or two and test again. Most home bakers stop a minute or two too early, judging by feel alone.
- Do this test several times during kneading rather than just once at the end.
- Wet your fingers to prevent the dough from sticking as you stretch.
- A dough that passes the windowpane will hold its shape beautifully when shaped and scored.
Kneading vs. folding
For stiffer, lower-hydration doughs — bagels, pretzels, sandwich bread, pizza — traditional kneading remains the best way to develop structure quickly and reliably. For wet, high-hydration loaves (most sourdough and ciabatta-style bread), folding techniques are usually superior because they build strength without crushing the airy, open crumb the baker is trying to preserve. Choosing the right method for the dough is more important than following any single technique to the letter.
- Stiff doughs (55–65% hydration): hand or mixer kneading works best.
- Medium doughs (65–75%): either method, or a short knead followed by folds.
- Wet doughs (75%+): skip traditional kneading; use stretch-and-folds or coil folds during bulk fermentation.
Common uses
Tips & pitfalls
- Resist adding flour during kneading — a tacky surface is normal and yields better crumb; flour your hand or bench scraper instead.
- Use a bench scraper constantly to lift, turn, and clean the dough off the counter; it cuts kneading time significantly and saves your hands.
- Test with the windowpane before stopping — the dough often feels done 1–2 minutes before gluten is actually developed.
- If using a stand mixer, watch the dough rather than the clock; it should clean the sides of the bowl and feel smooth, not glossy-tight, and the bowl should not be hot to the touch.
- Rest the dough for 5–10 minutes mid-knead if it feels resistant — gluten strands relax and the dough will come together far more easily after a short rest.
- For enriched doughs (butter, eggs, sugar), add fat only after gluten is partially developed to avoid coating the proteins and preventing proper hydration.
- If the dough heats up while kneading, chill it for 10–15 minutes before continuing — warm dough ferments too fast and risks over-proofing before it even reaches the oven.
- In hot kitchens, chill the mixing bowl and flour first to keep finished dough temperature under 80°F.
Good to know
- Primary purpose
- Develops gluten by aligning wheat protein strands into an elastic network that traps gas during fermentation.
- Typical hand-knead time
- 8–12 minutes for lean bread doughs; 3–5 minutes for enriched doughs; 2–3 minutes for pasta or pastry.
- Ideal dough temperature
- 75–78°F (24–26°C) for most yeasted breads; cooler for laminated doughs.
- Doneness test
- Windowpane test — a small piece stretched thin should become translucent without tearing.
- Tools
- Hands, stand mixer with dough hook, food processor, or bread machine; bench scraper is essential.
- Autolyse origin
- Developed by French baker Raymond Calvel in the 1970s to reduce kneading time and improve flavor.
- Over-kneading sign
- Dough feels tight, snappy, and tears easily when stretched; in machines, dough climbs the hook and feels hot.
- Under-kneading sign
- Dough tears or breaks when shaped; crumb is dense and gummy with uneven holes.
Also called
Dough Kneading · Knead · Pétrir · Hand Mixing · Working the Dough
Dishes that rely on it



Related

Whisk
Beat ingredients smooth and aerated with a looping wire motion

Sift
Pass dry ingredients through mesh to aerate and remove lumps

Strain
Pour through mesh to separate solids from liquid for a smooth result

Filter
Pass liquid through fine material to clarify out the smallest particles

Rice
Press cooked potatoes through small holes for fluffy, lump-free texture

Mash
Crush soft cooked food into a rustic, creamy purée

Grind
Crush food into a coarse to fine texture, from spices to meat

Grate
Shred food into fine bits against a sharp-toothed surface