Prep & Assembly
Rolling and Tying Chashu
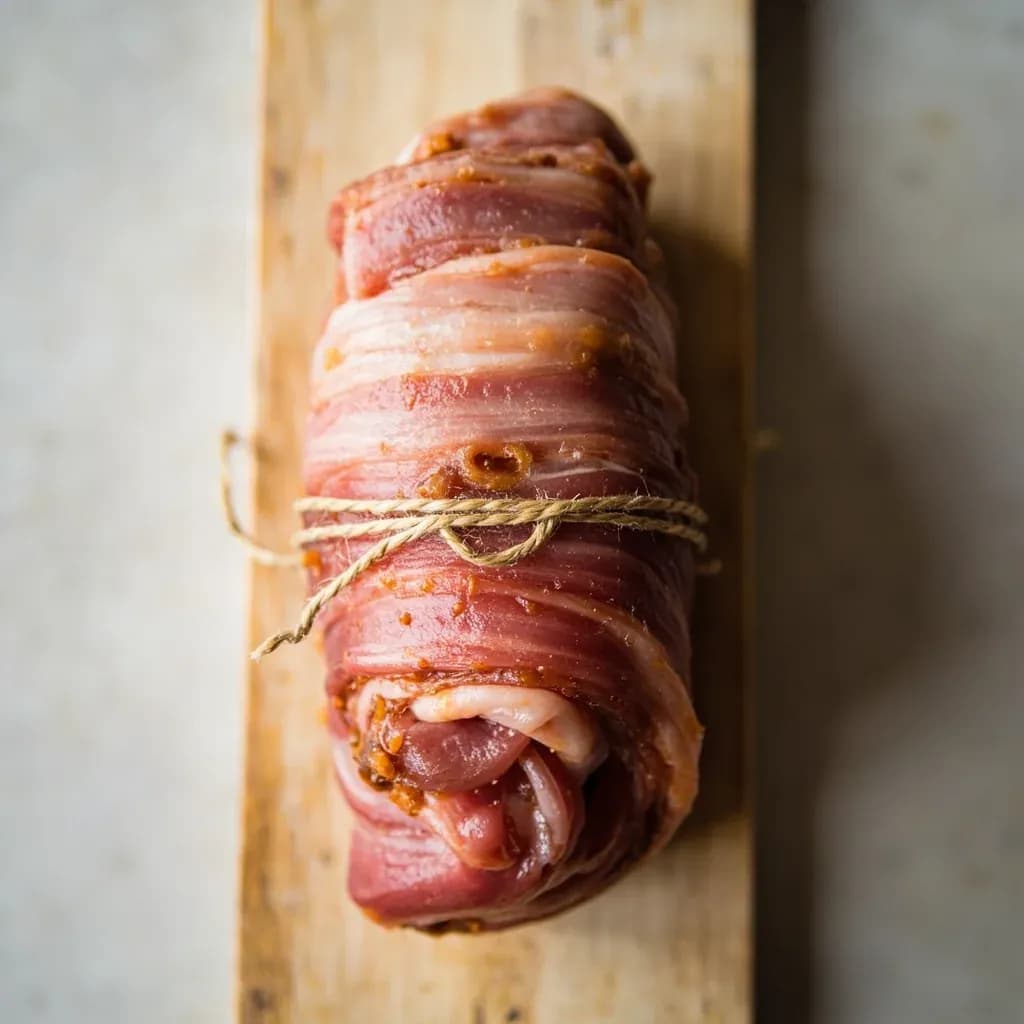
Rolling a pork belly slab into a tight cylinder and binding it with twine for braising.
Rolling and tying chashu shapes a slab of pork belly into a compact cylinder secured with butcher's twine so it holds its form and cooks evenly during long braising for ramen. The tight roll renders fat slowly and yields neat, round slices that fan across the bowl. Even, snug ties at regular intervals are key to a uniform shape and clean slicing once chilled.
Rolling and tying chashu is a structural technique, not a decorative one. A rectangular pork belly slab is rolled into a tight cylinder and bound with kitchen twine before being submerged in a soy-mirin-sake braise. The twine is doing real work: it compresses the alternating layers of fat and lean into a single firm log so heat penetrates evenly during the long simmer, the roll keeps its shape as fat softens, and — most importantly — after chilling, the cylinder can be cut into clean round slices that survive a ladle of hot broth without shredding.
The Japanese term maki chashu covers anything wrapped and braised, while bara-maki refers specifically to pork belly in this format. The technique is a Japanese adaptation of Chinese char siu, but the rolled-and-tied belly is now the dominant chashu in modern ramen shops, prized for the way self-basting fat keeps each slice juicy. Behaviorally, the roll behaves like a terrine: it gives up its structure to the braise, drinks in the tare, and then resets firm in the refrigerator. That final chill is what turns a soft, ragged log into something you can shave into even coins.
The skill itself is beginner-friendly. The tying is the only fiddly step, and once you have the rhythm of a snug double knot every 2–3 cm down the roll, the rest is patience: a slow braise, a cool rest, a weighted press overnight, and clean slicing the next day.
- Difficulty
- Medium
Types & varieties
The standard rolled-and-tied pork belly version, with layers of fat and meat compressed into a cylinder.
Rolled pork shoulder or loin; leaner, often used in lighter, clearer broths where belly would feel heavy.
Same roll, but bamboo skewers are pushed lengthwise through it instead of twine; common in many ramen shops.
Belly braised flat and sliced into strips rather than rounds; no tying step required.
Western-influenced version braised with red wine, bay leaf, and demi-glace-style aromatics.
How to do it
- 1
Select and trim the pork belly
Choose a rectangular pork belly slab, ideally 1–1.5 kg, with even layers of fat and meat. Trim ragged edges into a clean rectangle and square off the short ends so the roll has parallel sides. Leave the skin on or off depending on preference (skin-off is most common for ramen).
- 2
Optional: remove skin and score the fat
If removing skin, slide a sharp knife between skin and fat cap. Lightly score the exposed inner fat in a shallow crosshatch so the roll compresses evenly and absorbs seasoning without bulging.
- 3
Season the inside of the slab
Season the side that will become the interior of the roll with a thin, even layer of fine salt — roughly 1.5% of the meat's weight. A light dusting of white pepper is optional. Some cooks skip this and let the tare season the meat during the braise.
- 4
Roll tightly into a cylinder
Starting from one short end, roll the belly firmly along its long axis into a tight log, pressing gently as you go to expel air pockets. Aim for a uniform diameter end-to-end; the roll should be firm enough that the seam closes on its own.
- 5
Tie with butcher's twine
Cut several 25–30 cm lengths of cotton twine. Slip one under the roll, bring it up the sides, and tie a snug double knot on top. Repeat every 2–3 cm down the length. Finish with one or two loops running lengthwise around the entire cylinder to lock the seam and stop the ties from sliding off.
- 6
Optional: sear or par-blanch
For deeper color, pat the tied roll dry and sear on all sides in a hot dry pan until lightly caramelized. Alternatively, simmer in plain water for 20–30 minutes to draw out scum before the seasoned braise — this gives a cleaner, clearer tare.
- 7
Braise in seasoned liquid
Place the roll in a heavy pot and cover with chashu tare — typically soy sauce, mirin, sake, sugar, ginger, garlic, scallion, and star anise. Bring to a bare simmer (do not boil) and cook 2–4 hours, turning occasionally, until a skewer slides in with no resistance and the interior reads 80–85°C / 175–185°F.
- 8
Cool in the braising liquid
Remove from heat and let the roll cool fully in the tare. Cooling in the seasoned liquid lets it absorb flavor, finishes cooking gently, and begins firming the fat for cleaner slicing.
- 9
Press and chill overnight
Transfer the cooled roll to a tray, cover, and weight it down with a cutting board and a few cans. Refrigerate at least 8 hours, preferably overnight. Pressing compacts the layers for the cleanest possible slices.
- 10
Remove twine, slice, and reheat
Snip and pull away the twine (leaving tails at both ends of the original ties makes this faster). With a sharp knife, slice the cold roll crosswise into 3–5 mm rounds. Warm the slices briefly in a little reserved tare or directly in the ramen broth just before serving — do not let them boil hard, or the fat will render out and the slices will lose their shape.
Why the chill-then-slice step matters
A freshly braised chashu roll is soft, fatty, and structurally loose — the collagen has melted into gelatin and the fat layers are pliable. If you slice it warm, the rounds slump, shred, and shed fat into the broth. An overnight chill does two things at once: it firms the fat so the knife passes through cleanly, and it lets the braising liquid absorbed during cooking set into a sticky, sliceable matrix. The optional weighted press goes further, physically compressing the layers so even the wobbly bits fuse into one solid log. Skipping the chill is the single most common reason homemade chashu looks ragged in the bowl.
Twine versus bamboo skewers
Both produce a legitimate rolled chashu; the choice is largely about workflow and aesthetics. Twine compresses radially — each tie squeezes the belly inward, giving the slice a slightly scalloped edge where the band sat. Skewers run lengthwise, so the roll is held from the inside out and the slices come out perfectly round. Twine is easier at home (no splintering, no fishing bamboo out of a finished log before slicing); skewers are faster in a busy shop where a cook can punch through several rolls in the time it takes to tie one.
Skin on or skin off
Skin-on chashu gives the roll a firmer outer layer that helps each slice hold its shape, and renders a glossy, gelatin-rich exterior during the braise. Skin-off is more common in modern ramen because the soft fat-on-fat edge of each slice is what most cooks want melting into the broth. If you leave the skin on, torch or shave off any stray hairs first and consider a brief pre-blanch to clean it. If you remove it, slide the knife between skin and fat cap and either discard the skin or render it separately for cracklings.
Common uses
Tips & pitfalls
- Use untreated, unbleached cotton twine — synthetic or dyed twine can melt, leach color, or impart off-flavors during a long braise.
- Tie snug but not crushing: too tight and fat and meat squeeze out the ends, too loose and the roll unwinds in the pot. You should be able to just slip a fingertip between twine and meat.
- Roll with the skin on the outside if you want a firmer outer layer that helps each slice hold its shape; roll skin-side in for a softer, more traditional ramen slice where the fat bastes itself.
- Always slice the roll cold. A night in the fridge firms up the fat and gives you clean, round slices that hold their shape in hot broth.
- Pressing the cooled roll under a weight — a cutting board topped with cans — for several hours compresses the layers further and gives the neatest, most uniform slices.
- Reserve the braising liquid. It doubles as a reheating medium and as a seasoned finishing broth for the finished slices.
- Common mistake: skipping the chill. Slicing warm chashu gives ragged, falling-apart pieces no matter how carefully the roll was tied.
- Common mistake: boiling the braise. A hard boil disperses fat through the tare, clouds the liquid, and can split the roll apart; keep it at a bare tremble the entire time.
Good to know
- Also known as
- Maki chashu; bara-maki chashu when made specifically with pork belly
- Primary cut
- Pork belly (buta-bara), typically a 1–1.5 kg rectangular slab
- Binding material
- Untreated cotton butcher's or kitchen twine; never synthetic or dyed
- Twine spacing
- Roughly every 2–3 cm, plus one or two lengthwise wraps to lock the seam
- Braise time
- 2–4 hours at a bare simmer, until a skewer slides in with no resistance
- Chill and press
- Cool in the braising liquid, then refrigerate 8–24 hours under a light weight
- Slice thickness
- 3–5 mm (about 1/8–1/4 in) for ramen; thicker for rice bowls or as a main
- Difficulty
- Beginner-friendly; the tying is the only fiddly step
Also called
Chashu Rolling · Pork Belly Rolling and Tying
Related

Whisk
Beat ingredients smooth and aerated with a looping wire motion

Sift
Pass dry ingredients through mesh to aerate and remove lumps

Strain
Pour through mesh to separate solids from liquid for a smooth result

Filter
Pass liquid through fine material to clarify out the smallest particles

Rice
Press cooked potatoes through small holes for fluffy, lump-free texture

Mash
Crush soft cooked food into a rustic, creamy purée

Grind
Crush food into a coarse to fine texture, from spices to meat

Grate
Shred food into fine bits against a sharp-toothed surface