Knife Skills
Skinning Fillets
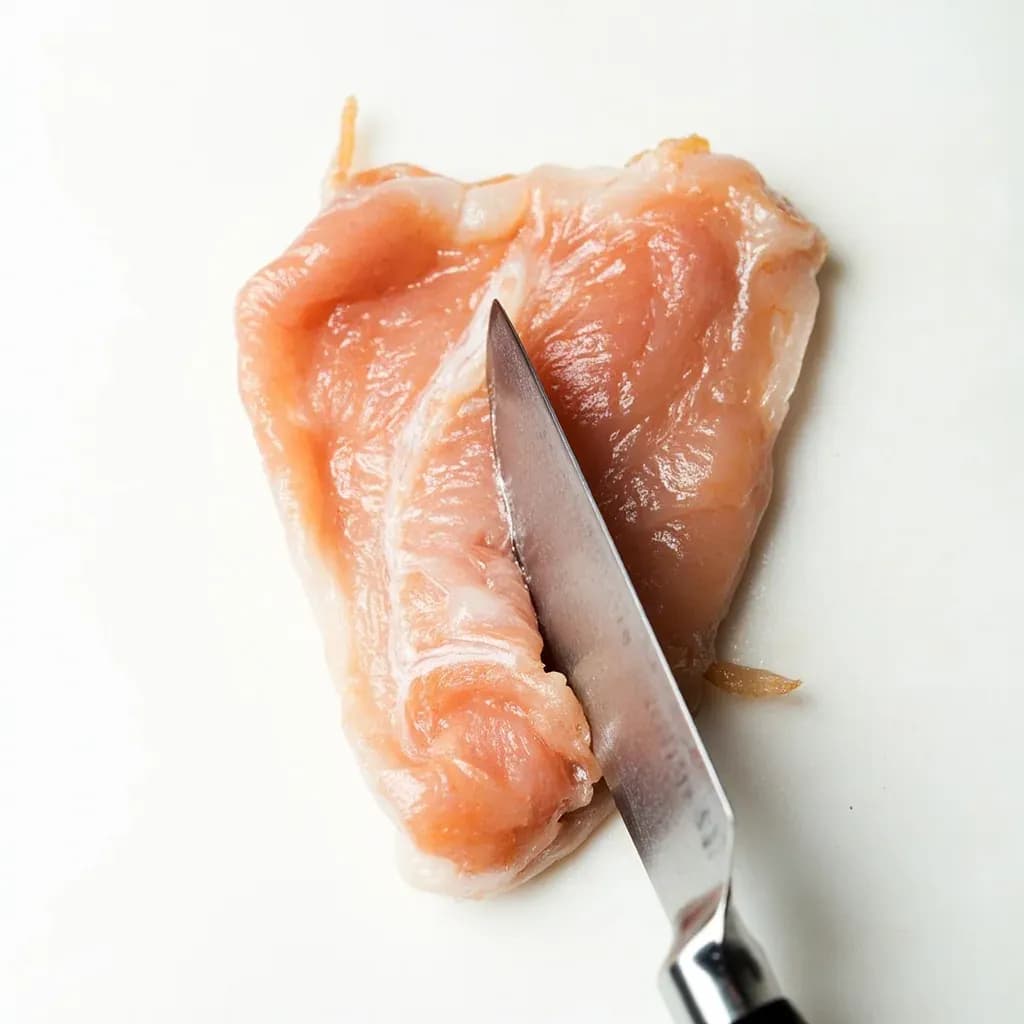
Removing the skin from a fish fillet by sliding the blade between flesh and skin.
Skinning fillets removes the skin from a fish fillet by anchoring the skin at the tail, angling the knife down against the cutting board, and sliding it forward between the flesh and skin. Keeping the blade flat and the skin taut yields a clean fillet with no flesh wasted. It's done when a recipe wants skinless fish or when the skin would turn gummy in the cooking method.
Skinning a fillet is the act of separating the flesh from its skin with a single, long knife stroke, leaving the edible muscle clean and the skin behind as a thin sheet. It is one of the three classic butchery moves on a filleted fish — sitting between filleting and portioning — and it transforms how a piece of fish behaves in the pan: a skinned fillet accepts marinades, glazes, and breading evenly, while a skin-on fillet offers its own reward of shatter-crisp sear.
The technique is more about angle and tension than force. The blade rides against the skin, not up into the flesh, and the skin is pulled taut in the opposite direction so the knife has something stable to slide along. Done well it takes twenty to sixty seconds; done with a dull knife or a steeply tilted blade, it shreds the flesh and leaves a silver membrane on the skin that no amount of trimming will disguise. Thickness matters too: salmon, trout, and other firm-fleshed fish give up their skin cleanly, while delicate flatfish like sole and flounder are often better left whole.
- Difficulty
- Medium
Types & varieties
The standard approach: fillet laid skin-down, blade entered at the thin tail end and worked forward. Works for salmon, trout, and most round fish.
Knife angled slightly more downward so a thin layer of flesh stays on the skin rather than the fillet. Used when the skin will be reserved for frying — for example, salmon-skin crackling.
For very thin fillets such as sole and flounder. The blade is held nearly parallel and only short, light strokes are used; often skipped entirely in favour of cooking the skin on.
Not strictly a skinning variant, but the deliberate alternative: score the skin and crisp it in the pan rather than remove it. Common with sea bass, branzino, and pan-fried trout.
How to do it
- 1
Set up the station
Place a damp towel under a stable cutting board so it cannot slide. Pat the fillet dry with paper towels and lay it skin-side down, with the thin tail end toward your dominant hand.
- 2
Anchor the skin and grip the knife
Pinch the very tip of the tail end between thumb and forefinger, or grip it through a folded paper towel for friction. Curl the fingers of your knife hand into a claw grip so the fingertips stay low and clear of the blade.
- 3
Position the blade
Hold the knife almost parallel to the board, with the edge angled very slightly down toward the skin. Insert the tip between flesh and skin at the tail end, just where the skin begins, until roughly 1–2 cm (½ in) of fillet sits over the blade.
- 4
Begin the stroke
Press the blade against the skin and push the knife forward in a long, slightly sawing motion while pulling the skin firmly toward you with your other hand. The knife should barely move sideways — think of it as gliding, not cutting.
- 5
Maintain angle and tension
Keep the edge riding the skin the whole way. As the skin tightens, slide your gripping hand lower. If flesh starts to tear, the knife has tilted up into the muscle — flatten it back against the skin.
- 6
Finish the fillet
Continue until the knife exits the opposite (head) end of the fillet, leaving the skin as a thin, mostly clean sheet. Lift the skinned fillet off and inspect the underside; shave off any remaining silver membrane or dark flesh with the tip of the knife.
When to skin, and when to leave the skin on
Skinning is a choice, not a default. Removing the skin opens the flesh to glazes, cures, and breadings that would otherwise slide off, and it removes a layer that can turn rubbery in long braises or in dishes that will be pureed. Leaving the skin on protects delicate flesh during cooking, holds a fillet together on the grill, and crisps into the best part of the pan-fried piece.
A useful rule: skin when the next step is wet, cured, or ground (sauces, marinades, mousses, gravlax, tartare, sausage); leave the skin on when the next step is dry-heat and direct (pan-fry, grill, plancha, salt-crusted bake). Flatfish are their own case: Dover sole is classically pan-fried dark-skin-on in the meunière style so the skin crisps in butter and is eaten; turbot and brill are usually poached or roasted whole with the skin on, then the white underside is removed and the dark side served up for presentation.
- Cures, terrines, mousses: skin the fillet — the skin would toughen or distort the texture.
- Sashimi and crudo: skin almost always removed for clean slices and even cure penetration.
- Pan-fry and grill: skin-on, scored, pressed flat in the pan for maximum crispness.
- Whole flatfish such as turbot and brill: traditionally skinned on the white underside only after cooking, dark side served skin-up for presentation.
What to do with the skin itself
The skin is not waste. Rinsed, dried thoroughly, and cut into strips or rectangles, it fries at 180 °C / 350 °F in a shallow layer of oil into a brittle, translucent garnish that tastes intensely of the fish. Salt it the moment it comes out of the oil and drain on paper; it will keep for an hour in a warm oven. Salmon, trout, snapper, sea bass, and mackerel skins are the most rewarding; thin skins from cod or haddock are less dramatic but still worth the effort.
- Pat the skin bone-dry before frying — moisture is the only reason it spits and curls.
- Lay it in the oil skin-side down and press flat for thirty seconds so it cannot buckle.
- Finish with flaky salt and, optionally, a pinch of smoked paprika or shichimi togarashi.
Common uses
Tips & pitfalls
- Sharpen before you start — a dull knife tears the flesh and leaves silver skin behind, and no amount of correction will recover the lost meat.
- Lay a damp paper towel or a piece of cling film over the tail to grip the slippery skin without cutting yourself.
- Hold the blade almost flat, around 10–15° to the board, with the edge angled down toward the skin, never up into the flesh.
- Use a long, smooth, slightly sawing stroke with light forward pressure; let the knife do the work rather than forcing it through.
- Pull the skin firmly toward you as you cut — slack skin bunches under the blade and the knife follows every wrinkle.
- Start at the tail end, not the middle: the thin leading edge of flesh gives the blade somewhere to seat.
- Chill a soft or warm fillet in the freezer for ten to fifteen minutes before skinning — firmer flesh separates cleanly and tears less.
- If a thin silver layer of flesh clings to the skin, switch approach: lay the skin down and shave the residual flesh off sideways with the tip of the knife rather than re-running the long stroke.
Good to know
- Difficulty
- Beginner to intermediate; easiest on thicker-skinned, fleshier fish such as salmon, trout, and arctic char.
- Typical time
- 20–60 seconds per fillet once the blade is positioned correctly.
- Equipment
- A sharp, thin, flexible blade of 15–23 cm (6–9 in) — a fillet or flexible boning knife — plus a stable board and a paper towel for grip.
- Best on
- Salmon, trout, arctic char, snapper, sea bass, mackerel, cod, haddock, monkfish, and tuna for sashimi.
- Best left on
- Sole, flounder, halibut, branzino, and black bass — the flesh is too delicate to skin cleanly, and the skin crisps beautifully.
- Yield
- Skin-only removal; flesh weight is unchanged. Trim dark flesh or bloodline at the same time for best appearance.
- Position in workflow
- Almost always performed immediately after filleting, before portioning or deboning.
Also called
Skinning Fillets · Removing Fish Skin
Dishes that rely on it
Related

Chop
Cut into rough, irregular pieces — the everyday workhorse cut

Dice
Cut into uniform cubes for even cooking and a tidy look

Mince
Cut as fine as possible so flavor melts evenly into the dish

Slice
Cut into even, flat pieces for consistent cooking and presentation

Julienne
Cut into thin matchsticks for fast cooking and elegant garnish

Brunoise
Cut into tiny, precise cubes — the finest dice in the kitchen

Chiffonade
Roll and slice leafy greens into delicate ribbons

Batonnet
Cut into tidy sticks, thicker than julienne — think classic fries