Prep & Assembly
Crimping
Pinching or pressing dough edges to seal a filling and create a decorative border.
Crimping seals the edges of pies, pasta, dumplings, and pasties by pinching, folding, or pressing the dough so the filling stays enclosed during cooking. Beyond the seal it creates a decorative fluted or rope border and a thicker rim that holds shape. For filled pasta and empanadas a tight crimp prevents leaks when boiling or frying.
Crimping is the technique of pressing, pinching, or rolling the overlapping edges of dough together to seal a filling and finish the rim of a pastry. It does two jobs at once: it fuses two layers of dough (or a folded edge) into a single leak-proof seam, and it shapes that seam into a visible border. A well-made crimp is the difference between a pie that holds its juices and one that weeps across the oven floor, and it remains the visual signature of a handmade pastry.
The technique behaves differently depending on the dough and the tool. Shortcrust and pie doughs, which are firm and fat-rich, accept pressure well and hold a deep pattern; thin egg pasta needs only a light, firm pinch with a fork or fluted wheel to seal; puff pastry edges crisp into shape on their own and usually require just a fork press. Working conditions matter as much as the motion itself: dough should be cool, rested, and just thick enough to take an impression, because warm or overworked dough resists clean crimps and cracks under pressure.
Mastery of crimping is less about any single pattern than about consistent, even pressure around a curve, and learning to read the dough so the seal closes without shearing through it. Once that base skill is in place, the same edge can be finished as a fork stripe, a scalloped thumb print, a rope of folded dough, or a decorative leaf pattern from a plier-style crimper.
- Difficulty
- Easy
Types & varieties
Tines of a fork pressed at an angle along a sealed edge to make parallel ridges; the standard finish for hand pies, empanadas, galettes, and ravioli.
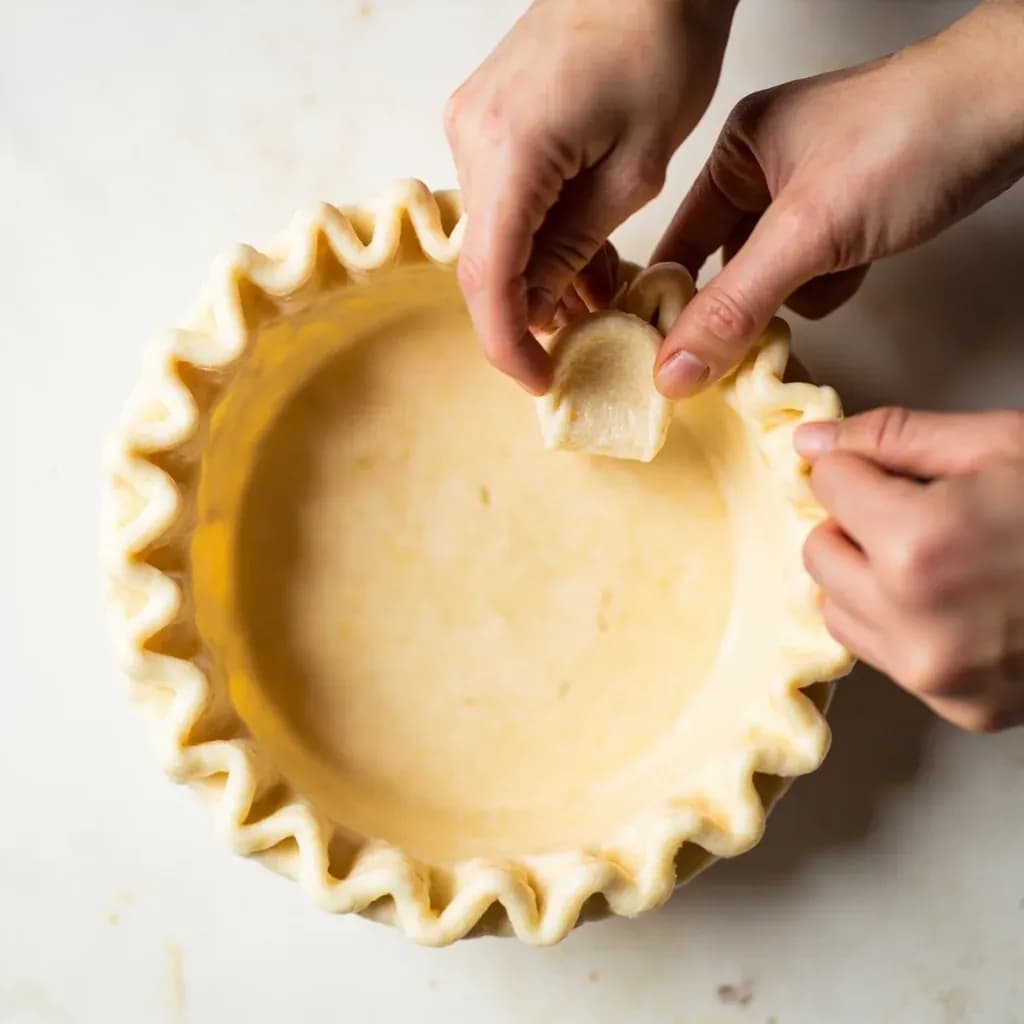
The classic pie-edge technique: the index finger pushes the rim outward from the inside while the thumb and forefinger of the other hand pinch and flute it from the outside.
The edge is folded under and rolled between thumb and forefinger to form a continuous rope of dough along the rim.
A fluted pastry wheel, jagger, or ravioli cutter rolled along the edge to produce a uniform scalloped or zigzag pattern.
A thumb pressed at regular intervals along the rim to make a series of rounded scallops; traditional on Cornish pasties and some fruit pies.
The back of a knife blade pressed at intervals to form ridges and valleys, common on shortcrust-topped pies.
A hand tool that presses a repeating motif — usually leaf or shell — along the pie rim in a single pass.
How to do it
- 1
Prepare and roll the dough
Roll the bottom and top pieces (or a single piece for a folded pastry) to an even thickness. If lining a pan, drape the bottom piece over the rim and let it relax for a few minutes before trimming so it does not shrink back. Trim so there is a clean, uniform overhang of about 1.5 cm (¾ in) all the way around.
- 2
Fill and lay on the top
Spoon the cooled filling into the base, mounding it slightly toward the center and staying at least 1 cm (⅜ in) below the rim. Lightly moisten the exposed bottom edge with cold water, milk, or egg wash. Lay the top crust over the filling and press it down gently so air escapes and the dough meets the edge of the bottom crust.
- 3
Trim and tuck the rim
Trim the overhang so a neat 1–2 cm border remains, and tuck this border under itself to create a smooth, raised rim that sits just above the pan edge. Press the top and bottom crusts together firmly all the way around with your fingertips to set the seal before you start patterning.
- 4
Apply the chosen pattern
For a finger crimp: with the pie on a flat surface, push the index finger of one hand into the rim from the inside while the thumb and forefinger of the other hand pinch the dough from the outside, forming a small flute. Move about 2 cm (¾ in) around the rim and repeat, rotating the pie as you go for even pressure. For a fork crimp, press the tines at a 30–45° angle into the edge at regular intervals, dipping the fork in flour between presses. For a fluted wheel, roll steadily along the rim with even downward pressure and do not stop mid-arc.
- 5
Crimping filled pasta or dumplings
Place a teaspoon of filling in the center of a round or wrapper. Lightly moisten the edge with water. Fold over to enclose the filling, press firmly from the filling outward to expel any trapped air, then seal with a fork or roll a fluted pastry wheel along the edge. Lay finished pieces on a floured tray and keep covered until cooking.
- 6
Finish and chill before baking
Brush off loose flour. Brush the crimped edge with egg wash or milk if the recipe calls for browning. Chill the assembled pastry for 10–15 minutes so the fat in the dough stays firm and the pattern holds its shape in the oven, then bake according to the recipe.
Function versus decoration
Crimping is often discussed as if it were purely cosmetic, but in most applications it is the only thing keeping the filling inside the dough. The decorative pattern is really a visible by-product of a mechanical seal: pressure fuses the two layers, expels trapped air, and creates a thickened rim that resists cracking as the dough expands in the oven or boils in water. A pretty crimp that does not actually close the seam will fail in the oven; a plain, deep fork press that fully fuses the layers will succeed even if it looks utilitarian. When choosing a pattern, think first about whether the dough and filling need a heavy, reinforced edge (a deep finger crimp on a juicy fruit pie) or just a light seal (a quick fork pass on a dry empanada).
- Crimp as seal: pressure bonds the two layers and ejects air pockets that would otherwise expand and split the seam.
- Crimp as reinforcement: a thickened rim resists slumping and cracking as the dough heats and sets.
- Crimp as signal: a clearly finished edge tells the cook the pie is fully sealed and ready to bake, and lets the baker mark different fillings on a shared tray with distinct patterns.
Matching the crimp to the dough
Not every pattern suits every dough. The general rule is that firmer, sturdier doughs take deeper, more sculptural crimps, while thin or delicate doughs need only a light, even press. A shortcrust pie shell can carry a tall finger crimp; a wonton wrapper cannot. Choosing the right tool for the dough is what separates a clean, professional-looking edge from a ragged, torn one.
- Shortcrust and pie dough: takes fork, knife-back, finger, rope, and plier-style crimps well.
- Puff pastry: usually needs only a fork press or simple pinch; the dough rises and crisps into shape on its own.
- Egg pasta (ravioli, mezzelune, cappelletti): fork or fluted wheel only, applied firmly enough to expel air.
- Stiff enriched buns (curry puff, baked bao): pinch or fork press, sometimes finished with a small pleat.
- Thin dumpling wrappers (wonton, gyoza): a quick fork crimp or a hand-pleated fold — anything heavier will tear the sheet.
Common uses
Tips & pitfalls
- Chill the shaped pie or filled pastry for 10–15 minutes before crimping; firm, cold fat is what holds a deep pattern through the oven.
- Trim the overhang cleanly first — ragged edges make even pressure impossible and tend to crack during crimping.
- Brush a thin line of water, milk, or egg wash along the bottom edge before laying on the top crust; the moisture is what actually fuses the two layers, not the pressure of the crimp itself.
- Do not overfill: leave at least 1 cm (⅜ in) of headspace inside the crimp so the filling does not bubble out and burst the seam.
- Press firmly enough to fuse the layers but stop short of cutting through; a crimp that shears the dough will split open as it bakes.
- For finger crimps, rest the pie on a flat surface and rotate it as you work so you can apply even pressure around the curve.
- Dip fork tines in flour or water between presses to keep dough from sticking and tearing the surface.
- Work with clean, dry hands; moist or sticky fingers drag dough out of shape rather than shaping it.
- Practice the motion on a scrap of rolled-out dough before committing to the finished pie — muscle memory for the pinch is short to learn.
- For ravioli and similar filled pasta, crimp firmly enough to expel trapped air; air pockets expand in boiling water and crack the pasta.
Good to know
- Definition
- A sealing and decorative technique in which two layers of dough (or a folded edge of a single layer) are pressed, pinched, or rolled along the perimeter to lock in a filling and create a patterned border.
- Primary contexts
- Pies, tarts, hand pies, pasties, empanadas, dumplings, pierogi, ravioli and other filled pasta, turnovers, calzones, and stuffed buns.
- Common tools
- Fingertips, fork tines, the back of a knife, a fluted pastry wheel, a ravioli/pasta crimping wheel, a pastry jagger, a bench scraper edge, or a plier-style pie crimper.
- Edge overhang
- About 1–2 cm (½–¾ in) of overhang is left before crimping; excess is trimmed with a knife or scissors so the rim is even and unbroken.
- Sealing agents
- Cold water, milk, egg wash, or a thin brush of melted butter applied to the lower edge before the top crust is laid on — moisture is what actually fuses the two layers.
- Working condition
- Dough should be cool, rested, and just thick enough to hold a shape; warm or overworked dough resists clean impressions and tends to crack.
- History note
- Decorative edge crimping on pies was a hallmark of 19th-century British and American home baking; fluted pastry wheels appear in European kitchens by at least the 18th century.
- Related skills
- Fluting, scoring, and docking — all edge-shaping techniques, but crimping is distinguished by acting on a sealed seam rather than a single sheet of dough.
Also called
Sealing · Sealing Filled Pasta · Fluting
Dishes that rely on it
Related

Whisk
Beat ingredients smooth and aerated with a looping wire motion

Sift
Pass dry ingredients through mesh to aerate and remove lumps

Strain
Pour through mesh to separate solids from liquid for a smooth result

Filter
Pass liquid through fine material to clarify out the smallest particles

Rice
Press cooked potatoes through small holes for fluffy, lump-free texture

Mash
Crush soft cooked food into a rustic, creamy purée

Grind
Crush food into a coarse to fine texture, from spices to meat

Grate
Shred food into fine bits against a sharp-toothed surface