Transform & Preserve
Dough Proofing
Letting yeasted dough rest and rise as fermentation builds gas, flavor, and structure.
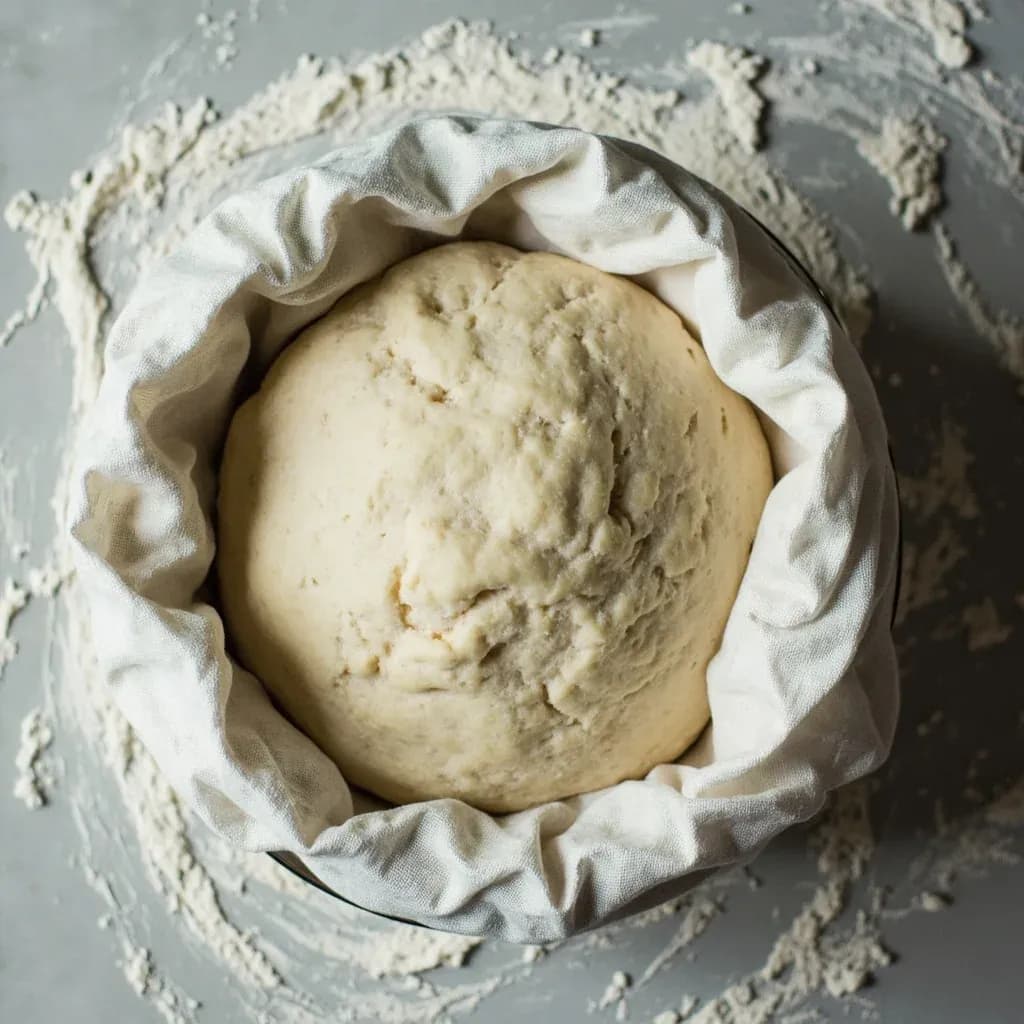
Proofing is the resting period during which yeast (or a sourdough starter) ferments the sugars in dough, producing carbon dioxide that inflates the gluten network and lifts the loaf. It happens after mixing and again after shaping, in a warm draft-free spot or a cool fridge for a slow, more flavorful rise. A properly proofed dough springs back slowly when poked; over-proofing collapses, while under-proofing yields a dense crumb.
Proofing is the final rise of yeasted dough after it has been shaped and before it goes into the oven — distinct from bulk fermentation, which is the first rise that happens before dividing. During proofing, the yeast (or wild culture in sourdough) consumes remaining sugars and produces carbon dioxide gas and ethanol, which inflate the gluten network that was built during mixing and bulk fermentation. This is the stage where a loaf's final volume, crumb structure, and a significant share of its flavor are set, so it deserves as much attention as kneading.
How long proofing takes and how the dough should feel depends on temperature, dough enrichment, and yeast activity. A warm proof at 75–85°F (24–29°C) typically takes 30–90 minutes and produces a soft, puffy dough ready to bake. A cold retard in the refrigerator (38–45°F) for 8–72 hours slows fermentation dramatically, giving wild yeasts and bacteria time to generate organic acids and esters that read as deeper, more complex flavor. Cold proofing also firms the dough for cleaner scoring and often yields a stronger oven spring when the loaf hits a hot baking surface.
The most common proofing mistakes are over- and under-proofing, and both are diagnosed the same way: with a floured finger pressed gently into the dough. A correctly proofed dough springs back slowly and leaves a slight indentation; one that snaps back quickly needs more time, while one that does not spring back at all and looks slack or has visible surface bubbles has gone too far.
- Difficulty
- Medium
Types & varieties
Standard final rise at 75–85°F; fastest method, used for daily loaves, rolls, and enriched doughs that risk collapsing if retarded.
Shaped dough held at refrigerator temperature (38–45°F) for 8–72 hours; the preferred method for sourdough and artisan loaves to develop flavor and make scoring easier.
A short 10–30 minute rest immediately after shaping and before the final proof or retard, used to relax gluten and prevent tearing; standard in baguette production.
Insulated cabinet with controlled temperature and humidity; used in bakeries and by serious home bakers for consistent, repeatable results.
Oven turned on briefly to warm, then off, with a pan of boiling water inside for humidity; a common DIY method that mimics a proof box.
Higher-heat, shorter-duration proof around 95–100°F; used in commercial bakeries to speed service but can stress yeast and flatten flavor.
Often long and cool, with an overnight cold retard, because wild-yeast activity is slower and more temperature-sensitive than commercial yeast.
How to do it
- 1
Shape the dough
After bulk fermentation, divide and pre-shape the dough, rest 15–25 minutes, then shape into the final form (loaf, rolls, boule, or batard). Handle gently from this point on to preserve the gas network built during bulk fermentation.
- 2
Place in a vessel or on a surface
Set the shaped dough seam-side up in a floured banneton, seam-side down on a parchment-lined sheet, or in a greased loaf pan. Choose the orientation you will bake from so the dough does not have to be flipped later.
- 3
Cover to prevent a skin
Cover with a lightly dampened (not wet) kitchen towel, plastic wrap, a couche, or a large inverted bowl so the surface stays moist and pliable. A dry skin will restrict oven spring and crack unevenly in the oven.
- 4
Proof at the right temperature
For a warm proof, set in a draft-free spot at 75–85°F (24–29°C). For a cold retard, refrigerate at 38–45°F (3–7°C) for 8–72 hours. Add humidity — a tray of warm water, a proof box, or a covered container — when the room is dry.
- 5
Test for doneness
Press a floured finger about ½ inch into the dough. It should spring back slowly, leaving a slight indentation. A quick snap-back means under-proofed; no spring-back and visible surface bubbles means over-proofed.
- 6
Score if needed
For crusty loaves, especially those that have been cold-proofed, score the top with a lame or sharp blade just before baking. Cold, firm dough scores cleanly; warm, fully proofed dough is harder to score without deflating.
- 7
Bake immediately
Transfer the dough to a preheated oven or baking surface without delay. Proofing continues at room temperature, so a loaf that sits waiting can over-proof and lose its oven spring.
Warm versus cold proofing
Choosing between a warm and a cold proof is one of the most useful decisions a home baker can make. The two methods are not interchangeable — they trade time for flavor and convenience.
- Warm proof (75–85°F, 30–90 min) is the default for weekday baking, soft rolls, cinnamon rolls, and any enriched dough that will collapse if held too long.
- Cold retard (38–45°F, 8–72 hr) is the artisan choice: flavor compounds accumulate, the schedule becomes flexible, and cold, firm dough scores cleanly with a lame.
- For most enriched doughs (brioche, babka, panettone), proof cooler and shorter — fat slows yeast, and excess warmth can cause a sudden collapse in the oven.
- If you cold-proof, plan to bake straight from the fridge or after only 20–45 minutes on the counter; warm dough that has already peaked will not improve with extra time.
Common uses
Tips & pitfalls
- Use the poke test rather than the clock: dough is ready when a floured finger pressed about ½ inch in springs back slowly and leaves a faint impression — timing alone is unreliable because room temperature and yeast activity vary.
- Under-proofed dough springs back quickly and feels tight; over-proofed dough will not spring back, may look slack or bubbly, and often collapses in the oven or gives a dense, gummy crumb.
- Cover shaped dough so it does not dry out — a damp (not wet) towel, plastic wrap, a couche, or an inverted large bowl all work. A dry skin restricts oven spring and cracks unpredictably.
- For enriched doughs (butter, eggs, sugar), proof on the cooler side around 75°F and watch closely — fat slows yeast activity, but excess warmth and sugar can push the dough past its peak quickly.
- Cold-proofing in the fridge is forgiving: you can often add 6–12 hours of slack and still bake a good loaf, and the cold, firm dough is much easier to score without deflating.
- Do not punch down or degas shaped dough — handle it gently from shaping onward so the gas network built during bulk fermentation survives to oven spring.
- Yeast activity roughly doubles for every 17°F (10°C) rise in temperature within its viable range, so a few degrees of room temperature noticeably shifts proofing time — watch the dough, not the clock.
- Avoid drafts: an unevenly cooled surface develops a thick skin that limits oven spring and bakes into a tough, cracked crust.
Good to know
- Also called
- Proving (British English); final fermentation; apprêt (French, the final rise)
- Stage of breadmaking
- The final rise, performed after shaping and before baking; distinct from bulk fermentation (first rise)
- Typical warm-proof temperature
- 75–85°F (24–29°C); cooler end for enriched doughs, warmer for lean doughs
- Typical warm-proof time
- 30–90 minutes for most yeasted doughs, depending on yeast activity, hydration, and enrichment
- Cold-proof (retard) range
- 38–45°F (3–7°C) for 8–72 hours; many artisan bakers default to 12–24 hours
- Doneness test
- The poke test — a floured finger pressed about ½ inch into the dough should spring back slowly and leave a slight indentation
- Ideal humidity
- 70–80% relative humidity; prevents a dry skin that would restrict oven spring and crust formation
- Flavor effect
- Slow, cool proofing develops organic acids, esters, and alcohols that translate into deeper, more complex bread flavor
Also called
Proofing · Proving · Resting Dough · Gehenlassen · Lievitazione · Long Dough Fermentation
Dishes that rely on it


Related

Confit
Cook slowly submerged in fat for silky tenderness and keeping

Cure
Draw out moisture with salt and time to preserve and concentrate

Pickle
Steep in acidic brine for bright, tangy, crunchy preservation

Ferment
Let friendly microbes transform food into tangy, complex flavor

Marinate
Soak in a seasoned mix to flavor and tenderize before cooking

Brine
Soak in salt water so meat stays juicy and seasoned throughout

Dehydrate
Slowly dry out moisture to concentrate flavor and extend shelf life

Cold-Smoke
Perfume cured food with smoke without cooking it through