Prep & Assembly
Whisking to the Ribbon Stage
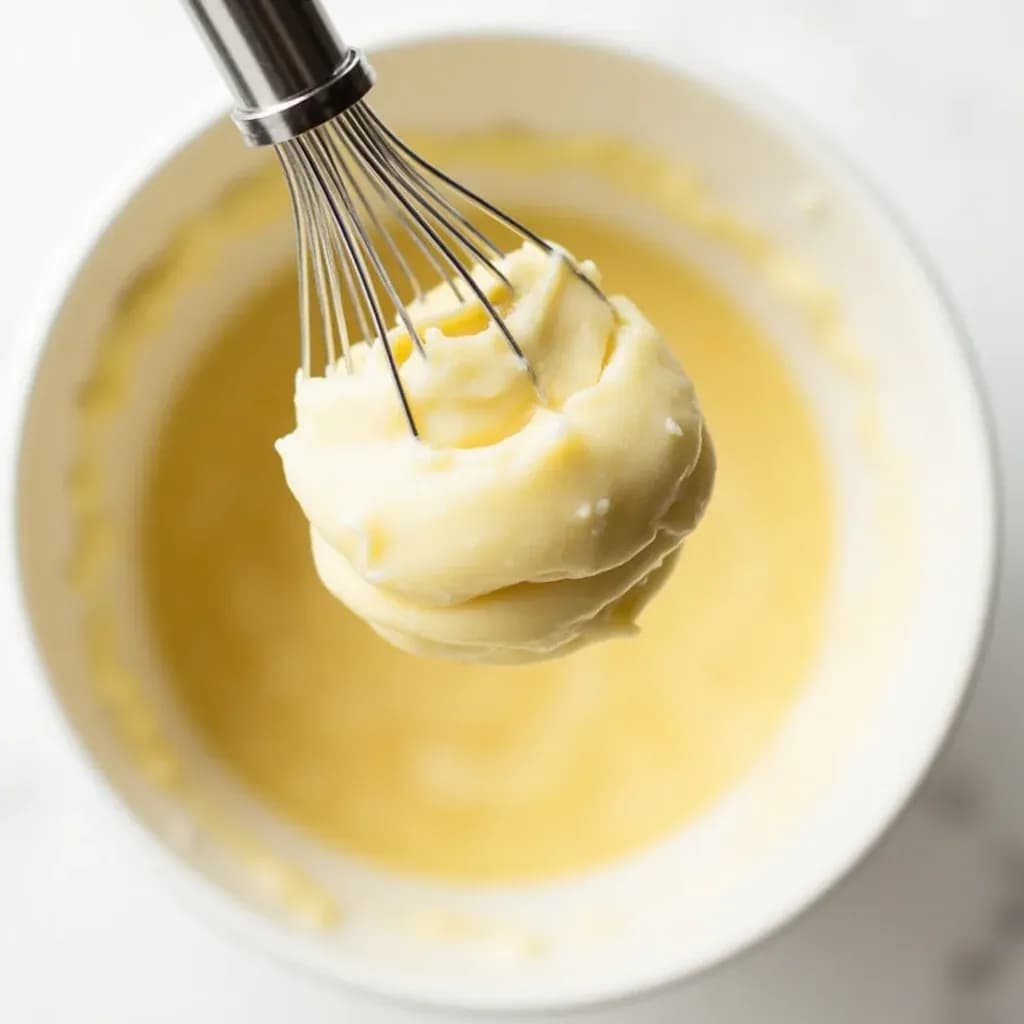
Beating eggs and sugar until thick and pale enough to fall in a slowly dissolving ribbon.
Whisking to the ribbon stage beats eggs (or yolks) and sugar until the mixture turns thick, pale, and aerated, so a lifted whisk leaves a ribbon that sits briefly on the surface before sinking. This stage incorporates air that gives sponge cakes, génoise, and zabaglione their light structure. Reaching it fully is essential before folding in flour so the batter does not deflate.
Whisking to the ribbon stage is the act of beating eggs and sugar together until the mixture has roughly tripled in volume, turned a pale ivory-yellow, and thickened into a glossy, pourable foam that falls from the whisk in a slow, continuous band. That falling band, which sits on the surface for a moment before melting back in, is the 'ruban' — and reaching it correctly is what gives genoise, madeleines, ladyfingers, financiers, and Japanese castella their characteristic tender, even crumb. The technique is less about raw force than about patience and visual reading: you are dissolving sugar into eggs while whipping in just enough air to support flour and butter, but not so much that the foam turns stiff and meringue-like.
The ribbon stage sits in the middle of the classical French foaming progression: it begins at mousseux (frothy, loose, full of large bubbles), passes through blanchir (whitened, opaque, and foamy), and arrives at ruban when the foam has become dense, elastic, and pourable. Many home cooks stop at blanchir or push the mixture all the way to peaks, and both errors matter — an under-whipped foam cannot lift flour, while an over-whipped one is too rigid to fold without deflating. The ribbon sits in the sweet spot: stable enough to hold flour and butter, fluid enough to pour, level, and bake into the even crumb that defines a good sponge.
The method you choose — warm over a bain-marie or cold from the start — changes the result subtly. Warming to 40–45°C dissolves sugar faster and lets the eggs hold more air, producing a taller, more resilient cake; the cold method is gentler on flavor, slightly less voluminous, and more forgiving for everyday baking. Either way, the visual and tactile test is the same: lift the whisk and watch the batter write a letter on the surface that takes two or three seconds to vanish.
- Difficulty
- Medium
Types & varieties
The standard version, made with whole eggs; the foundation of classic genoise, sponge rolls, and savoiardi.
Made with yolks only for richer, denser bases such as financiers, madeleines, and certain biscuit mixtures where extra fat is welcome.
Eggs and sugar whisked over a bain-marie to 40–45°C, then beaten off-heat; gives the most stable and voluminous ribbon.
Eggs and sugar whisked from the start without any heat; gentler flavor, slightly less volume, and the most common approach in home baking.
Sugar cooked to a light syrup (around 110°C / 230°F) and poured in a thin stream over already-whipped eggs, in the style of Italian meringue; produces an exceptionally stable ribbon and a very fine crumb.
How to do it
- 1
Gather and warm the eggs
Bring whole eggs or yolks to room temperature (20–30 minutes out of the fridge). If using the warm method, set a mixing bowl over a pan of barely simmering water, making sure the bottom of the bowl does not touch the water.
- 2
Combine eggs and sugar
Crack the eggs into the bowl, add the sugar, and whisk by hand just to combine. This prevents sugar from settling on the bottom and overcooking once the bain-marie is applied.
- 3
Warm over the bain-marie (warm method only)
Whisk constantly in a circular motion, scraping the sides, until the mixture reaches 40–45°C / 104–113°F — warm but not hot to the touch. Rub a pinch between your fingers: the sugar should feel completely dissolved with no grittiness.
- 4
Begin whipping
Transfer the bowl to a stand mixer fitted with the whisk attachment, or continue with a hand balloon whisk. Start on low for about 30 seconds to break up large bubbles, then increase to medium-high.
- 5
Whip to the ribbon
Beat for 5–8 minutes. The mixture will pass through the frothy mousseux stage, then whiten at blanchir, then thicken and lighten. Stop when the foam has roughly tripled in volume, turned pale ivory-yellow, and falls from the whisk in a slowly dissolving ribbon.
- 6
Confirm the ribbon
Lift the whisk 10–15 cm above the surface. The batter should drop in a thick, continuous band, sit on the surface for two or three seconds, and then slowly sink, as if writing a letter that disappears. If it sinks immediately, keep whipping; if it piles up stiffly, you have passed the ribbon stage.
- 7
Cool the foam (warm method only)
Continue beating off the heat for another 2–3 minutes, until the bowl feels neutral or only slightly warm. A cool foam holds its air far better when dry ingredients are folded in.
- 8
Fold in flavorings and dry ingredients
Fold in any melted butter, vanilla, or other liquids gently. Sift in the flour (with cocoa, ground nuts, or starch as the recipe calls for) in three additions, folding with a spatula in a J-motion — cut through the center, sweep along the bottom, and fold over the top — after each addition, just until no streaks remain.
Reading the Ribbon
The ribbon is a visual and tactile test, not a timed one, and the difference between a perfect ruban and a slightly under- or over-whipped foam shows up immediately in the finished cake. Lift the whisk 10–15 cm above the bowl and let the batter fall back onto the surface. A correct ribbon drops in a thick, continuous band, sits visibly on top of the foam for two to three seconds, and then slowly sinks, leaving a momentary 'letter' that dissolves. If the batter splashes in and disappears at once, the foam is still at the whitened stage and needs more time. If it piles up stiffly, folds over on itself, or stands in a peak, the mixture has moved past ribbon into a meringue-like state and will be difficult to fold without deflating. At the same moment, pinch a bit of the foam between thumb and forefinger: any grittiness means sugar has not fully dissolved, and either the bain-marie was not warm enough or the whipping time is too short.
- Under-ribbon foam sinks back instantly when dropped from the whisk and will produce a dense, heavy cake.
- Correct ribbon sits on the surface for 2–3 seconds before melting in, and writes a visible letter.
- Over-whipped foam piles up stiffly and holds a peak — closer to meringue than to sponge batter — and resists gentle folding.
The French Foam Progression
French pastry schools teach three named foam stages for whole-egg mixtures, and the ribbon is the middle one. Understanding where it sits explains why the technique feels so specific. Mousseux is the loose, large-bubbled foam you get after the first minute of beating. Blanchir is the next stage: the mixture has turned opaque and whitened but is still light and foamy, with a texture closer to shaving cream than to batter. Ruban is where the foam thickens, glosses, and becomes pourable. Beyond ruban, egg whites alone can be whipped to soft peaks, firm peaks, and the dry 'bec d'oiseau' (bird's beak) used for meringue; a whole-egg foam should never be taken that far, since it will lose its ability to flow into a level cake.
- Mousseux — frothy, loose, full of large bubbles; not yet a foam you can build on.
- Blanchir — whitened and opaque, but still light and aerated; many home bakers stop here by mistake.
- Ruban — thick, glossy, pourable, and the target for sponge-cake batters.
- Beyond ruban — territory reserved for egg whites and meringues, not for whole-egg sponge batters.
Common uses
Tips & pitfalls
- Test the ribbon by lifting the whisk and letting the batter fall back into the bowl; it should sit on the surface for 2–3 seconds before sinking — longer means over-whipped, instant means under-whipped.
- Rub a pinch of foam between your fingers to confirm the sugar has fully dissolved; any grittiness means the bain-marie was not warm enough or the whipping time was too short.
- When warming over a bain-marie, the bowl should feel barely warm, not hot — if the mixture feels like a baby's bottle, you have dissolved the sugar without risking scrambled eggs.
- Add the sugar in two or three additions rather than all at once; this lets you whip in more air and helps the sugar dissolve evenly.
- After warming, keep beating off-heat until the bowl returns to room temperature; folding flour into a warm foam deflates it almost immediately.
- Do not confuse the ribbon stage with whipped egg-white peaks: ribbon batter is pourable, glossy, and falls under its own weight, while peaks stand up and hold their shape when the whisk is lifted.
- Sift dry ingredients over the foam in three additions and fold with a spatula in a J-motion, cutting through the center, sweeping along the bottom, and folding over the top, to keep the incorporated air intact.
- Avoid plastic bowls when whipping eggs — they can harbor traces of fat that prevent the foam from building volume; use stainless steel, glass, or copper.
Good to know
- French name
- Au ruban (the ribbon)
- Stage family
- Part of the French foam progression: mousseux (frothy) → blanchir (whitened) → ruban (ribbon)
- Typical ratio
- Eggs to sugar by weight, generally 2:1; genoise runs around 1.5:1; financiers use yolks only
- Target temperature (warm method)
- 40–45°C / 104–113°F over a bain-marie, just warm to the touch
- Final volume
- Roughly triple the starting volume of eggs and sugar
- Final appearance
- Pale ivory to lemon-yellow, glossy, pourable, no visible sugar grains
- Mixing time
- Roughly 5–8 minutes off-heat after warming with a stand mixer; 8–12 minutes total by hand whisk
- Equipment
- Stand mixer with whisk attachment or large balloon whisk; stainless-steel, glass, or copper bowl; bain-marie for the warm method
- Egg state
- Room temperature for maximum volume; cold eggs whip to noticeably less air
Also called
Ribbon Stage · Whisking to Ribbon
Dishes that rely on it
Related

Whisk
Beat ingredients smooth and aerated with a looping wire motion

Sift
Pass dry ingredients through mesh to aerate and remove lumps

Strain
Pour through mesh to separate solids from liquid for a smooth result

Filter
Pass liquid through fine material to clarify out the smallest particles

Rice
Press cooked potatoes through small holes for fluffy, lump-free texture

Mash
Crush soft cooked food into a rustic, creamy purée

Grind
Crush food into a coarse to fine texture, from spices to meat

Grate
Shred food into fine bits against a sharp-toothed surface