Prep & Assembly
Applying Dry Rub
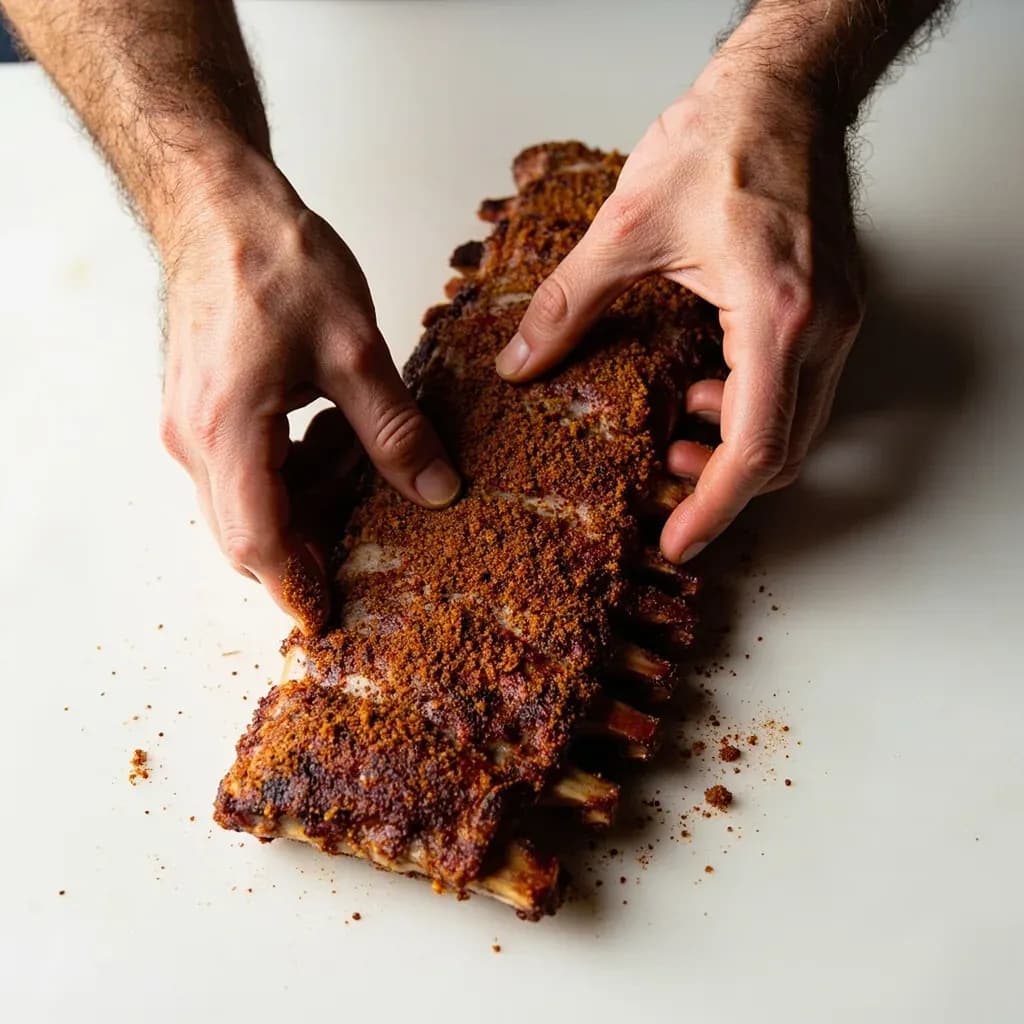
Coating meat in a blend of salt, sugar, and spices to season and form a flavorful crust.
Applying a dry rub massages a mixture of salt, sugar, and ground spices onto the surface of meat before cooking, especially for barbecue and grilling. The rub seasons the exterior and, during low-and-slow cooking, melds with the meat's surface to form a savory bark. It is applied anywhere from just before cooking to hours ahead so the salt can penetrate.
A dry rub is a blend of dry seasonings—salt, sugar, ground spices, and dried herbs—applied directly to the surface of meat without any liquid binder. The technique depends on a small amount of surface moisture to dissolve the salt and sugar, which then re-adheres to the meat as a thin, glistening paste. This "sweat" is what holds the rub in place through hours of cooking and forms the dark, intensely flavored crust that barbecue cooks call bark.
Beyond flavor, a rub does real work: salt seasons the outer layer of meat through osmosis, sugar fuels the Maillard browning that gives bark its color and crunch, and spices create the regional or personal signature. Because nothing is diluted with oil or liquid, the seasoning stays concentrated on the surface rather than soaking in, which is why a rub is the chosen method for low-and-slow barbecue where you want a defined crust over a long cook.
The trade-offs come from those same ingredients. Salt left on lean cuts for too long can cure the surface and dry it out; sugar scorches above roughly 275°F (135°C) and turns bitter. Knowing the ratio of salt to sugar to spice—and matching the rub to the cooking method—is what separates a good bark from a burnt one.
- Difficulty
- Easy
Types & varieties
Minimalist blend of coarse kosher salt and coarse black pepper, sometimes with a little garlic powder. Built for beef brisket to let the meat flavor dominate and form a peppery bark.
Sweet and mildly spiced, built on brown sugar and paprika with garlic, onion, chili powder, and cayenne. Traditional on pork ribs and shoulder, often served with a tomato-free, vinegar-or-mustard-based sauce.
Balanced sweet-spicy profile of brown sugar, paprika, chili powder, garlic, and black pepper. An all-purpose blend for ribs, chicken, and pork.
Lighter on sugar, heavier on chili, cumin, and pepper. Designed to play well with the region's vinegar- or mustard-based sauces.
Built on allspice and Scotch bonnet or habanero, layered with thyme, cinnamon, ginger, cloves, and garlic. Traditional on chicken and pork.
Paprika-forward with cayenne, garlic, onion, oregano, thyme, and white pepper. Versatile on chicken, pork, and firm-fleshed fish.
Modern barbecue blends that add finely ground coffee or unsweetened cocoa for depth and darker color on brisket and beef ribs.
Dried rosemary, thyme, sage, and garlic, kept low in sugar to prevent burning. Suited to lamb, poultry, and pork loin.
How to do it
- 1
Trim and dry the meat
Trim off loose fat, silverskin, and any ragged edges. Pat the entire surface thoroughly with paper towels until visibly dry. The meat should feel tacky, not wet, so the rub can grab on without sliding or clumping.
- 2
Prepare the rub
Measure the rub into a small bowl or shaker. If it has hardened from humidity or age, break it up with a fork or pulse it briefly in a spice grinder, then sift it through a fine mesh strainer. Aim for a uniform, sand-like texture so it spreads evenly.
- 3
Apply a thin, even first coat
Sprinkle or shake the rub lightly over the top surface, holding your hand or shaker about 12 inches above so it falls like dust. Turn the meat and repeat on all sides, edges, and any crevices. Resist heaping it on; you can always add more.
- 4
Press the rub into the meat
With clean, dry hands or food-safe gloves, pat the rub gently but firmly across every surface. The goal is contact, not rubbing—pressing forces the granules into the meat's moisture channels so they adhere rather than sitting loosely on top.
- 5
Check coverage and add a second pass if needed
Look for pale spots and dust them. For thick or lean cuts, a second light pass followed by another gentle press improves coverage without oversalting.
- 6
Rest so the rub sweats in
Set the meat on a rack set over a tray or sheet pan. At room temperature, 30–60 minutes is enough for the salt to pull moisture and form a glistening paste. For deeper flavor and a drier surface, refrigerate uncovered for 4 to 24 hours.
- 7
Cook using the matched method
Smoke, grill, roast, or sear according to the cut. Low-and-slow cooking at 225–275°F (107–135°C) lets the rub form a true bark; higher-heat cooks benefit from a lower-sugar rub or a later application. Baste or sauce only after the crust has set, if at all.
- 8
Rest the cooked meat before slicing
Let the meat rest loosely tented with foil for 15–30 minutes (longer for large briskets and shoulders). The interior juices redistribute and the bark firms up, so it slices cleanly instead of tearing.
The science of the sweat
The defining moment of applying a rub is not the sprinkling—it is the rest that follows. Salt draws moisture out of the meat's surface by osmosis; that moisture dissolves the surrounding sugar, salt, and soluble spices into a wet paste that re-adheres to the protein. As the paste dries, the surface becomes tacky and the rub is locked in place. This is why covering the meat in rub and immediately throwing it on the grill often gives patchy, falling-off seasoning, while a rested rub forms a continuous shell. The same principle is why uncovered refrigeration works so well: the dry air of the fridge pulls that moisture back out, leaving a firm, seasoned surface ready for the Maillard browning of the cook.
Matching the rub to the cut and the cook
Rubs are not one-size-fits-all. A high-salt, high-sugar blend that produces a stunning bark on a 14-hour brisket will turn to ash on a 6-minute seared steak. The two levers to balance are salt density (how much rub per pound) and sugar content (how dark and fast the surface will brown). Lean, quick-cooking cuts like chicken breast, pork tenderloin, and fish want a lighter hand and less time between salting and cooking. Fattier, long-cooking cuts like brisket, rib, and shoulder tolerate—and reward—generous salting, sugar, and overnight rests. Heat is the other dial: above 275°F (135°C), sugar begins to scorch, so high-heat cooks call for lower-sugar blends or for the rub to be applied later in the process.
Rub vs. marinade vs. brine
A rub seasons only the surface, leaving the interior flavor of the meat to speak for itself. A marinade uses acid and oil to carry flavor several millimeters into the meat and to tenderize the surface. A brine soaks the cut in salted liquid so seasoning penetrates throughout and the meat holds more moisture during cooking. Each has its place: rubs for bark and concentrated surface flavor, brines for lean white meat and pork chops that dry out easily, marinades for quick flavor on weeknight steaks and vegetables. Many cooks combine them—brining a turkey, then rubbing the skin, for example.
Common uses
Tips & pitfalls
- Pat the meat thoroughly dry with paper towels before applying; surface moisture helps the rub stick but pooled water dilutes it and causes clumping.
- Weigh or measure the rub. Estimating almost always leads to oversalting, especially on small cuts—start with roughly 1–2 tablespoons per pound and adjust to taste.
- Press the rub into the meat with clean, dry hands rather than sweeping it on. Patting grips the surface and prevents fall-off during the cook.
- Let the rubbed meat rest uncovered in the refrigerator for at least 1 hour, ideally overnight on a rack; the dry air firms the surface and helps a better bark form.
- If the rub clumps, sift it through a fine mesh strainer or break it up with a fork before applying; pre-ground spices absorb moisture and harden over time.
- Apply salt-heavy rubs close to cook time on lean cuts (chicken breast, fish, pork tenderloin) to avoid drawing out too much moisture and curing the texture.
- Keep sugar-heavy rubs away from direct, very high heat unless applied late in the cook, or they will scorch and turn bitter above 275°F (135°C).
- Do not reuse rub that has touched raw meat, and store leftover rub in a labeled, dated jar away from heat and light; if it smells flat or dusty, replace it.
Good to know
- Technique type
- Dry seasoning application (no liquid binder)
- Primary purpose
- Season meat and form a flavorful surface crust, especially during low-and-slow cooking
- Core components
- Salt, sugar, ground spices, dried herbs—no oil or liquid
- Typical ratio
- 1–2 tablespoons of rub per pound of meat, adjusted for saltiness and cut
- Rest after applying
- 30 minutes minimum; 1–4 hours typical; overnight refrigerated for thick cuts
- Common heat range
- 225–275°F (107–135°C) for low-and-slow smoking; up to 350°F (175°C) for shorter cooks
- Surface prep
- Meat patted dry with paper towels and trimmed of loose fat and silverskin
- Storage of mixed rub
- Airtight jar in a cool, dark place, 3–6 months; whole-spice versions keep longer
Also called
Dry-Rub Seasoning · Dry Rubbing · Seasoning with Rub
Dishes that rely on it
Related

Whisk
Beat ingredients smooth and aerated with a looping wire motion

Sift
Pass dry ingredients through mesh to aerate and remove lumps

Strain
Pour through mesh to separate solids from liquid for a smooth result

Filter
Pass liquid through fine material to clarify out the smallest particles

Rice
Press cooked potatoes through small holes for fluffy, lump-free texture

Mash
Crush soft cooked food into a rustic, creamy purée

Grind
Crush food into a coarse to fine texture, from spices to meat

Grate
Shred food into fine bits against a sharp-toothed surface