Heat & Fire
Pan-Searing
Cooking food in a hot pan to form a browned, flavorful crust on the surface.
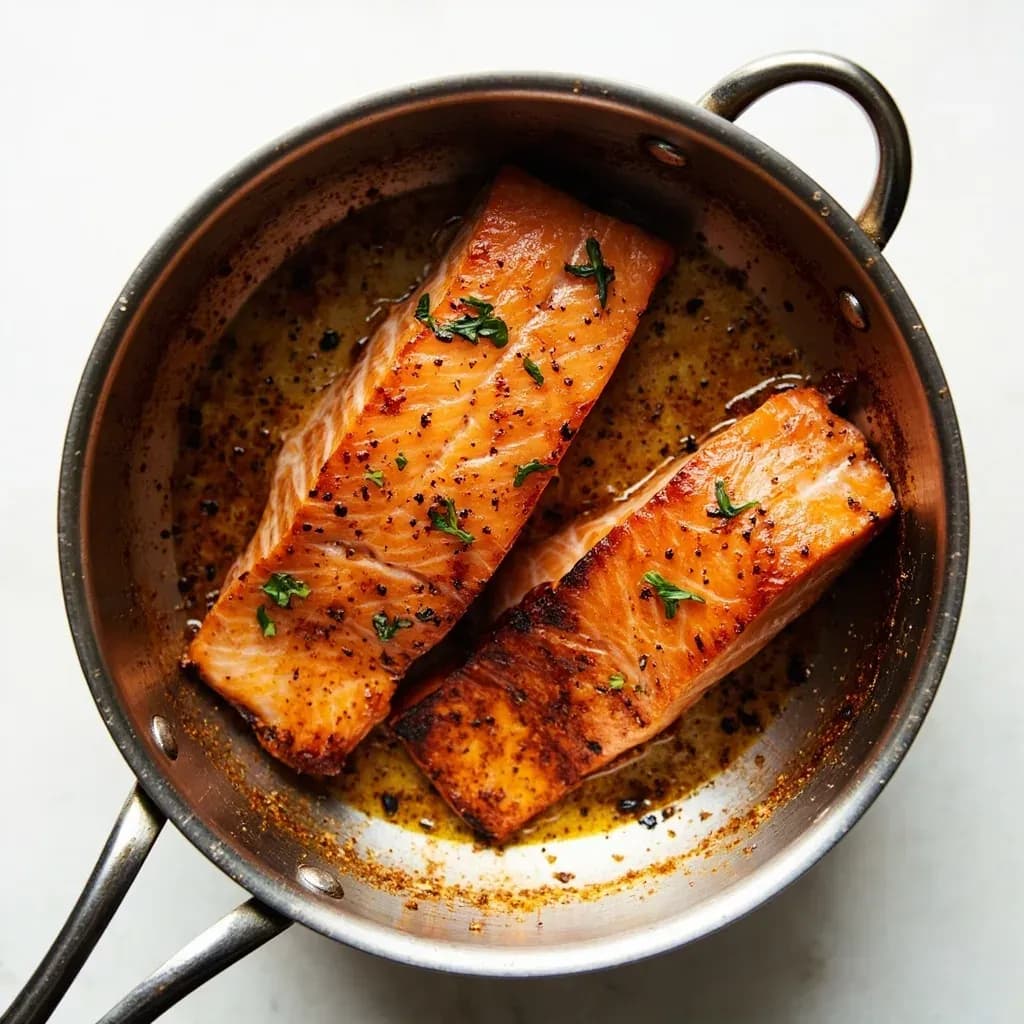
Pan-searing cooks food in a hot, lightly oiled pan so the surface browns rapidly via the Maillard reaction, creating a savory crust and contrasting tender interior. It is the go-to method for steaks, fish fillets, scallops, and chicken breasts. A properly preheated pan and a dry food surface are crucial, since excess moisture steams the food instead of letting it sear.
Pan-searing is the dry-heat workhorse of the home kitchen: food laid into a very hot, lightly oiled pan until its surface transforms from pale and raw into a deep, crusted brown. That crust is the product of the Maillard reaction — amino acids and sugars recombining at temperatures above roughly 280°F / 140°C to produce hundreds of new aromatic compounds — alongside surface caramelization of the food's natural sugars. Together they deliver the savory, almost meaty depth that distinguishes a properly cooked steak or chop, and the same chemistry gives a sautéed mushroom or cauliflower steak its character.
What separates a good sear from a grey, steamed disappointment is straightforward but unforgiving: the contact between pan and food must stay hot and dry. Surface moisture drops the local temperature below the browning threshold, and overcrowding the pan does the same by trapping steam. The long-held belief that a hard crust "seals in juices" has been disproven — the crust adds flavor and texture, not moisture retention — but that does not make it any less worth pursuing. Get the fundamentals right — dry food, hot enough pan, enough space — and the technique becomes one of the most forgiving in the kitchen, repeatable across steaks, fish, vegetables, and tofu with only minor adjustments.
The legacy of a good sear also lives on in the pan itself. The browned bits — the fond — that cling to the metal after the food is removed are concentrated flavor, and they become the foundation of any pan sauce when deglazed with wine, stock, or citrus. Skip the deglaze and you are throwing away the best part of the cook.
- Difficulty
- Easy
Types & varieties
Cooking in a hot, un-oiled pan — common for cured meats like bacon or skin-on duck breast, where the food releases its own fat as it heats
Standard method: a thin film of high-smoke-point oil in a preheated pan; the default approach for steaks, chops, and fish fillets
Sear in oil, then finish with whole butter, aromatics, and a spoon-over basting motion; classic for steak and pan-seared fish
Maximally dark crust, often the first step before braising or pot-roasting to build fond for the cooking liquid
Brief contact — 30–60 seconds per side — for tuna, scallops, or thin-cut vegetables where a rare or crisp-tender center is desired
Sear on high heat then slide the pan to a cooler burner to finish gently; reduces smoke in a home kitchen
How to do it
- 1
Choose the right pan
Select a heavy pan that holds heat well — cast iron, carbon steel, or 3-ply stainless steel. Thinner pans cool too quickly when cold food hits them, ruining the sear.
- 2
Prepare the food
Pat the protein or vegetables thoroughly dry with paper towels. Season generously with salt (and pepper if desired). If time allows, salt 40 minutes ahead and let rest uncovered on a rack in the refrigerator so the surface dries further.
- 3
Preheat the pan
Place the empty pan over medium-high to high heat for 3–5 minutes. Test by flicking a few drops of water onto the surface — they should bead up and dance across the metal rather than immediately boiling off.
- 4
Add the fat
Pour a thin film (about 1 tablespoon for a 12-inch skillet) of high-smoke-point oil — avocado, refined grapeseed, or clarified butter — and swirl to coat. The oil should shimmer and just barely begin to ripple.
- 5
Lay the food in and leave it alone
Place each piece down away from you to avoid splatter. Do not shift, nudge, or flip for at least 2 minutes. Listen for a steady sizzle; if the sound dies, the pan was too cool or is overcrowded.
- 6
Watch for the release
The crust has formed when the food moves freely if you nudge it with tongs. If it sticks, give it another 30–60 seconds. Forcing it tears the crust.
- 7
Flip and finish
Turn once with tongs or a fish spatula. Cook the second side for a similar time, or transfer to a 400°F oven to finish thicker cuts to target internal temperature (125°F for medium-rare steak, 115°F for salmon).
- 8
Optional: baste with butter and aromatics
For the final minute, add a knob of whole butter, smashed garlic, thyme, or rosemary. Tilt the pan and spoon the foaming fat over the food repeatedly to add color and flavor.
- 9
Rest, then deglaze
Transfer the seared food to a warm plate or rack and rest 5–10 minutes. Pour off excess fat, then deglaze the pan with wine, stock, or citrus, scraping up the fond to make a quick sauce.
Equipment and Pan Choice
The pan you choose sets the ceiling for how good your sear can be. A heavy pan — cast iron, carbon steel, or tri-ply stainless steel — has the thermal mass to recover quickly when cold food hits it and to hold a steady temperature across the surface. A lightweight aluminum skillet chills the moment a steak is laid in, and the surface drops below the browning threshold within seconds. Nonstick pans are a special case: they technically brown food, but their coatings degrade above roughly 500°F and the surface rarely reaches the temperatures needed for a true hard crust.
- Cast iron — the traditional choice; excellent heat retention; naturally nonstick once seasoned; needs careful drying after washing to prevent rust
- Carbon steel — similar performance to cast iron but lighter; the standard in restaurant kitchens; must be seasoned
- Tri-ply or clad stainless — heats evenly and is oven-safe, useful when finishing thick cuts in the oven
- Nonstick — surface temperatures stay too low for a hard crust, and coatings break down at high heat; not recommended for true searing
- A 10- to 12-inch skillet is the most versatile size; larger pans heat unevenly, smaller ones crowd the food
Common uses
Tips & pitfalls
- Dry the surface — pat food with paper towels until no surface moisture remains; this is the single biggest factor between a true sear and grey, steamed food
- Preheat the pan longer than you think — 3–5 minutes over medium-high or high, until a drop of water shimmers and skitters across the surface (Leidenfrost test)
- Salt well in advance — salting 40–60 minutes (or overnight dry-brine) before cooking draws moisture up, then reabsorbs it, seasoning deeply and aiding browning
- Never overcrowd the pan — leave at least a thumb-width between pieces or work in batches; overcrowding drops pan temperature and traps steam
- Resist the urge to move or peek — the crust releases itself when it is ready; forcing it tears the food and the browning
- Match the fat to the heat — sear in a neutral high-smoke-point oil, then finish with butter for flavor; whole butter's milk solids scorch above ~350°F
- Ventilate — pan-searing produces smoke; use a hood fan, open a window, or work on an outdoor burner for heavy jobs
- Deglaze the fond — after removing the food, splash in wine, stock, or citrus to lift the browned bits into a pan sauce; that fond is concentrated flavor
Good to know
- Heat method
- Dry-heat conduction through a metal pan, typically 400–500°F / 200–260°C at the cooking surface
- Primary chemistry
- Maillard reaction (browning of proteins and sugars) starting around 280°F / 140°C, plus surface caramelization of natural sugars
- Ideal pan materials
- Cast iron, carbon steel, and heavy-gauge stainless steel — all retain high, even heat
- Pan size rule
- Food should cover roughly two-thirds of the pan surface; more causes steaming rather than searing
- Typical fat options
- High smoke point fats only — avocado oil (~520°F), refined grapeseed (~450°F), clarified butter or ghee (~450°F), light olive oil (~465°F)
- Surface prep
- Pat food completely dry with paper towels; surface moisture must be below the visible threshold or it will steam instead of sear
- Time per side
- Roughly 2–4 minutes per side for a 1-inch steak; thinner cuts may need only 60–90 seconds
- Resting after sear
- Most seared proteins benefit from 5–10 minutes of rest so juices redistribute before slicing
Also called
Searing · Sofreir
Dishes that rely on it
Related

Sear
Blast the surface hot for a deep-browned, savory crust

Sauté
Cook quickly in a little fat over lively heat, tossing as you go

Stir-Fry
Toss bite-sized pieces over roaring heat for fast, smoky cooking

Pan-Fry
Crisp food in a shallow layer of hot fat, turning once or twice

Deep-Fry
Submerge in hot oil for an all-over crackling crust

Roast
Cook uncovered in dry oven heat for browned edges and tender centers

Bake
Cook with steady, surrounding oven heat — the soul of bread and pastry

Broil
Hit food from directly above with fierce overhead heat