Transform & Preserve
Brining
Soaking food in salt water to season it throughout and keep it moist and tender.
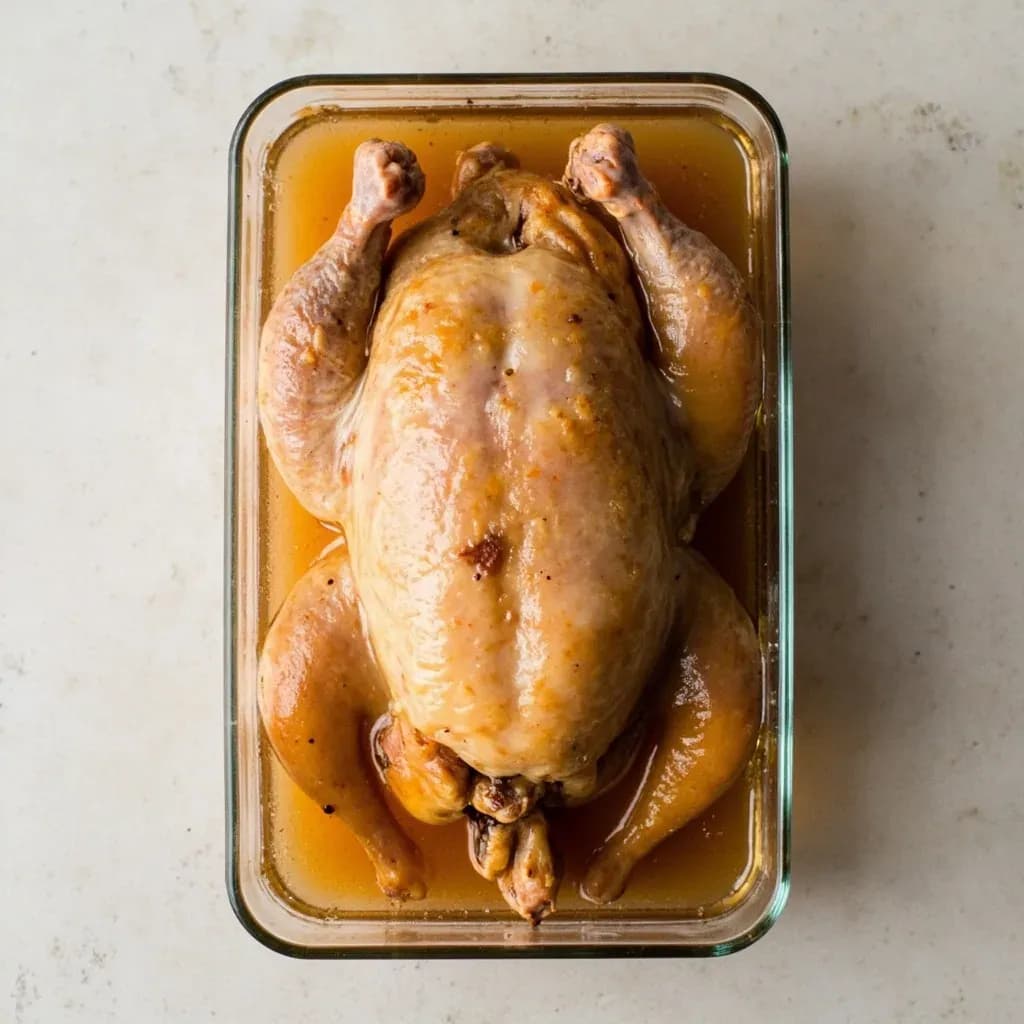
Brining submerges meat, vegetables, olives, or cheese in a salt-water solution so the salt penetrates deep, seasoning from within and helping proteins hold moisture during cooking. A wet brine can also carry sugar and aromatics, and longer soaks begin a mild preservation as with olives and cured cabbage. The salt alters the protein structure so the food retains more water, yielding noticeably juicier roasted poultry and pork.
Brining is the practice of soaking food in a salt solution — or salting it directly on the surface — before cooking. The salt denatures muscle proteins, causing them to unwind and reorganize in a way that traps and holds water more efficiently as the food cooks. That extra retained water is what keeps a brined turkey breast juicy at 165°F or a brined pork chop tender after a few minutes on a hot grill. Beyond moisture, the salt seasons the food from the inside out, and when sugar or aromatics are added to the brine, those flavors travel with the salt deep into the flesh.
Brining earns its place most often with lean, mild-flavored proteins that lack the intramuscular fat to keep them moist: turkey, chicken breast, pork chops, pork loin, Cornish hens, and shrimp. It is wasted on fatty, well-marbled cuts like ribeye or brisket, and actively harmful on delicate fish fillets, which can cure in minutes and turn mushy. The technique is distinct from marinating, which is acid- or oil-based surface flavoring, and from curing, a longer preservation process that often uses nitrates.
Done well, brining is forgiving: the food is hard to overcook to dryness and gains noticeable flavor depth. Done badly — with the wrong salt, the wrong ratio, or too long in the bath — the result tastes closer to ham than to dinner. The whole technique comes down to three habits: measure by weight or by the standard ratio, keep everything cold, and time it by the pound.
- Difficulty
- Easy
Types & varieties
The classic method: salt (and often sugar and aromatics) dissolved in water and cooled, with the food submerged.
Salt rubbed directly onto the food's surface. Moisture drawn out dissolves the salt and is reabsorbed. Often called koshering.
Adds brown or white sugar (and sometimes maple syrup or molasses) to balance salt and encourage browning.
Infused with herbs, garlic, peppercorns, bay leaves, citrus zest, or allspice for layered flavor.
A precise modern approach in which salt is matched to the exact combined weight of meat and water, so the final product is reliably seasoned but not oversalted.
Brine pushed into thick cuts or whole birds with a meat injector to speed penetration and ensure the interior is reached.
A vinegar-based preserving liquid rather than a water-based seasoning brine; the two terms are often used interchangeably.
How to do it
- 1
Choose your ratio and salt type
Plan on about 1 cup kosher salt per gallon of water for a standard wet brine, or 1/2 cup for a milder poultry brine. For a dry brine, plan 1/2 teaspoon kosher salt per pound of meat. Always use non-iodized kosher or pickling salt.
- 2
Dissolve salt (and sugar, if using)
Heat about a quarter of the measured water in a pot, add the salt (and sugar, usually equal parts to salt for a sweet brine), and stir until fully dissolved. Sugar is optional but helps with browning and balances flavor.
- 3
Add aromatics, then chill the brine
Off the heat, add aromatics such as bay leaves, peppercorns, crushed garlic, thyme, or citrus zest. Pour the concentrate into the remaining cold water and refrigerate until the brine is at or below 40°F (4°C). Never add food to a warm brine.
- 4
Submerge the food
Place the food in a non-reactive container (stainless steel, food-grade plastic, or glass — never aluminum or cast iron, which can react with salt). Weigh it down with a plate if needed so it stays fully under the brine.
- 5
Refrigerate and time it correctly
Keep the food refrigerated the entire time. A rough guide is 1 hour per pound for whole poultry and large roasts, 1 to 4 hours for chicken parts and pork chops, and 30 minutes or less for shrimp and thin fish fillets. When in doubt, err on the short side.
- 6
For thick cuts or whole birds, consider injecting
Use a meat injector to push some cooled brine into the thickest parts of large items (turkeys, whole chickens, pork loins) in a grid pattern. This speeds penetration and ensures the interior is seasoned.
- 7
Remove, rinse, and dry
Lift the food out of the brine, discard the brine, rinse briefly under cool water to remove excess salt from the surface, and pat very dry with paper towels. Dry skin and surfaces are essential for crisp browning.
- 8
Cook immediately, optionally air-dry
Cook the food right away, or for poultry, refrigerate uncovered on a rack for several hours or overnight to dry the skin further. This step yields noticeably crisper roasted or grilled skin.
Brining versus marinating and curing
The three techniques are easy to confuse, but they work on different principles and timelines. Understanding the difference prevents the most common kitchen mistakes with each one.
- Marinating relies on acid (citrus, vinegar, wine) and oil to flavor and sometimes tenderize the surface of food. It is rarely a deep-penetration technique and works in minutes to a few hours. Brining uses salt, not acid, and works through protein denaturation and osmosis over hours.
- Curing is a preservation technique that uses heavy salt (and often nitrates or nitrites) over days or weeks to draw out enough moisture that bacteria cannot grow. Corned beef, bacon, and gravlax are cured, not brined in the kitchen sense. A short overnight brine is a seasoning step; a multi-day salt treatment is curing.
- Brining is a seasoning and moisture step; it does not preserve food. Anything brined for a few hours and then cooked behaves like fresh food, not preserved food.
When not to brine
Brining is a targeted tool. Applying it to the wrong cut wastes effort or ruins the dish.
- Skip fatty, well-marbled steaks and roasts. The fat already protects them from drying out, and brining pushes them toward an overly salty, ham-like profile.
- Do not brine already-salted products such as ham, bacon, prosciutto, pancetta, or most deli meats. They will become inedibly salty.
- Be cautious with delicate fish fillets (sole, flounder, tilapia). They absorb salt in minutes and turn mushy. Firmer fish like salmon can take a brief 10–15 minute brine.
- Whole small fish like sardines and anchovies are essentially cured by salt; do not add a wet brine on top.
Common uses
Tips & pitfalls
- Use kosher salt, not iodized table salt — iodine can taste bitter and the anti-caking agents cloud the brine.
- Always chill the brine completely before adding food; warm brine promotes bacterial growth and can partially cook the surface.
- Measure by weight or by the standard ratio, not by taste. A brine that tastes like seawater is almost always over-salted.
- Err on the short side with timing. Over-brined meat tastes cured rather than seasoned and can develop a ham-like texture.
- Rinse and thoroughly pat dry the food before cooking so the skin crisps and the surface browns instead of steaming.
- Skip brining for already-salted cuts (ham, bacon, prosciutto) and for fatty steaks — the fat already keeps them moist.
- Add sugar only when it suits the dish; it promotes browning but can scorch at high heat, so watch grill and oven temperatures.
- For whole birds, loosen the skin and rub some dry brine directly onto the breast meat for faster, more even seasoning.
- Save the strained aromatics from the brine and nestle them around the meat while roasting for extra flavor.
Good to know
- Typical wet-brine ratio
- About 1 cup (≈230 g) kosher salt per gallon (3.8 L) of water, roughly a 6% solution; milder poultry brines use 1/2 cup.
- Typical dry-brine ratio
- About 1/2 teaspoon kosher salt per pound (≈450 g) of meat, rubbed directly onto the surface.
- General brining time
- Roughly 1 hour per pound for whole poultry and large roasts; 1 to 4 hours for chicken parts and pork chops; 30 minutes to 2 hours for cutlets; 15–30 minutes for thin cuts and shrimp.
- Salt type
- Non-iodized kosher or pickling salt; iodized table salt can taste metallic and its anti-caking agents cloud the brine.
- Brine temperature
- Brine must be fully chilled (≤40°F / 4°C) before food is added, and food must stay refrigerated the entire time.
- Mechanism
- Salt denatures muscle proteins so they bind and hold more water during cooking; some salt also penetrates the meat, seasoning it from within.
- Best candidates
- Lean, mild meats prone to drying out: turkey, chicken, pork chops, pork loin, Cornish hens, and shrimp.
- Yield effect
- A properly brined bird can retain 10–20% more moisture during roasting than an unbrined one.
- History
- Brining predates refrigeration and was used to preserve meat and fish; the corned-beef process is essentially a multi-day brine with curing salts.
- Difficulty
- Low — the main risks are oversalting and unsafe temperature, not technical execution.
Also called
Brine · Salt-Water Soak · Wet Brine
Dishes that rely on it
Related

Confit
Cook slowly submerged in fat for silky tenderness and keeping

Cure
Draw out moisture with salt and time to preserve and concentrate

Pickle
Steep in acidic brine for bright, tangy, crunchy preservation

Ferment
Let friendly microbes transform food into tangy, complex flavor

Marinate
Soak in a seasoned mix to flavor and tenderize before cooking

Brine
Soak in salt water so meat stays juicy and seasoned throughout

Dehydrate
Slowly dry out moisture to concentrate flavor and extend shelf life

Cold-Smoke
Perfume cured food with smoke without cooking it through