Heat & Fire
Charring Chiles
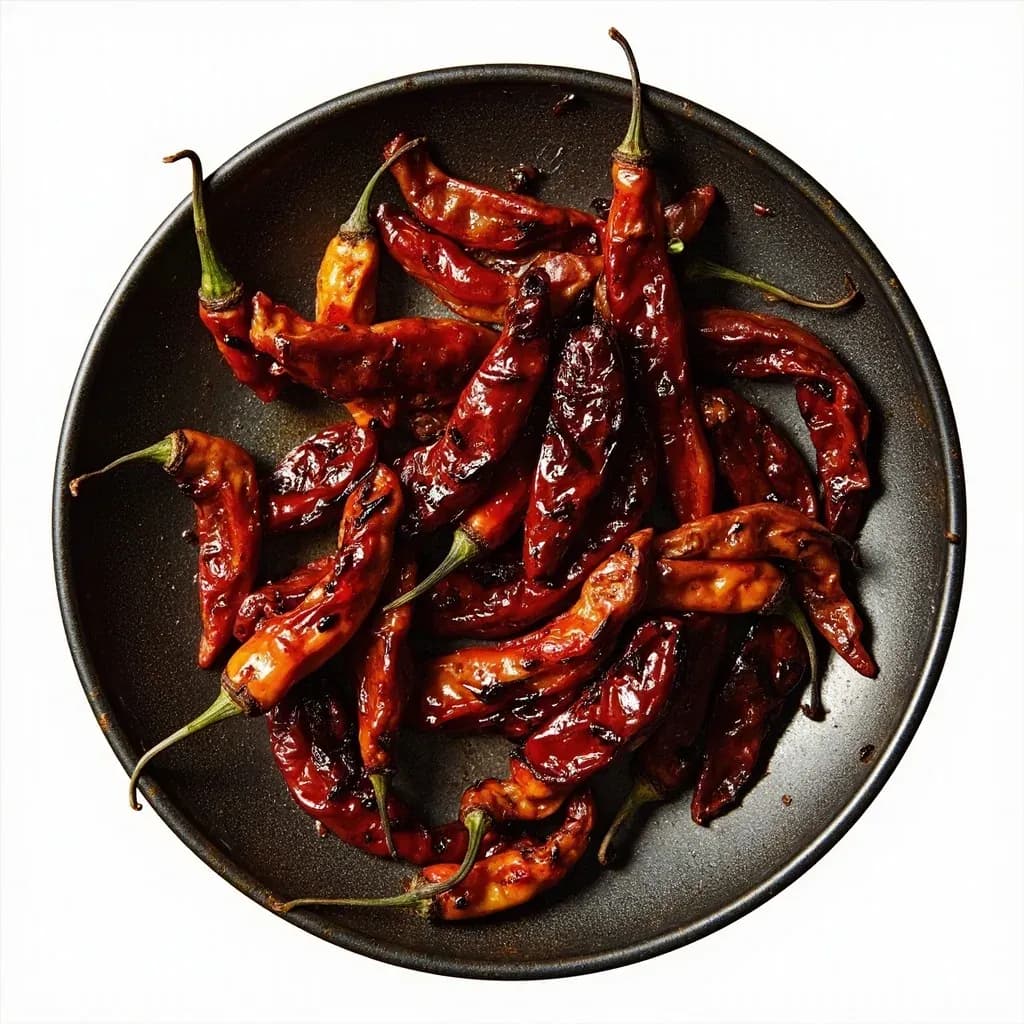
Blistering chiles over flame to blacken the skin for peeling and deep smoky flavor.
Charring chiles holds them directly over a flame, on a comal, or under a broiler until the skin blackens and blisters. The charred skin steams loose for easy peeling and the process develops a smoky, roasted depth central to salsas and chile sauces. Resting the charred chiles covered helps the skins slip off cleanly.
Charring chiles is the foundational fire technique behind a wide swath of Mexican, Southwestern, Thai, Sichuan, Korean, and Indian cookery. A fresh chile is held over direct, dry heat — a gas flame, charcoal embers, a smoking comal, or a hot broiler — until its skin blisters into a brittle black shell while the flesh underneath softens, steams in its own moisture, and develops a deep, smoky sweetness. The blackened skin is then either rubbed off under water to reveal tender, silken flesh, or left in place and blended smooth into a salsa or paste.
The value of the technique sits in the chemistry. High dry heat breaks down cell walls, drives Maillard browning, and transforms the raw, grassy sharpness of a fresh chile into something rounder and more layered than steaming, boiling, or sautéing can reach. The capsaicin-bearing placental tissue softens and releases its heat more readily, and the sugars in the flesh caramelize against the blackened skin. Done right, a charred chile tastes simultaneously hotter, sweeter, and more savory than its raw counterpart — the green, vegetal bitterness replaced by woodsmoke, sweet pepper, and earthy depth.
The same logic applies to the dried chiles of Mexican and Sichuan pantries, though the move is gentler. Guajillo, pasilla, ancho, mulato, and árbol are toasted briefly on a hot comal to wake their seed oils, then soaked. That is a cousin technique — toasting and rehydrating — not the same as flame-blistering a fresh chile. The two are often confused in modern recipes, but the goal and the cookery are distinct: blacken and peel fresh, awaken and soak dried.
- Difficulty
- Easy
Types & varieties
Large, mild, thick-walled; classic for rajas and chiles rellenos. Needs longer over flame — usually 4–6 minutes — because of the flesh depth.
Long, mild-to-medium; the Southwestern green chile staple, often flame-roasted in autumn batches by the bagful.
Small to medium, medium heat; charred whole for nachos, salsas, and as a pickling base.
Thin-walled and hot; chars in under two minutes. Pull the moment the skin splits, or the flesh collapses.
Usually sold dried; briefly toasted on a comal to awaken aroma, then soaked — not flame-blistered whole.
Dried Mexican chiles dry-toasted on a comal until pliable and fragrant, then soaked. Related but distinct technique.
Thin and very hot; quick char or dry-toast, common in salsas and Mexican chili oils.
Red, medium-heat; charred for table salsas using the same treatment as jalapeño.
Charred dry in a wok or pan for nam jim jaew and Thai curry pastes; cooks in under a minute.
Sichuan dried chile; dry-roasted until fragrant and lightly darkened for chili oils and dry-fried dishes.
Broiled or flame-charred for Korean chile condiments and fermented pastes.
How to do it
- 1
Select and prep the chiles
Choose firm, unblemished chiles of similar size so they finish at the same time. Wash and dry them thoroughly — surface moisture creates steam pockets that slow blistering and can tear the skin. Leave stems intact for handling and turning; pull them after resting if you plan to peel. Pat dry again just before cooking.
- 2
Set up high, direct heat
Use the hottest dry heat available: a gas burner set to high, glowing charcoal or wood embers, a cast-iron comal preheated until it smokes, or a broiler with the rack 4–6 inches from the element. Do not oil anything — this is a dry technique, and oil will smoke and coat the skin.
- 3
Char the chiles evenly
Lay or hold chiles directly over the heat. For a gas flame or embers, use tongs to turn them every 20–40 seconds. For a comal or skillet, lay them flat and rotate as each side blackens. Aim for skin that blisters and turns charcoal-black while the flesh beneath stays soft and only slightly translucent. Total time is roughly 2 minutes for small thin chiles and 4–6 minutes for poblanos and Anaheims. Avoid letting any spot char all the way through to wet pulp.
- 4
Steam to loosen the skin
Immediately transfer the charred chiles to a heat-safe bowl, pot, or paper bag and cover tightly with a lid, plate, or kitchen towel. Rest 10–15 minutes. The trapped steam separates the brittle black skin from the cooked flesh. Larger chiles (poblano, Anaheim) want the full 15 minutes; thin chiles need less. Under 10 minutes and the skin resists; over 30 and the flesh turns mushy and leaks juice.
- 5
Peel (or skip)
For peeled applications, rub the chiles gently between your fingers or with the back of a paring knife under cool running water — the blackened skin should slide off in sheets. Tear a small slit lengthwise to scrape out seeds if you want a milder result. Never use a vegetable peeler, which scrapes flesh. For purées and salsas where the chiles will be blended smooth, skip peeling entirely.
- 6
Use or store
Use immediately, or pack peeled chiles into airtight containers with a little of their own liquid. Refrigerate up to a week, or freeze in 1–2 chile portions in zip bags pressed flat for 3–6 months. The smoky flavor actually deepens after a day in the fridge.
Mexican terminology for charred-chile forms
The Mexican kitchen has separate words for how a charred chile ends up, and reading a recipe is easier once you know them. They are not synonyms — each describes a different final texture and use.
- Asado — the whole process: blackening over heat, resting, and preparing for use.
- Toreado — skinned, slit, and sliced into strips or rajas, then sautéed with onion and sometimes cream or cheese.
- Martajado — crushed by hand or with a heavy knife, skin still on, seeds typically included; common in salsas martajadas for tacos.
- Molcajeteado — ground in a molcajete with seeds and skin, producing a coarser, more rustic paste than a blended salsa.
Common uses
Tips & pitfalls
- Use the highest, hottest flame available — a weak flame dries and toughens skin before it chars.
- Leave stems on for easy turning; remove them after resting if you plan to peel.
- Char evenly on all sides — pale patches will cling and tear the flesh during peeling.
- Do not rush the steam rest: under 10 minutes the skin resists, over 30 minutes the flesh turns to mush.
- Peel under cool running water or with the back of a paring knife — never a vegetable peeler, which scrapes flesh.
- Work in small batches; piling raw chiles on top of charred ones steams them unevenly.
- Ventilate seriously or move outside — this technique smokes more than most home cooks expect.
- Salt after charring, not before — salt draws moisture and slows blistering.
- Save the peels and stems in the freezer — they make a great base for vegetable stock or a fire-roasted chile oil.
- For very thin chiles (serrano, Thai, árbol), lower the heat or pull them the moment the skin splits, or the flesh will collapse.
Good to know
- Also called
- Blistering, fire-roasting, blackening, or asado de chiles
- Heat methods
- Open gas flame, charcoal or wood embers, comal or cast-iron skillet, grill, broiler, or dry hot wok
- Core purpose
- Blacken the skin to loosen it for peeling and to build smoky, roasted flavor
- Skin vs. flesh
- Skin chars to a brittle black layer; underlying flesh softens and steams in its own juice without burning through
- Steam rest
- Chiles are covered (lidded pot, paper bag, towel-draped bowl) for 10–15 minutes so the skin releases
- Weight loss
- Peeled chiles lose roughly 10–20% of original weight from skin removal and moisture
- Storage
- Peeled chiles keep 5–7 days refrigerated; freeze flat in bags for 3–6 months
- Origin
- Practiced across Mexican, Southwestern U.S., Indian, Thai, Sichuan, and Korean cuisines; pre-Columbian in the Americas
Also called
Roasting Chiles · Blistering Peppers
Dishes that rely on it
Related

Sear
Blast the surface hot for a deep-browned, savory crust

Sauté
Cook quickly in a little fat over lively heat, tossing as you go

Stir-Fry
Toss bite-sized pieces over roaring heat for fast, smoky cooking

Pan-Fry
Crisp food in a shallow layer of hot fat, turning once or twice

Deep-Fry
Submerge in hot oil for an all-over crackling crust

Roast
Cook uncovered in dry oven heat for browned edges and tender centers

Bake
Cook with steady, surrounding oven heat — the soul of bread and pastry

Broil
Hit food from directly above with fierce overhead heat