Transform & Preserve
Fermenting
Letting microbes transform food over time to develop sour, savory, and complex flavors and preserve it.
Fermenting harnesses bacteria, yeasts, or molds to convert sugars and starches into acids, alcohol, and aromatic compounds, transforming and preserving food. It underlies yogurt, dosa and injera batters, kimchi, miso, bread, and fermented drinks across nearly every cuisine. Controlling salt, temperature, and time steers the microbial activity toward safe, flavorful results.
Fermenting is the controlled harnessing of microbes — bacteria, yeasts, and molds — to transform food from within. The microbes consume sugars, starches, or proteins and excrete acids, alcohols, gases, and aromatic compounds that change a food's flavor, texture, and keeping qualities. It is among the oldest forms of food preservation, with archaeological evidence reaching back to the Neolithic, and remains essential to nearly every culinary tradition: from the cabbage fields of Central and Eastern Europe to the koji rooms of Japanese miso makers, from the sourdough baskets of San Francisco to the fish-sauce barrels of coastal Vietnam.
What makes fermentation work as a technique is a small set of levers a cook can actually control. Salt concentration, temperature, and oxygen exclusion each shape which microbes flourish and which are suppressed. Get those three things right and the food protects itself — lactic acid drops the pH below 4.6, alcohol reaches levels hostile to pathogens, and anaerobic conditions keep spoilage organisms at bay. Get them wrong and the same microbes can turn a jar of cabbage into compost.
For the working cook, fermentation is less a recipe than a framework. Once you understand that a sauerkraut, a bottle of hot sauce, and a crock of miso are all governed by the same microbial logic, you can improvise across them. A single 2%-salt sauerkraut teaches the levers intuitively and transfers to nearly every other fermented food worth making at home.
- Difficulty
- Medium
Types & varieties
Lactic acid bacteria (Lactobacillus, Leuconostoc, Pediococcus) convert sugars into lactic acid. The workhorse of vegetable ferments: sauerkraut, kimchi, sour pickles, and the acid base of yogurt, kefir, and crème fraîche.
Yeast (Saccharomyces and others) convert sugars to ethanol and CO2. Includes wine, beer, mead, cider, sake, and the leavening rise of sourdough.
Acetobacter bacteria oxidize ethanol into acetic acid, producing vinegars of every kind. Also the secondary phase of kombucha, where yeast-alcohol gives way to bacteria-acid.
Filamentous fungi like Aspergillus oryzae (koji) and Rhizopus (tempeh) break down starches and proteins, building deep savory flavors. Includes miso, sake, tempeh, soy sauce, and mold-ripened cheeses.
Bacterial and yeast communities working in sequence. Includes kombucha, sourdough, traditional fish sauces like garum, and the fermentation of cacao beans.
Bacillus-driven, producing ammonia and an alkaline pH. Examples include Japanese natto and West African iru and dawadawa seed condiments.
How to do it
- 1
Choose and prepare your vegetables
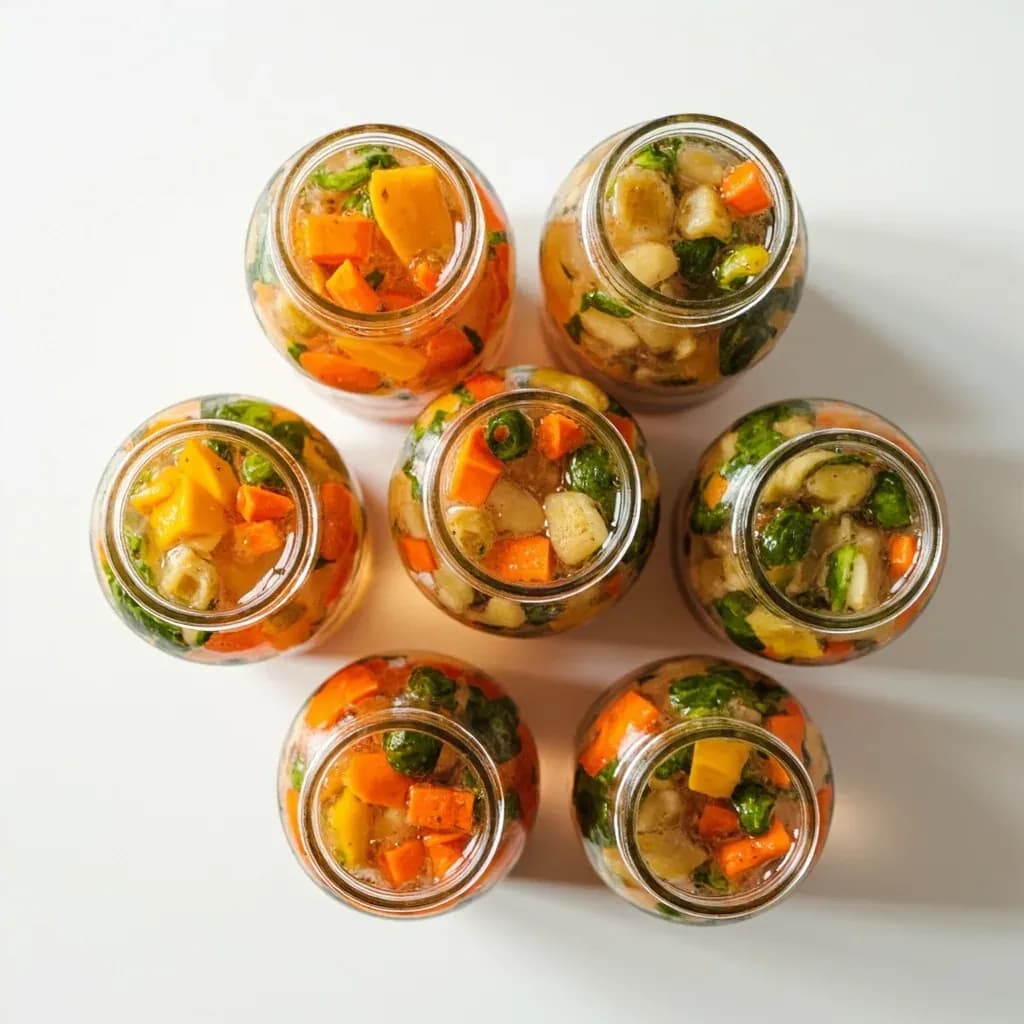
Select fresh, unblemished produce and wash it well. Trim any bruised spots. Shred, slice, or leave whole depending on the recipe — hard vegetables like cabbage, carrots, daikon, and beets are the most forgiving starting point. Soft vegetables like tomatoes and herbs will turn to mush if fermented too long and are better added as flavoring rather than the main ingredient.
- 2
Calculate and add salt
Weigh the trimmed vegetables, then add non-iodized salt at 1–3% of that weight. 2% is the standard workhorse for sauerkraut-style ferments. For dry-salted ferments, massage the salt into the vegetables until they release their own brine; this usually takes 5–10 minutes. For brined ferments, dissolve the salt in the measured non-chlorinated water first, then pour over the packed vegetables.
- 3
Pack the vessel
Pack vegetables tightly into a clean glass jar or glazed ceramic crock, pressing down to remove air pockets. For shredded cabbage, the tamping will draw out enough liquid to cover the vegetables on its own. For whole or sliced vegetables, pour brine over them until they are submerged by at least 1 inch. Leave 2–3 inches of headspace in the jar to contain foam and CO2 release.
- 4
Keep food below the brine line
Place a follower — a smaller glass dish, a food-grade glass weight, or a reserved cabbage leaf cap — directly on top of the vegetables so nothing pokes above the liquid. This is the single most important step for a clean ferment. Any exposed surface is an invitation to kahm yeast and mold.
- 5
Cover and ferment
Cover loosely: a lid set ajar, cheesecloth secured with a rubber band, or a dedicated fermentation lid with an airlock. Store at 65–75°F (18–24°C), out of direct sunlight. For the first 24–48 hours you will likely see bubbles and a layer of foam; this is normal CO2 release as the lactic bacteria colonize. Burp jars daily if there is no airlock.
- 6
Monitor and taste
After day 3, open and taste daily. You are looking for a pleasant tang, a slight effervescence on the tongue, and vegetables that have turned translucent and tender. Skim any kahm yeast film that forms on the surface. Fermentation usually finishes between day 7 and day 21 depending on temperature, salt level, and your own taste preference.
- 7
Move to cold storage
Once the flavor is where you want it, cap the jar tightly and refrigerate at 35–40°F. Cold storage does not halt microbial activity, but it slows it dramatically. Properly submerged ferments hold in the refrigerator for six months to a year. Always use a clean fork or tongs to remove fermented food to keep the brine free of contamination.
The Three Levers of a Safe, Flavorful Ferment
Every fermented food is governed by the same three variables, and learning to read them is the difference between a confident fermenter and a hesitant one. Mastering them in a basic sauerkraut teaches the logic that transfers to virtually every other fermented food.
- Salt concentration: salt pulls water and sugar out of vegetable cells (osmosis), feeds beneficial lactic bacteria, and inhibits spoilage organisms. Below 1% and spoilage organisms gain the upper hand; above 3% and the ferment stalls, often with tougher texture and muted flavor. The 2% line is the sweet spot for most vegetables.
- Temperature: warmer ferments move faster but risk soft texture and off-flavors; cooler ferments move slowly but develop cleaner, more complex acidity. The 65–75°F range is forgiving; below 60°F you may wait weeks; above 80°F you can lose a batch in days.
- Oxygen exclusion: anaerobic conditions favor lactic bacteria and suppress molds, kahm yeast, and oxidative browning. Anything poking above the brine is fair game for spoilage organisms, which is why the follower weight matters more than any other piece of equipment.
Reading a Ferment in Progress
A fermenting jar is a living thing, and the signs it gives off tell you whether you are on the right track. Bubbles, foam, and turbid brine are signs of active, healthy fermentation. Cloudy brine is normal; pink, black, or fuzzy growth is not.
- Bubbles in the first 48 hours mean CO2 is being released as bacteria colonize. This is the most reliable early sign of life.
- Cloudy brine is expected; it is yeast and bacterial cells in suspension. It does not mean spoilage.
- Kahm yeast appears as a flat, white, film-like growth on the surface. It is harmless but tastes sharp and off; skim it and push the food back under the brine.
- Fuzzy, pink, black, or otherwise colorful growth means mold and possible spoilage. When in doubt, discard the batch — the cost of vegetables is not worth a bout of food poisoning.
- Sauerkraut should turn translucent and pale as it ferments. Cucumbers turn olive-green and, when well-made, stay snappy; loss of crunch usually signals over-fermentation, low tannins in the recipe, or too little salt.
Common uses
Tips & pitfalls
- Always keep food submerged under the brine — exposed surfaces oxidize and invite kahm yeast or mold. A glass weight, a reserved cabbage-leaf cap, or a small ceramic dish works equally well as a follower.
- Use non-iodized salt and non-chlorinated water; iodine and chlorine both inhibit the lactic bacteria you want working for you. Pickling salt, sea salt, and kosher salt (with its larger crystals accounted for) are all acceptable choices.
- Taste daily from day 3 — fermentation flavor shifts quickly, and 'done' is a matter of preference rather than a fixed day. Some cooks want bright, fresh acidity; others want a deeper, rounder tang.
- Reserve 10–20% of finished brine from a successful ferment as a starter for the next batch. It shortens fermentation time, standardizes flavor, and inoculates the new batch with a healthy culture.
- Skim white, film-like kahm yeast and continue; discard the batch if you see fuzzy, pink, or black growth. Kahm yeast is harmless but introduces off-flavors; the others signal true spoilage.
- Burp jars daily for the first week if there is no airlock, or use a fermentation lid. Sealing a vigorously fermenting jar airtight can crack the glass or send the lid across the kitchen.
- Pack vegetables tightly — crowding drives out oxygen and supports the anaerobic conditions lactic bacteria need. Loose packing is a leading cause of moldy, off-flavored ferments.
- Fruits, aromatics like garlic and ginger, and chili accelerate fermentation. A spoonful of previous ferment brine or a splash of dairy whey will jump-start a sluggish one as well.
Good to know
- Origin
- Among the oldest food preservation techniques; archaeological evidence of fermented beverages from Neolithic China (~7000 BCE) and Sumerian beer (~3000 BCE).
- Scientific foundation
- Louis Pasteur's work in the 1850s and 1860s established that microorganisms — not spontaneous generation — drive fermentation, laying the groundwork for modern food science.
- Salt range for vegetable ferments
- Typically 1–3% by weight of the prepared vegetables; 2% is the standard workhorse for sauerkraut-style ferments, while 3.5–5% is traditional for whole-cucumber brines.
- Target pH for safety
- Below pH 4.6; well-run vegetable ferments typically finish between pH 3.3 and 4.0, a range that inhibits pathogens while letting lactic bacteria thrive.
- Optimal temperature range
- 65–75°F (18–24°C) for most lacto-ferments; cooler temperatures slow the process, warmer temperatures accelerate it and raise spoilage risk.
- Typical timeline
- 3–7 days for quick vegetable ferments, 1–4 weeks for sauerkraut, 7–14 days for kombucha, and months to years for wine, vinegar, and aged miso.
- Salt requirement
- Use non-iodized salt — iodine inhibits lactic bacteria. Sea salt or pickling salt are standard; kosher salt works if you account for its larger crystal size.
- Water requirement
- Use non-chlorinated water; chlorine suppresses microbial activity. Filtered or dechlorinated tap water is fine; distilled water lacks minerals some ferments benefit from.
- Key equipment
- A food-grade vessel (glass jar or glazed ceramic crock), a follower or weight to keep food submerged, and a loose cover or airlock to release CO2 while keeping oxygen and contaminants out.
Also called
Fermentation · Culturing · Souring
Dishes that rely on it
Related

Confit
Cook slowly submerged in fat for silky tenderness and keeping

Cure
Draw out moisture with salt and time to preserve and concentrate

Pickle
Steep in acidic brine for bright, tangy, crunchy preservation

Ferment
Let friendly microbes transform food into tangy, complex flavor

Marinate
Soak in a seasoned mix to flavor and tenderize before cooking

Brine
Soak in salt water so meat stays juicy and seasoned throughout

Dehydrate
Slowly dry out moisture to concentrate flavor and extend shelf life

Cold-Smoke
Perfume cured food with smoke without cooking it through