Prep & Assembly
Kneading Dough
Working dough to develop gluten into a strong, elastic, cohesive structure.
Kneading stretches and folds dough so its gluten proteins align into an elastic network that traps gas and gives chew. Cooks knead bread, noodle, and seitan doughs by hand or mixer until the dough turns smooth and passes the windowpane test. The amount of kneading dictates texture, from tender to highly chewy.
Kneading is the mechanical work that transforms a shaggy, just-mixed mass of flour and water into a smooth, elastic dough capable of trapping the gases produced during fermentation. At the molecular level, the pressing, folding, and stretching aligns glutenin and gliadin proteins into long, interconnected strands that give dough its strength and spring; without this network, bread would bake dense and flat, and enriched doughs would collapse under their own weight. Good kneading produces a dough that feels alive — tacky but not sticky, supple, and slightly cool to the touch — and that responds to a gentle stretch by pulling thin without tearing.
The technique is older than written recipe collections and remains essentially unchanged: a rhythmic push, fold, and turn repeated until the dough passes the windowpane test. What has evolved is our understanding of when to knead, when not to, and how to adapt the method to hydration, flour type, and enrichment. Modern bakers often blend mechanical kneading with long, passive fermentation (autolyse, bulk folds) and choose gentler techniques like stretch-and-folds for very wet doughs, where aggressive push-fold-turn would tear the developing structure.
Reading the dough matters more than following a clock. Time ranges are useful guides — 8 to 15 minutes by hand, 5 to 10 in a stand mixer — but dough tells you when it is ready through feel, sound, and the windowpane test. Under-kneaded dough feels dense and tears readily; over-kneaded dough feels either tight and rubbery (lean breads) or suddenly slack and greasy (enriched doughs with butter and eggs). Learning to recognize those signals is the real skill behind kneading.
- Difficulty
- Medium
Types & varieties
Classic rhythm using the heel of the hand on a lightly floured bench; best for medium-hydration doughs around 60–70%.
Dough hook on low speed; watch for the dough climbing the hook or the bowl warming from friction.
Four-corner lift-and-fold every 30 minutes during bulk fermentation; preserves structure in high-hydration doughs.
Slide fingers under dough, lift, and let it coil onto itself; gentler still, used in sourdough and enriched doughs.
Slapping wet dough onto the counter and folding it back onto itself; the traditional way to develop ciabatta and other slack doughs.
Smearing and pressing dough with a wet hand inside a bowl; common for brioche and other high-fat doughs.
Relies on 12–24 hours of cold fermentation and time rather than mechanical work to develop gluten.
Two-handed lift-and-throw motion used in traditional baguette production.
How to do it
- 1
Mix to a shaggy mass
Combine flour, water, salt, and yeast (or starter) just until no dry flour remains. The dough will look rough, uneven, and possibly dry in spots — that is correct at this stage.
- 2
Autolyse (optional rest)
Cover the dough and let it rest 20–30 minutes. The flour hydrates fully and gluten begins forming passively, which shortens active kneading time and improves extensibility.
- 3
Prepare the bench
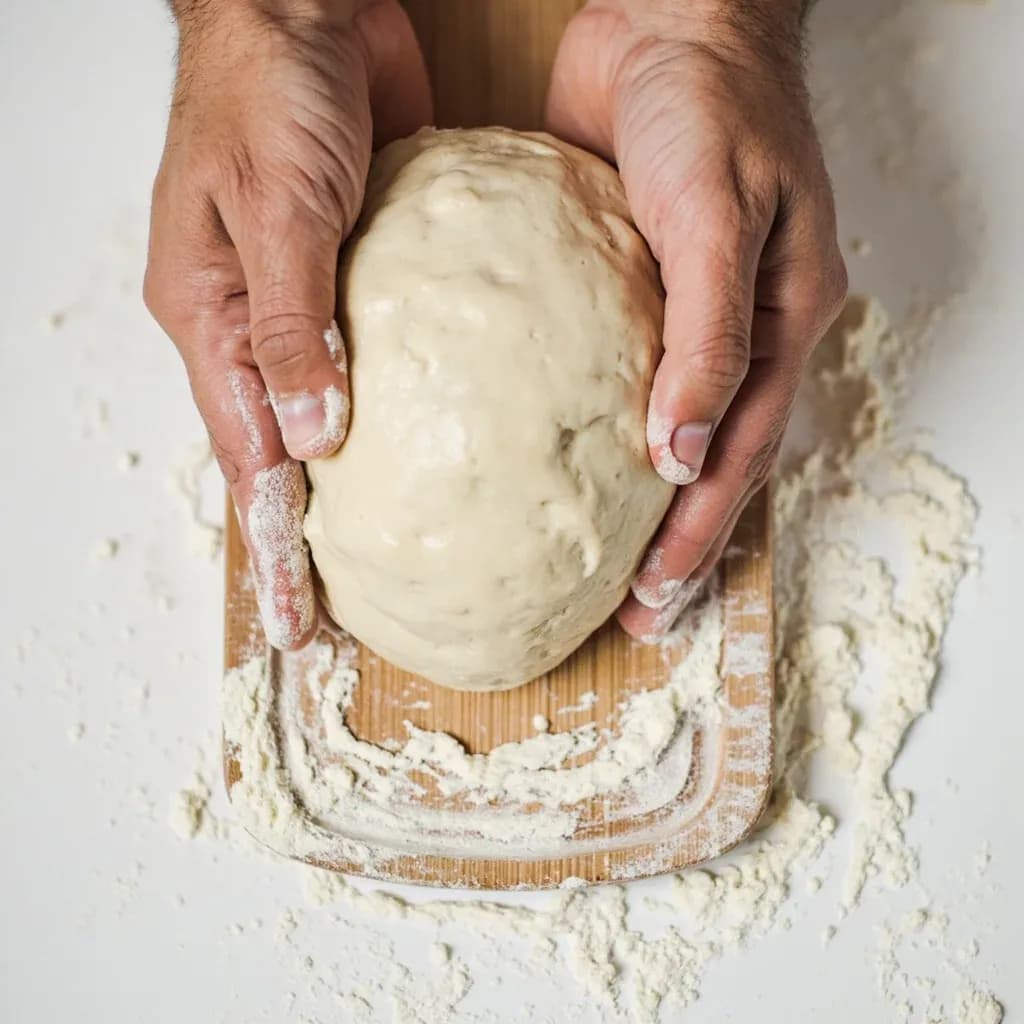
Lightly flour the work surface for medium-hydration doughs; for wet doughs above about 70%, leave the bench bare or mist it with water. Scrape the dough out cleanly, leaving any stubborn bits in the bowl.
- 4
Push and fold
With the heel of your dominant hand, push the dough forward and away from you, then fold the far edge back over itself. Use your other hand to anchor the dough near you so it does not slide around.
- 5
Quarter turn and repeat
Rotate the dough 90° and repeat: push, fold, turn. Establish a steady rhythm and continue for 8–10 minutes for most bread doughs.
- 6
Adjust hydration as you go
If the dough is sticking badly to the bench or your hands, dust the surface with a tablespoon of flour at a time. If it is fighting back dry and stiff, mist your hands or the dough lightly with water.
- 7
Check for doneness
Pinch off a golf-ball piece and gently stretch it between your fingers. If it pulls thin enough to see light through without tearing, gluten is developed. If it tears immediately, knead 1–2 minutes more and retest.
- 8
Shape into a tight ball
Gather the dough and pull the edges underneath to create surface tension on top — this gives the loaf structure during its first rise.
- 9
Bench rest if needed
If the dough is springy and tight when you try to shape it, cover and let it rest 10–20 minutes so the gluten relaxes before the next step.
- 10
Transfer for first rise
Place the kneaded dough in a lightly oiled bowl, turn once to coat, cover, and proceed to bulk fermentation according to the recipe.
When to skip or modify kneading
Kneading is not always the right tool. Very wet doughs above roughly 75% hydration cannot tolerate the push-fold-turn method without tearing; instead, mix briefly to combine, then build strength through a series of stretch-and-folds or coil folds during bulk fermentation. No-knead breads rely on a long, wet autolyse and extended cold fermentation to develop gluten passively, producing a more open, irregular crumb than actively kneaded dough. Enriched doughs high in butter, eggs, or sugar behave differently too: knead only after the fat is fully incorporated, and stop the moment the dough clears the sides of the mixing bowl — further work breaks the emulsion and the dough turns greasy and slack, a state that cannot be undone.
- Above ~75% hydration, use stretch-and-folds rather than push-fold-turn.
- Enriched doughs with butter or eggs should be kneaded only after fat is incorporated; stop the moment the dough clears the bowl.
- No-knead methods produce a more open crumb but require 12–24 hours of cold time.
- Whole-grain and rye doughs need less kneading — bran particles cut gluten strands as you work.
Reading the dough
Kneading is a feedback skill more than a timed one. A dough that is ready feels cool, smooth, and slightly tacky; it holds its shape when poked and springs back slowly. It makes a soft, dull thud when slapped against the counter, not a wet slap. The windowpane test is the definitive check: pinch off a small piece and gently stretch it between your thumbs and fingers in all directions. If it stretches thin enough to see light through without tearing and without snapping back, gluten is fully developed. If it tears immediately, the dough needs another minute or two.
- Cool to the touch and slightly tacky, not sticky or dry.
- Springs back slowly when poked, rather than holding the indent or springing back fast.
- Passes the windowpane test — stretches thin enough to read light through without tearing or snapping back.
Common uses
Tips & pitfalls
- Use the windowpane test as the definitive doneness check — a small piece should stretch thin enough to see light through without tearing.
- Avoid adding flour during kneading unless the dough is genuinely unworkable; excess flour toughens the final crumb and dulls flavor.
- Keep dough temperature cool — if a stand mixer bowl feels warm to the touch, the dough is overworking and the yeast is suffering; chill the bowl first in summer.
- If the dough resists and springs back tight when you try to shape it, cover and let it rest 10–15 minutes so the gluten can relax before continuing.
- Mist or lightly oil the bench instead of flouring heavily when working with slack, wet doughs like ciabatta or focaccia.
- Stop the moment the dough is smooth, elastic, and passes the windowpane — over-kneading breaks down gluten and leaves the dough slack and sticky.
- Use the heel of your dominant hand for the push; fingers only guide and turn, they should not do the heavy work.
- For whole-wheat and rye doughs, expect a shorter knead — bran particles physically cut gluten strands, so less mechanical work is needed.
- Sprinkle, don't dump, flour when dusting; aim at the bench, not the dough, so you do not incorporate raw flour into the loaf.
- Listen to the dough — a rhythmic dull thud and a tacky-but-not-sticky feel means it is nearly ready.
Good to know
- Type
- Mixing and dough-development technique
- Primary purpose
- Aligns gluten proteins into a network that traps fermentation gases
- Hand-kneading time
- 8–15 minutes for most bread doughs
- Stand mixer time
- 5–10 minutes on low speed with dough hook
- Target dough temperature
- 75–78°F (24–26°C) for yeasted breads
- Doneness test
- Windowpane / membrane test — dough stretches thin without tearing
- Hydration range worked
- Approximately 55% (bagels) to 85%+ (ciabatta)
- Origin
- Practiced for thousands of years; depicted in ancient Egyptian tomb paintings
Also called
Kneading Noodle Dough · Kneading Gluten (Seitan)
Dishes that rely on it


Related

Whisk
Beat ingredients smooth and aerated with a looping wire motion

Sift
Pass dry ingredients through mesh to aerate and remove lumps

Strain
Pour through mesh to separate solids from liquid for a smooth result

Filter
Pass liquid through fine material to clarify out the smallest particles

Rice
Press cooked potatoes through small holes for fluffy, lump-free texture

Mash
Crush soft cooked food into a rustic, creamy purée

Grind
Crush food into a coarse to fine texture, from spices to meat

Grate
Shred food into fine bits against a sharp-toothed surface