Prep & Assembly
Larding Meat
Threading strips of fat through lean meat to keep it moist during cooking.
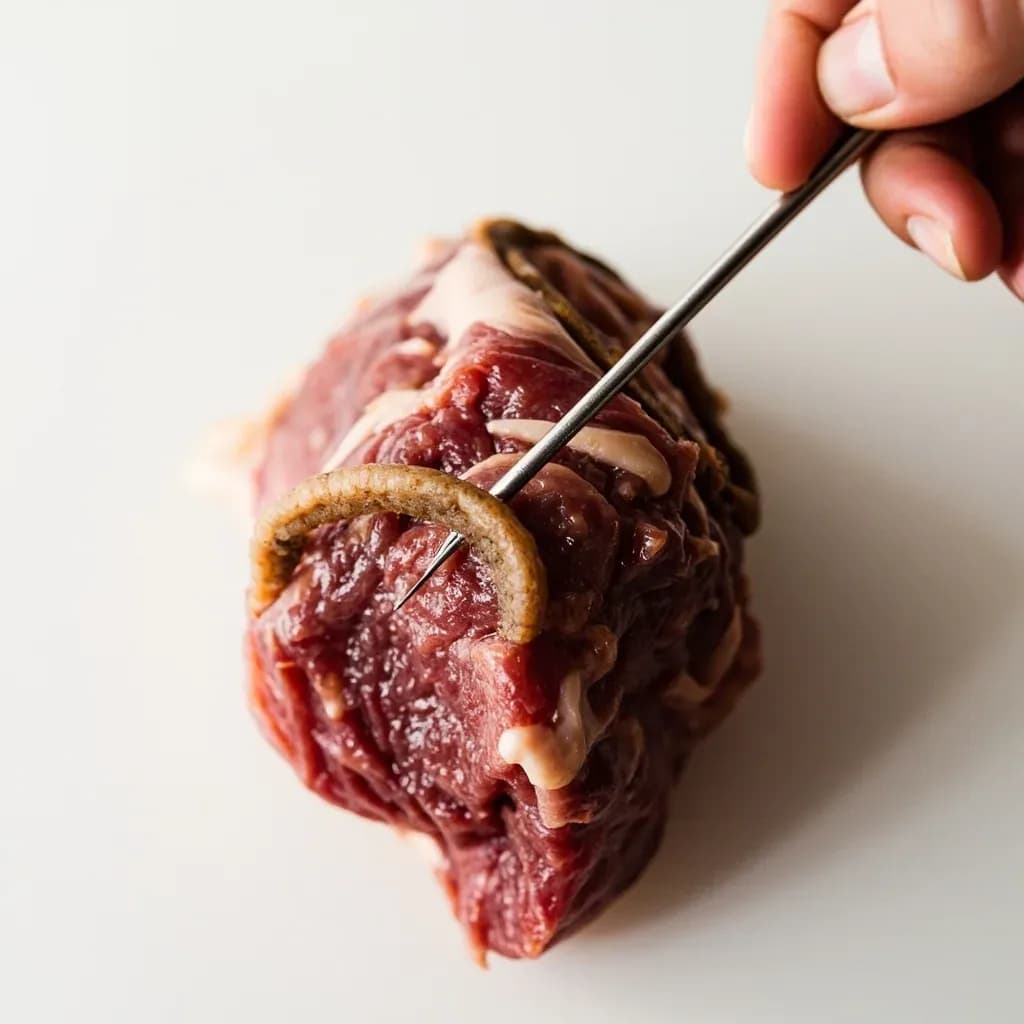
Larding inserts thin strips of fat (lardons) into the interior of a lean roast using a larding needle, so the fat melts and bastes the meat from within during slow cooking. The related barding wraps the exterior in fat instead. Both prevent dry, lean cuts from drying out and add richness, a classic technique for game and older butchery.
Rooted in 18th- and 19th-century French haute cuisine — formalized by Antonin Carême and codified by Auguste Escoffier — larding threads strips of firm, cold fat through the interior of a lean cut so it renders slowly during cooking and bastes the muscle from within. The method was developed for an era when the beef, venison, and game available to European kitchens were far leaner than the grain-fed beef most cooks buy today.
For modern cooks, larding is less often a necessity than a deliberate choice. It shines on cuts that are genuinely dry: eye of round, sirloin tip, veal loin, hare saddle, and venison loin, where there is little natural marbling to keep things moist. The inserted fat — traditionally raw pork backfat, or lard gras — melts as the meat heats, distributing succulence and a touch of richness through what would otherwise be a punishingly dry mouthful. Lardoons can also be marinated in brandy, Madeira, or herb infusions before insertion, turning the technique into a vehicle for layered flavor.
Larding is distinct from two techniques it is often confused with. Barding wraps the outside of a roast in a sheet of fat (bacon, caul, or pork fatback) to shield the surface from direct heat. Natural marbling is fat the animal laid down during life, distributed through the muscle in fine veins. Larding is the only one of the three that puts fat inside the meat by hand, which is why it remains genuinely useful on truly lean game and older-style beef where marbling cannot be relied on.
- Difficulty
- Hard
Types & varieties
Lardoons are pushed all the way through the meat so both ends protrude, then trimmed flush — the original, classical method.
Strips are laid into shallow slits cut partway into the meat with a knife, rather than threaded completely through.
The classic choice: firm, neutral, white kidney fat that does not impose its own flavor on the meat.
Used when a smoky or salty note is desired; usually blanched 1–2 minutes first to mellow the cure and firm the strips.
Softer and more flavorful than pork backfat; reserved for poultry and game where richer taste is welcome, though the softness makes threading trickier.
Used in classical preparations of very lean beef or game when a beef-on-beef flavor is acceptable.
Spring-loaded end opens to grip the lardon; the most common home-style tool and the easiest to learn on.
Cylindrical barrel loads a stack of lardoons; the plunger ejects one at a time — favored in professional kitchens for speed.
A related classical technique using a smaller needle to insert slivers of pork fat or truffle into the surface of the meat.
How to do it
- 1
Chill the meat and fat
Place the trimmed roast and a block of fresh pork fatback in the freezer for 20–30 minutes, or in the refrigerator for 1–2 hours. Both must be firm and well below room temperature so the fat slides cleanly through the muscle without smearing or tearing it.
- 2
Cut the lardoons
Slice the cold fatback into uniform strips about 4–6 mm (1/4 in) square in cross-section and 5–8 cm (2–3 in) long. Taper one or both ends with your knife so they have a chisel-like leading edge. If using cured pork, blanch the strips for 1–2 minutes in simmering water and pat them dry.
- 3
Optional flavoring
Marinate the lardoons in brandy, Madeira, port, or a herb-and-spice infusion for 30 minutes to a few hours, then drain and re-chill. Pat dry before loading the needle so the fat stays firm in the jaws.
- 4
Load the larding needle
Open the split tip (or retract the plunger on a hollow needle) and insert a single lardon, tapered end first, so it sits firmly in the jaws of the needle. With a hollow needle, you can pre-load several lardoons and eject them one at a time.
- 5
Pierce the meat
Hold the roast firmly on a cutting board. Push the needle through the meat in one smooth motion, following the grain, and keep the insertion at least 2–3 cm (about 1 in) from any surface. The needle should travel the full length of the roast.
- 6
Release the lardon
Press the plunger (or squeeze the split handle) to deposit the lardon inside the meat, then withdraw the needle. Both ends of the lardon should protrude slightly from the meat.
- 7
Trim and repeat in a pattern
Trim the protruding ends flush with the surface using a sharp knife. Work in parallel rows about 1.5–2 cm apart across the whole roast, then make a second pass at a perpendicular or angled direction for even distribution.
- 8
Re-chill before cooking
Return the larded roast to the refrigerator for 20–30 minutes so the fat firms back up and the muscle fibers relax around the inserted lardons. A cold roast also sears more cleanly.
- 9
Sear and cook
Pat the surface dry, season generously with salt and pepper, then sear the roast on all sides in a hot pan before finishing in a moderate oven. The larded fat will render slowly through the interior as the meat cooks, basting it from within.
Larding vs. Barding vs. Marbling
These three terms are routinely confused, and the differences matter when you are deciding what a lean roast actually needs. Each one places fat in a different position, and each addresses a different problem.
- Larding puts fat inside the muscle in long strips, so it bastes the meat from within as it renders — ideal for very lean cuts with no internal fat.
- Barding wraps fat around the outside of the roast (typically bacon, salt pork, or caul fat) to shield the surface from direct heat — useful for lean birds and for protecting a roast during the early, hot phase of cooking.
- Natural marbling is fat the animal deposited during its life, woven through the muscle in fine veins. It cannot be added later, and it is the reason a well-finished ribeye needs no help at all.
Choosing the Right Fat
The fat you choose is the flavor you add. Most larding is done with raw, unsalted pork backfat because it is neutral, firm, and reliably available, but other options each bring something specific.
- Pork backfat (lard gras): the default. White, firm, neutral; the closest to a blank canvas.
- Cured pork (bacon, salt pork): brings smoke and salt; blanch first to remove excess salt and to firm the strips for cleaner insertion.
- Goose or duck fat: softer, more aromatic, and richer; a good match for poultry and game where the meat can carry extra flavor.
- Beef suet: used in some classical game preparations where the cook wants the fat to taste of the same animal; the strongest-flavored option.
- Flavored lardoons: pork backfat soaked 30 minutes to a few hours in brandy, Madeira, port, or a herb-and-spice infusion, then drained and re-chilled before use.
Common uses
Tips & pitfalls
- Chill the meat to about 2–4 °C (firm but not frozen) and keep the fatback ice-cold; warm fat will tear and smear instead of sliding cleanly.
- Cut lardoons on the bias with a sharp knife so they have a slight taper — they will thread through the meat far more cleanly than blunt-ended strips.
- If using cured pork or bacon, blanch the lardoons for 1–2 minutes in simmering water and pat dry to remove excess salt and firm them up for insertion.
- Always follow the natural grain of the meat when larding; against-the-grain insertions are more likely to tear fibers and let fat escape during cooking.
- Keep insertion points at least 2–3 cm (about 1 in) from the surface, otherwise the fat will simply render out during the first minutes of cooking and scorch.
- Season the surface (salt, pepper, herbs) after larding, not before, so salt does not draw moisture out of the meat during prep.
- Common mistake: pulling the needle backward to 'help' a stuck lardon — instead, push the needle fully through and trim the protruding end; pulling tears the meat.
- Common mistake: forgetting to re-tie the roast after larding — the internal structure has been pierced, so a loose roast will lose its shape and the lardons will shift during roasting.
Good to know
- Origin
- Classical French cuisine, formalized in 18th–19th-century haute cuisine by Antonin Carême and Auguste Escoffier.
- French terms
- Lardage (the act), lardoire (the needle), and lardon (a single strip of inserted fat; pl. lardons).
- Primary tool
- A larding needle — a hollow steel shaft with either a spring-loaded split tip or a side-loading chamber, plus a plunger to eject the fat.
- Traditional fat
- Fresh, raw pork fatback (lard gras) from the kidney region — white, firm, and virtually flavorless so it does not dominate the meat.
- Lardon dimensions
- Roughly 4–6 mm (about 1/4 in) square in cross-section and 5–8 cm (2–3 in) long, tapered at one or both ends to ease insertion.
- Best candidates
- Very lean meats: eye of round, sirloin tip, venison loin, hare saddle, veal loin, and lean poultry breast.
- Difficulty
- Moderate; requires a sharp needle, cold ingredients, and a steady hand to avoid tearing the meat.
- Time
- About 10–20 minutes of active prep for a 1–1.5 kg roast, plus 20–30 minutes to re-chill the meat before cooking.
- Status today
- Rare in home kitchens; still taught in classical French culinary schools and used in game cookery and fine-dining restaurants.
Also called
Larding Meat (Špikování) · Larding/Barding With Fat
Related

Whisk
Beat ingredients smooth and aerated with a looping wire motion

Sift
Pass dry ingredients through mesh to aerate and remove lumps

Strain
Pour through mesh to separate solids from liquid for a smooth result

Filter
Pass liquid through fine material to clarify out the smallest particles

Rice
Press cooked potatoes through small holes for fluffy, lump-free texture

Mash
Crush soft cooked food into a rustic, creamy purée

Grind
Crush food into a coarse to fine texture, from spices to meat

Grate
Shred food into fine bits against a sharp-toothed surface