Prep & Assembly
Meal Prepping
Cooking and portioning meals ahead of time into containers for the days to come.
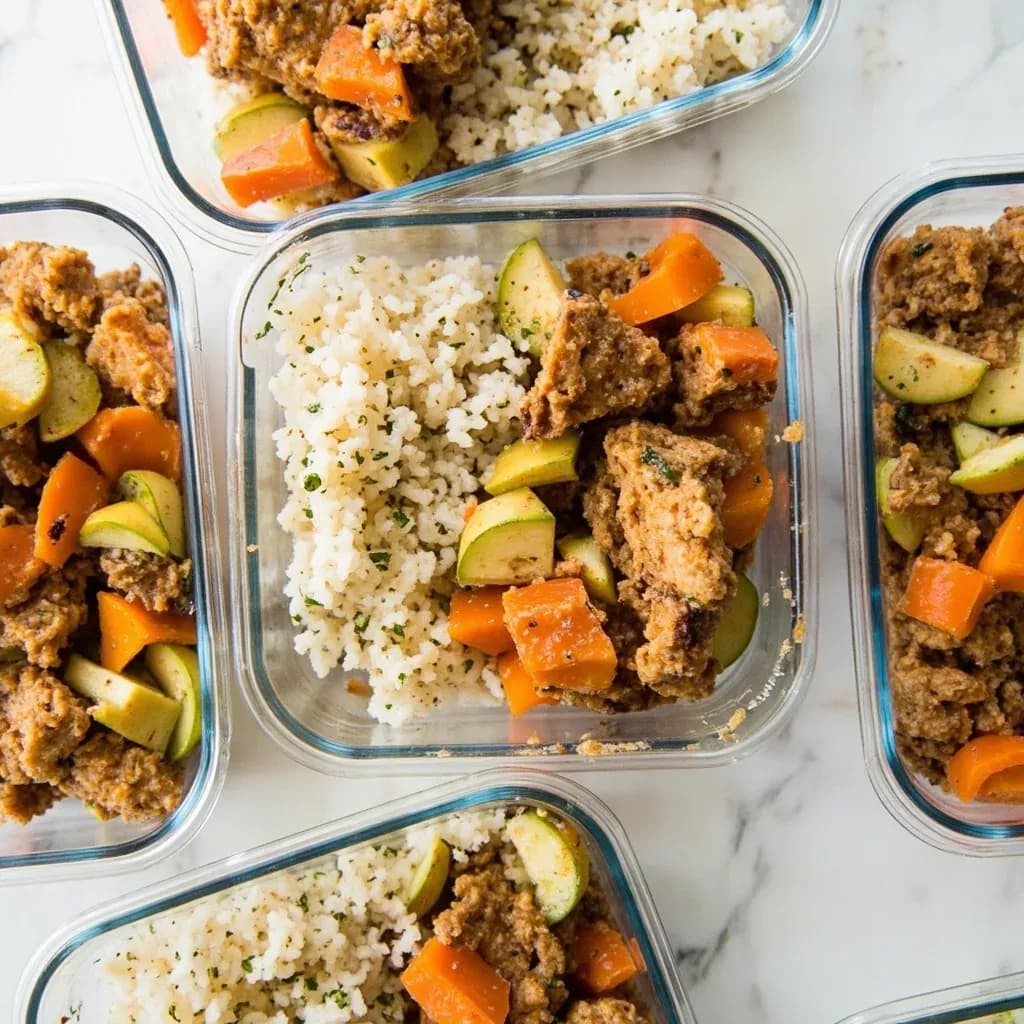
Meal prepping is the practice of cooking, portioning, and storing meals or components in advance to save time during the week. It ranges from batch-cooking grains and proteins to assembling complete portioned containers. Good prep balances foods that reheat and store well and labels portions clearly. Proper cooling and refrigeration keep prepped food safe across several days.
Meal prepping is a system built from three linked steps — planning (menu and shop), production (batch cooking), and storage (portioning, labeling, chilling) — that together turn a few hours of focused work into five or more weeknight dinners. Most home cooks reclaim 30–60 minutes on a busy evening, control portion size, and sidestep the takeout reflex; the craft, though, is understanding how cooked food behaves over several days. Most dishes hold well in the refrigerator for 3–4 days, which is why the classic 5-day prep cycle aligns with USDA's refrigerated-leftover window, while anything destined for day six or seven needs to go into the freezer. Texture is the other quiet limit: pasta, rice, and roasted vegetables all degrade differently on the second reheat, so the best prep cooks know which components to hold raw, which to undercook on purpose, and which to keep in separate small containers until serving.
The modern weekly-prep format is a 2010s phenomenon rooted in bodybuilding, CrossFit, and macro-tracking communities, but its ancestors are older: Sunday family-roast leftovers, mid-century TV-dinner assembly lines, and the French mise en place that every professional kitchen runs before service. Home cooks who treat it as a system rather than a chore report that the highest-leverage habit is choosing recipes that share ingredients — a single tray of roasted vegetables and one pot of grains can flex into three or four different meals across the week just by changing the protein, the sauce, and the garnish.
- Difficulty
- Easy
Types & varieties
Complete, ready-to-eat entrées portioned into individual containers — protein, starch, and vegetable all in one. The classic Sunday-prep style.
Bulk-cook individual ingredients (grains, proteins, roasted vegetables) and store them separately, then assemble or remix during the week for more variety.
Assembled raw or partially cooked, frozen, and baked later — casseroles, soups, marinated proteins, and braises. Suited to longer planning windows and batch cooking for new parents, illness, or gifting.
Washing, chopping, marinating, and storing raw ingredients so weeknight cooking becomes a matter of assembly. Minimal or no cooking on prep day.
Compact, compartmentalized portions — often cold and including raw vegetables, fruit, and protein — designed for transport and no-reheat lunches.
Pre-portioned raw ingredients for a one-pan dish (stir-fry, sheet-pan dinner, tacos) stored in zip bags or containers to be cooked fresh each night.
A 5-day prep stays inside the 3–4 day safe fridge window with refrigerated foods only; a 7-day prep blends fridge items for the first half of the week with frozen portions for the second half.
How to do it
- 1
Plan the menu
Decide on 4–6 recipes that share ingredients to minimize waste. Aim for at least one grain, one protein, two vegetables, and one sauce or seasoning blend per prep day, and cross-reference against the week's schedule — quick-assembly items for the busiest nights, slow-reheat stews and braises for lazier evenings.
- 2
Write a consolidated shopping list
Group the list by store section (produce, protein, dry goods, dairy, frozen), subtract pantry staples you already have, and buy in bulk only for items with long shelf life such as rice, dried beans, and frozen vegetables. Sticking to a single list is the single biggest money-saver in the system.
- 3
Set up containers and station
Wash and dry all containers and lids, set out cutting boards, knives, sheet pans, and the scale, and preheat the oven. Having everything in reach before the heat is on prevents the mid-prep scramble that wastes the most time.
- 4
Start with the longest-cooking item
Begin with whatever has the most passive time: rice in the rice cooker, beans in the pressure cooker, a whole chicken in the oven, or a pot of soup on the back burner. Use that hands-off window to wash, peel, and chop vegetables.
- 5
Batch-prep proteins
Cook 2–3 proteins in parallel — a sheet pan of chicken thighs, a tray of baked tofu, hard-boiled eggs, or a slow-cooker pulled pork. Season them differently (teriyaki, lemon-herb, jerk, taco-spice) so the same protein tastes different across the week.
- 6
Batch-prep vegetables and grains
Roast a sheet pan of mixed vegetables at 425°F / 220°C so they keep some texture on the second reheat. Cook a large pot of grains (rice, quinoa, farro, barley). For raw vegetables meant to stay crunchy, just wash, cut, and store cold.
- 7
Cool food quickly
Spread hot food in shallow containers or on sheet pans; an ice bath will chill soups and grains in minutes. Never put a hot, sealed container directly into the fridge — it raises the internal temperature and can push neighboring food into the danger zone.
- 8
Portion and weigh
Weigh or scoop each container to a target calorie or macro number if tracking. A simple repeatable template — for example, 150 g protein, 150 g cooked grain, 200 g vegetables — keeps every meal balanced and visually consistent.
- 9
Add finishing items separately
Pack dressings, sauces, fresh herbs, cheese, nuts, seeds, and any raw leafy greens in small side containers or compartments so they stay crisp and fresh until serving.
- 10
Label, stack, and store
Write the dish name and prep date on every container. Stack fridge-only items at the front so they get used first; freeze any portion that won't be eaten within 3–4 days. Most prepped meals are best within 4 days refrigerated or 2–3 months frozen.
- 11
Reheat safely
Reheat only what will be eaten in that sitting, to an internal temperature of 165°F / 74°C. Glass containers can move straight from fridge to microwave; loosen the lid to vent steam and stir midway through.
Food Safety and Storage Windows
The practical ceiling on meal prep is set by food safety, not by appetite. Cooked food should move from the stove to the fridge within 2 hours (1 hour if the room is above 90°F / 32°C), and once there, most dishes — grains, meats, vegetables, stews — keep for 3–4 days at or below 40°F / 4°C. Anything destined for day five onward belongs in the freezer at 0°F / -18°C, where 2–3 months preserves best quality for most cooked dishes. Soups, braises, and chilis freeze better than crisp vegetables or dairy-heavy sauces, which is why those components are often added fresh on serving day.
- Cool food fast: spread hot food in shallow containers or on sheet pans, and use an ice bath for soups and grains — a sealed hot container will raise the fridge temperature and put neighboring food into the 40–140°F danger zone.
- Reheat to 165°F / 74°C and reheat only once; reheating the same portion twice is the most common food-safety lapse in prep cooking.
- Discard prepped food that smells off, looks slimy, or has been at room temperature for more than 2 hours — when in doubt, throw it out.
Equipment That Earns Its Space
Beyond basic pots and pans, a small set of dedicated tools turns a prep afternoon from a slog into a smooth production line. Most are inexpensive and pay for themselves in a season or two of saved takeout.
- A digital kitchen scale — the single most useful tool, because weighing portions is faster and more accurate than measuring cups and produces visually identical containers.
- Half- and full-size sheet pans with rims for roasting vegetables and proteins in parallel.
- Glass containers with leak-proof lids for fridge and microwave use; rectangular footprints stack better than round ones.
- A set of small sauce cups or condiment containers for dressings, herbs, nuts, and seeds — kept separate until serving to protect texture.
- Masking tape and a permanent marker for labeling — the cheapest, most reliable inventory system in any kitchen.
Common uses
Tips & pitfalls
- Undercook pasta, rice, and grains by 1–2 minutes; they keep softening when reheated and will turn to mush if cooked to full doneness the first time.
- Store sauces, dressings, salsas, avocado, and any raw leafy greens separately and add at serving time — sogginess and browning are the two most common prep-day disappointments.
- Roast vegetables at high heat (425°F / 220°C) so they reheat with some texture rather than collapsing into something limp and wet.
- Cool cooked food to room temperature before sealing and refrigerating, and divide large pots into shallow containers to speed chilling — a sealed hot pot will warm the entire fridge. Don't leave food out for more than 2 hours total (1 hour if the room is above 90°F / 32°C).
- Label every container with the contents and prep date; masking tape and a Sharpie is the classic setup for a reason.
- Don't dress raw leafy salads ahead of time — they wilt within a day. Prep the vegetables, dressing, and protein separately and toss at the table.
- Use square or rectangular containers; they stack and waste far less fridge space than round ones, and freeze flat in zip bags to speed thawing.
- Avoid reusing plastic containers that are scratched, warped, or stained — they harbor bacteria and may leach, especially after microwave use.
Good to know
- Type
- Time-management and batch-cooking technique
- Typical cycle
- Weekly (most commonly Sunday) or biweekly
- Active time
- 60–180 minutes for a full week's prep, depending on menu complexity
- Fridge shelf life
- 3–4 days for most cooked foods (USDA guideline for refrigerated leftovers)
- Freezer shelf life
- 2–3 months for best quality on most cooked dishes; up to 6 months for some
- Standard lunch portion
- ~400–600 g / 14–21 oz total per container
- Safe storage temperature (fridge)
- At or below 40°F / 4°C
- Safe storage temperature (freezer)
- 0°F / -18°C
Also called
Batch Cooking
Dishes that rely on it
Related

Whisk
Beat ingredients smooth and aerated with a looping wire motion

Sift
Pass dry ingredients through mesh to aerate and remove lumps

Strain
Pour through mesh to separate solids from liquid for a smooth result

Filter
Pass liquid through fine material to clarify out the smallest particles

Rice
Press cooked potatoes through small holes for fluffy, lump-free texture

Mash
Crush soft cooked food into a rustic, creamy purée

Grind
Crush food into a coarse to fine texture, from spices to meat

Grate
Shred food into fine bits against a sharp-toothed surface