Water & Steam
Rehydrating Dried Chiles
Soaking dried chiles in hot water to soften them for sauces, salsas, and pastes.
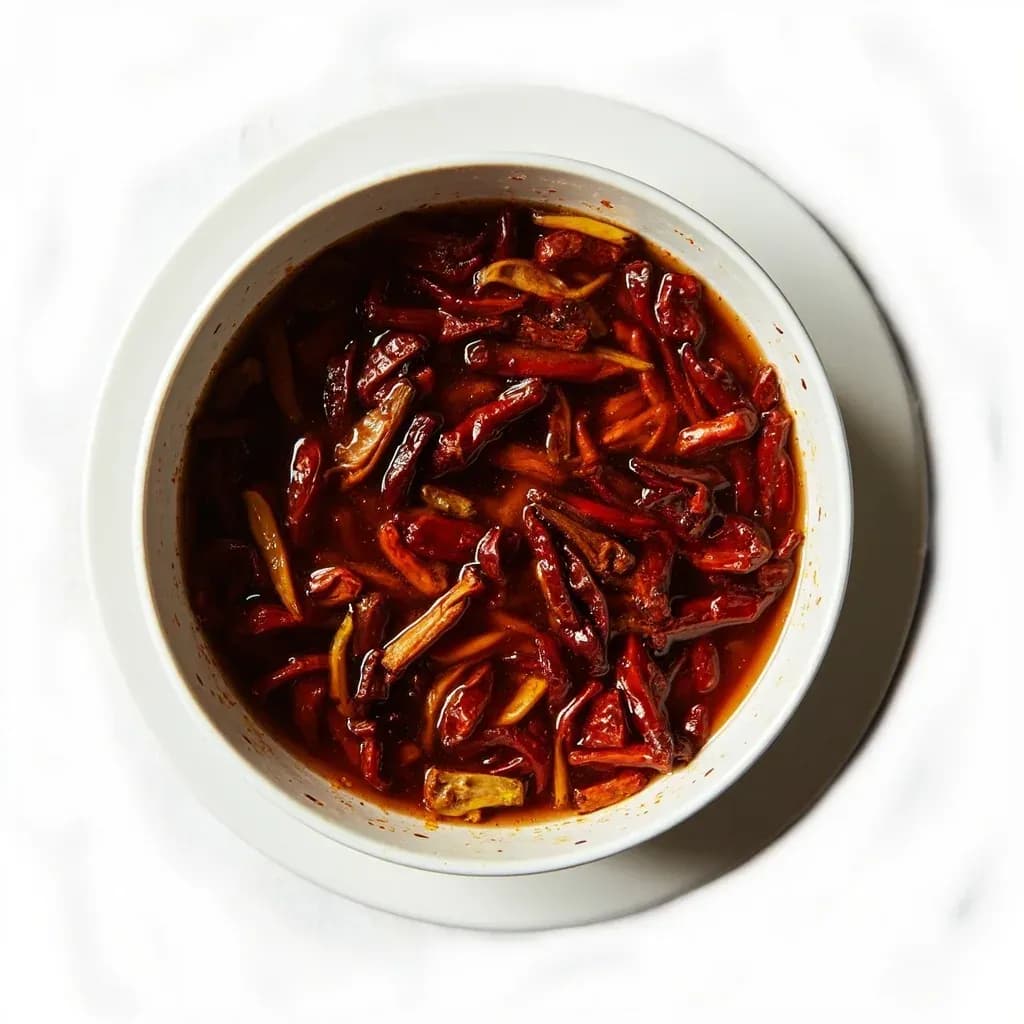
Rehydrating dried chiles steeps them in hot water (often after a quick dry-toast to wake their aroma) until pliable, restoring the soft flesh needed to blend into adobos, moles, and salsas. The flavorful soaking liquid can be reserved for the sauce. Toasting first deepens the flavor but must be brief to avoid bitterness.
Dried chiles are not a substitute for fresh ones — they are a different ingredient that happens to come from the same fruit. Once a chile has lost most of its moisture, its sugars have concentrated, its oils have oxidized, and its cell walls have stiffened into a papery shell. Soaking in hot water reverses only the last of those changes: the flesh rehydrates, the capsaicin and color leach into the liquid, and the pod becomes pliable enough to tear, grind, or purée into a smooth sauce. It is the bridge step between a basket of brittle, leathery pods and the deep brick-red, glossy sauces that anchor Mexican, Southwestern U.S., and much of South Asian cooking.
The technique itself is simple, but the small choices — water temperature, whether to toast first, how long to wait, what to do with the liquid — change the flavor of the finished dish more than almost any other prep step. Boiling water drives off volatile aromatics and can turn a guajillo bitter. Water that's barely warm takes forever and leaves the pods leathery at the stem. A 20-second toast in a dry pan before soaking wakes the dormant oils and adds a smoky undertone that no other step provides. And the reddish-brown liquid left in the bowl is not waste water; it is a seasoned broth carrying color, sweetness, and heat, and seasoned cooks strain it straight into the blender.
Most of the failures in chile-based sauces trace back to this single step: chiles that are scorched or under-toasted, soaked too long so they purée into something flat and dull, or soaked in liquid that was then poured down the sink. Master the soak and the rest of the sauce almost builds itself.
- Difficulty
- Easy
Types & varieties
Dried poblano; mild to medium heat, sweet and fruity. The most common rehydrated chile and the backbone of many red sauces.
Dried chilaca; long, thin, very dark. Adds a deep, almost raisin-like flavor to moles and adobos.
Bright red, tangy and slightly sharp; the workhorse of enchilada and birria sauces.
Dried poblano of a different strain than ancho; richer, smoky, with chocolate notes. Essential in mole poblano.
Round, dark red; nutty and lightly smoky. Usually toasted before soaking to bring out the flavor.
Small, thin, very hot. Soaks in 5–10 minutes and often needs only a brief soak or none at all.
Long, narrow, hot; similar flavor profile to guajillo but noticeably fierier.
Earthy and mildly hot; classic for red chile sauces of the American Southwest.
Mild, deep red; inexpensive and widely available, a good everyday base sauce chile.
Already smoked and dried jalapeños; rehydrate in warm water for pastes and adobos.
Indian chiles rehydrated for curries, dals, and chutneys; soak in warm (not boiling) water to preserve their brilliant red color.
How to do it
- 1
Inspect and prep the chiles
Pick over the dried chiles and discard any with mold, soft spots, or off smells. Tear off the stems or snip them with scissors. For large pods (ancho, mulato, pasilla), slit each one open along one side with a sharp knife so water can reach the thick flesh. Leave the seeds in for now — they shake out easily after soaking.
- 2
Toast in a dry pan (optional but recommended)
Heat a comal, cast-iron skillet, or heavy dry pan over medium heat. Press each chile flat against the hot surface with a spatula for 10–20 seconds per side until fragrant and just slightly darker. Flip carefully — they crackle and can jump. Work in batches and remove each chile as soon as it smells toasty; do not let them blacken or smoke heavily.
- 3
Heat the water
Bring water to a boil, then turn off the heat and let it settle for about a minute. You want it hot — roughly 175–200°F / 80–93°C — but no longer bubbling. A thermometer is helpful; otherwise count to 30 after the boil stops.
- 4
Soak the chiles
Place the toasted chiles in a heatproof bowl and pour the hot water over them to cover by about 1 inch (2.5 cm). Set a small plate or saucer directly on top to keep them submerged. Cover the bowl with a lid or a plate to hold in heat.
- 5
Wait until pliable
Let stand 15–30 minutes. Thin chiles like de árbol and guajillo are usually ready in 10–15 minutes; large, thick-fleshed chiles like ancho, mulato, and pasilla can take 30 minutes or longer. They are done when they feel soft, thick, and pliable like a damp raisin, with no stiff or papery spots.
- 6
Reserve the soaking liquid
Lift the chiles out with tongs, or pour through a fine-mesh strainer into a second bowl. Set the reddish-brown liquid aside — you'll strain it and use it in the sauce, soup, or marinade.
- 7
Stem, seed, and finish
Working over the bowl of reserved liquid, tear each chile open and pull out the stem and the loose seed cluster. The flesh should tear cleanly. If any pods still feel stiff at the stem end, return just those pieces to the warm liquid for a few more minutes.
- 8
Use or store
Blend the chiles immediately with the other sauce ingredients, or pack them in a small container, pour a thin layer of the soaking liquid over the top, and refrigerate up to 5 days. For longer storage, freeze in measured portions in zip-top bags with the air pressed out, up to 6 months.
The Soaking Liquid Is an Ingredient
The water left in the bowl is not a byproduct. It is a thin, seasoned broth carrying the chile's dissolved pigments, sugars, and a meaningful share of its capsaicin. Pouring it down the drain is one of the most common — and most expensive — mistakes in chile cookery. Strain it through a fine-mesh sieve and use it in place of some or all of the water, stock, or tomato liquid in your sauce. A cup of soaking liquid can replace a cup of stock and deepen both the color and the flavor of the finished dish.
- Strain through a fine-mesh sieve to remove any grit or stray seeds.
- Replace roughly 1:1 with the water or stock called for in the recipe.
- If a recipe does instruct you to discard it, it's almost always to control heat or color, not flavor — taste it first.
Texture Cues Beat the Clock
Every bag of dried chiles is different: older chiles take longer, fresher ones shorter, and pod thickness varies even within the same variety. The reliable test is feel, not minutes. A properly rehydrated chile bends without cracking, feels like soft leather when pinched, and has no stiff or papery patches — especially at the stem end, which is the last spot to soften. Pull them at that moment. Soaking past it turns the flesh waterlogged and the resulting purée flat and dull.
- Bend test: the pod should curve in a U without snapping.
- Check the stem end — if it still feels stiff, give those pieces another 5–10 minutes in the warm liquid.
- If the chile feels slimy or falls apart in your fingers, it has over-soaked and will need to be balanced with more aromatics in the sauce.
Toasting: A Twenty-Second Decision
Toasting dried chiles in a dry comal or skillet for a few seconds per side before soaking is the single biggest upgrade most home cooks skip. It drives off residual moisture, lightly chars the surface, and releases aromatic oils that have been sitting dormant in the dried flesh, adding a subtle smoky depth no other step provides. The window is narrow: the chile should darken by half a shade and smell toasty, not blacken. Once a pod smokes heavily or chars, the flesh turns bitter and that bitterness survives into the sauce.
- Use medium heat and press each pod flat with a spatula for 10–20 seconds per side.
- Work in small batches; chiles scorch in seconds once they heat through.
- Let the toasted pods cool briefly before adding water — pouring water onto a screaming-hot pan can crack glass bowls and stall the soak.
Common uses
Tips & pitfalls
- Toast the dry pods in a dry comal or skillet for 10–20 seconds per side before soaking; this wakes the oils and adds a smoky depth. Watch closely — they scorch in seconds.
- Use water just off the boil, not a rolling boil. Boiling water can leach capsaicin and turn the soak bitter, especially with thin-skinned chiles like de árbol or guajillo.
- Keep the chiles fully submerged with a small plate; any pods poking out stay tough and rehydrate unevenly.
- Save the soaking liquid. Strain it and use it in place of some of the water in your sauce — it's already seasoned with the chile's color, sweetness, and a little heat.
- Slit large pods lengthwise before soaking so water reaches the thicker flesh around the stem end.
- Remove stems and seeds after soaking, not before. The softened pods tear cleanly and the seed membranes slip out without scraping.
- Don't over-soak. Pasty, waterlogged chiles blend into a flat, dull purée. Pull them when they feel like a pliable, damp raisin.
- For very fresh dried chiles, add a splash of vinegar or a pinch of salt to the soak — it helps them soften and seasons the flesh.
- Rehydrated chiles freeze beautifully. Pack them flat in zip-top bags in measured portions so you can drop a portion straight into a blender.
- If a recipe tells you to discard the soak, taste the liquid first — it's rarely wasted for flavor, only for heat or color control.
Good to know
- Category
- Water & Steam technique (hot-water soak)
- Time
- 15–30 minutes for most chiles; up to 1 hour for large, thick-fleshed pods like ancho, mulato, and pasilla
- Liquid temperature
- Hot but not boiling, roughly 175–200°F / 80–93°C
- Water amount
- Enough to cover the chiles by about 1 inch (2.5 cm)
- Equipment
- Heatproof bowl, small plate or saucer as a weight, kettle or saucepan; optional comal or dry skillet for toasting
- Yield
- Chiles roughly double in weight and plump back to near-fresh size
- Difficulty
- Easy
- Storage of rehydrated chiles
- Refrigerate in a sealed container with a little soaking liquid for up to 5 days, or freeze in portions for 3–6 months
- Origin / tradition
- Ancient Mesoamerican; drying and rehydrating chiles was standard in Aztec, Maya, and Pueblo kitchens, and remains foundational in Mexican and Southwestern U.S. cooking
Also called
Rehydrating Dried Chiles · Dry-Toasting Dried Chiles
Dishes that rely on it
Related

Boil
Cook in vigorously bubbling liquid at full rolling heat

Simmer
Hold liquid at a gentle shimmer for tender, unhurried cooking

Poach
Cook gently in barely-trembling liquid for silky, tender results

Steam
Cook in rising vapor to keep color, nutrients, and shape intact

Blanch
Plunge briefly in boiling water, then shock cold to lock color

Braise
Sear, then cook slow in a little liquid until fall-apart tender

Stew
Simmer bite-sized pieces fully submerged into a rich, unified pot

Sous-Vide
Seal and cook in precise warm water for edge-to-edge doneness