Transform & Preserve
Second Fermentation (2F)
A second sealed ferment that builds carbonation and flavor in drinks like kombucha or beer.
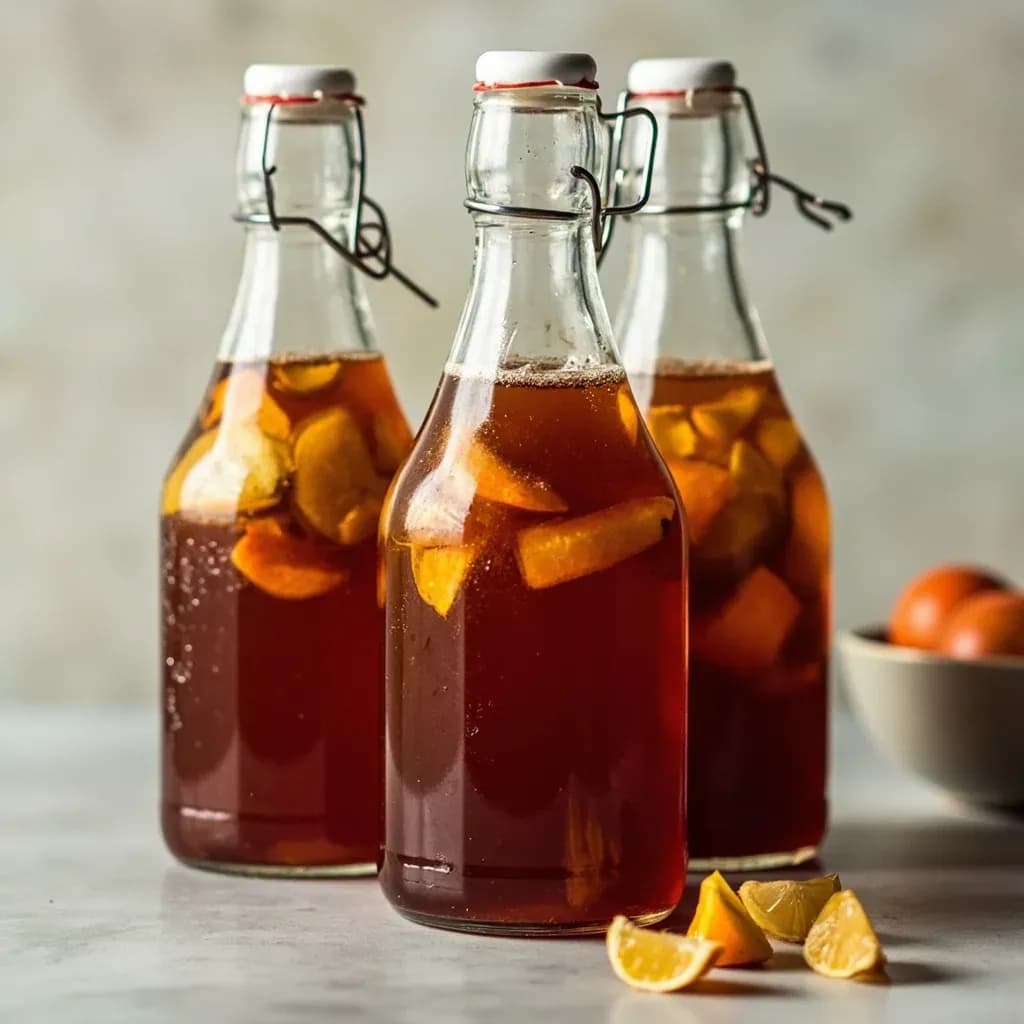
Second fermentation, or 2F, takes an already-fermented base such as kombucha or kefir, adds sugar or fruit, and seals it in airtight bottles for a few days. The trapped carbon dioxide from continued yeast activity dissolves into the liquid, carbonating it naturally and deepening the flavor. It is a key step in bottling fizzy ferments, and pressure must be monitored or burped to avoid over-carbonated bottles bursting.
Second fermentation, almost always shortened to 2F, is the sealed phase that follows an initial open or loosely covered fermentation. The base liquid — kombucha, water kefir, ginger bug soda, young beer, sweet cider — still contains live yeast and a small amount of residual sugar. Once it is bottled in a pressure-tolerant container, that yeast converts the remaining sugar into carbon dioxide, which has nowhere to go but into solution. The result is a naturally sparkling, often flavor-infused drink with finer, softer bubbles than force-carbonated versions, made with nothing more than a bottle, a seal, and time.
The technique does two jobs at once. It builds carbonation, and it lets the brewer add a second layer of flavor that wasn't possible during the first ferment. In kombucha, this is when fruit, juice, herbs, or extra sugar go in; in beer, it is where priming sugar or dry hops condition the finished ale; in cider and sparkling wine, it is the legal method for producing mousse. Because the yeast is enclosed, secondary flavors steep into the liquid as it carbonates — chopped ginger and mango in kombucha, or blackcurrant in a Belgian lambic, become part of the drink itself rather than floating free.
A note on terminology: in home kombucha circles, 2F almost always means the bottled, carbonating phase. In professional brewing, 'secondary' more often refers to racking beer off its primary sediment into a carboy for cold conditioning — a different process that clarifies and matures the beer but does not produce carbonation. The sparkling-wine term is prise de mousse, and the homebrew beer term is bottle conditioning. Same chemistry, different vocabulary.
- Difficulty
- Medium
Types & varieties
The most common form; whole or chopped berries, mango, peach, and pineapple add flavor and natural sugars
1–3 oz (30–90 ml) juice per 16 oz bottle; gives more predictable sweetness and color than whole fruit
Ginger, turmeric, lavender, lemongrass, cardamom, and cinnamon — used sparingly because flavor concentrates
Plain white sugar, ½–1 tsp per 16 oz, for clean carbonation without altering flavor
Same principle in smaller bottles; fruit or juice for fizz, 1–3 days at room temperature
Wild-fermented sodas bottled after the primary ferment; short duration (1–3 days) and lively carbonation
Priming sugar or fresh wort added at packaging; yeast carbonates the beer over 1–3 weeks
Back-sweetened with non-fermentable sugar and primed for natural carbonation in bottle
Méthode traditionnelle / méthode champenoise; tirage followed by long lees aging, riddling, and disgorgement
How to do it
- 1
Sanitize bottles and equipment
Submerge swing-tops, crown-cap bottles, or thick mason jars in hot soapy water, scrub the seals and gaskets, then rinse with a no-rinse sanitizer such as Star San or 1 tablespoon white vinegar per quart of water. Bottles that smell of detergent or hold residual water won't carbonate evenly.
- 2
Finish the first fermentation
Taste the kombucha, water kefir, or beer before bottling. A kombucha ready for 2F is pleasantly tart, roughly pH 2.5–3.5, with most of the original sugar consumed. If it still tastes like sweet tea, give the first ferment another day; if it bites like vinegar, dilute it slightly with cold water or fresh sweet tea before bottling.
- 3
Strain the base liquid
Lift out the SCOBY (or kefir grains) and pour the liquid through a fine-mesh strainer or cheesecloth into a large bowl or pitcher. Removing the pellicle and stringy yeast now keeps the bottled drink clear and prevents runaway fermentation inside the bottle.
- 4
Portion flavorings into bottles
Add roughly 60–120 g chopped fruit, 30–90 ml juice, 1–2 tsp plain sugar, or a small handful of fresh herbs per 16 oz (475 ml) bottle. Strong flavors — ginger, lavender, cardamom, star anise — go in lightly because they concentrate as the yeast works. Frozen fruit works as well as fresh and breaks down faster.
- 5
Pour and seal
Funnel the strained liquid into each bottle, leaving 1.5–2 inches (4–5 cm) of headspace — carbon dioxide takes up volume as it forms and whole fruit expands. Seal swing-tops firmly or cap with a crown capper. Do not use thin screw-cap bottles or decorative glass; they are not rated for the pressure.
- 6
Ferment at room temperature
Stand the sealed bottles in a dark corner at 68–78 °F (20–26 °C), ideally on a tray or inside a plastic bin to catch the leaks that active fruit almost always produces. Keep them out of direct sunlight, which encourages off-flavors and accelerates yeast metabolism.
- 7
Burp and test daily
Each day, refrigerate one test bottle for an hour and open it cold to gauge fizz. If it is still flat, reseal and let the rest go another day. Burp the remaining bottles by cracking the seal briefly over a sink — a soft hiss is fine; a sharp pop means the whole batch should go into the fridge.
- 8
Refrigerate to lock in carbonation
Once the test bottle is where you want it, move every bottle to the fridge at about 38 °F (3 °C). Cold drops yeast activity to near zero and holds the dissolved CO₂ in solution. Properly cold-stored kombucha keeps 1–3 months; bottle-conditioned beer keeps considerably longer.
- 9
Strain and serve
Open bottles slowly over the sink, especially fruit-forward ones, and pour through a small strainer to catch solids. A thin layer of pale yeast at the bottom of kombucha bottles is normal and harmless — decant it off or leave it in the glass.
Reading pressure: how to know when it's done
Unlike force-carbonation with a CO₂ tank, sealed 2F gives you no gauge. The liquid looks identical whether it is flat or fully sparkling, so the only honest signal is a controlled pop. Build the habit of opening one bottle cold per day and using the rest of the batch by feel.
- Pick a single 'sacrificial' bottle per batch; refrigerate it for 12–24 hours before opening to get a true reading without disturbing the rest
- A properly carbonated kombucha releases a soft hiss and forms a small, tight head of bubbles; a hiss that pushes the cap off the bottle is over-carbonated
- A crown cap on a bottle-conditioned beer that bulges outward (domed) signals over-pressure; a cap pulled noticeably inward (concave) signals under-carbonation, while a flat cap at room temperature is usually the calm state of equilibrium
- Fruit-heavy 2F reaches target fizz 1–2 days faster than plain-sugar 2F, because the fruit's glucose and fructose feed the yeast directly
- Temperature is the single biggest variable: at 70 °F (21 °C) most kombucha hits good carbonation in 2–3 days; at 80 °F (27 °C) the same bottle can gush in 36 hours
Bottle bombs: what goes wrong and how to prevent it
Over-pressurization is the only real danger in 2F. Glass fails suddenly and without warning, often hours after a bottle seemed fine, and a single shattered bottle can take an entire batch with it and scatter shards across a pantry. None of the safety rules below are optional.
- Use only pressure-rated glass: thick swing-tops, crown-capped beer bottles, or champagne-style bottles designed for ~90 psi
- Never use thin-walled soda bottles, decorative glass, or commercial screw-top bottles; they give no warning before bursting
- Burp bottles daily in a sink, twice daily in warm rooms, to release excess CO₂ and learn what 'over' feels like
- If a bottle is rock-hard, hisses violently when jostled, or feels warmer than its neighbors, refrigerate it for 24 hours before opening — cooling the liquid draws CO₂ from the headspace into solution, lowering the pressure inside
- Keep fermenting bottles in a plastic bin or on a rimmed sheet pan in a dark, room-temperature spot; never in a warm closet, sunlit window, or above a radiator
Common uses
Tips & pitfalls
- Use one 'sacrificial' bottle per batch as a daily fizz test: refrigerate it, then crack it open to gauge carbonation without losing the rest of the bottles to over-pressure.
- Burp swing-tops daily in a sink, and twice a day once the room is above 75 °F (24 °C); warm yeast moves fast and geysers do not need a warning label.
- Fruit carrying wild yeasts on its skin — grapes, plums, unwashed berries — ferments dramatically faster than pasteurized juice; swap to juice or thawed frozen fruit for predictable timing.
- Always refrigerate the finished bottles; cold storage is the only reliable way to stop yeast activity and lock carbonation into solution.
- Leave 1.5–2 inches (4–5 cm) of headspace — carbon dioxide takes up volume as it dissolves, and whole fruit expands as it softens.
- Stir sugar or juice thoroughly before bottling so carbonation is even; pockets of undissolved sugar produce uneven fizz and geysers from a single bottle.
- Avoid thin-walled soda bottles entirely; they give no warning before bursting. Crown-cap or swing-top thick glass only, and never recap a commercial screw-top bottle for fermenting.
- Label every bottle with the date and contents — after a week in the fridge, plain ginger and peach-ginger look identical, and the date tells you which to open first.
- Condition bottle-conditioned beer at cellar temperature, around 50–55 °F (10–13 °C), for cleaner flavor and fewer yeast-derived off-flavors.
Good to know
- Also called
- Secondary fermentation, 2F (kombucha), bottle conditioning (beer, cider), prise de mousse (sparkling wine)
- Primary use
- Building natural carbonation and adding flavors after a prior fermentation
- Kombucha temperature range
- 68–78 °F (20–26 °C); warmer fermentations produce CO₂ noticeably faster
- Kombucha duration
- 1–5 days at room temperature; up to 7 days in a cool room
- Sparkling wine duration
- Weeks to months on the lees; non-vintage Champagne requires at least 15 months total (12 of them on lees) by EU law
- Headspace guidance
- Leave 1.5–2 inches (4–5 cm) of headspace; never fill bottles above roughly 80%
- Container
- Thick glass only — swing-top (Grolsch-style), crown-cap beer bottles, or champagne bottles
- Storage after 2F
- Refrigerate at ~38 °F (3 °C) to halt yeast and lock carbonation into solution
- Safety risk
- Over-pressurization can rupture glass ('bottle bombs'); daily burping and pressure-rated bottles are essential
- Difficulty
- Beginner-friendly; the main skill is reading bottle pressure by feel and timing
Also called
2F · bottle conditioning
Dishes that rely on it
Related

Confit
Cook slowly submerged in fat for silky tenderness and keeping

Cure
Draw out moisture with salt and time to preserve and concentrate

Pickle
Steep in acidic brine for bright, tangy, crunchy preservation

Ferment
Let friendly microbes transform food into tangy, complex flavor

Marinate
Soak in a seasoned mix to flavor and tenderize before cooking

Brine
Soak in salt water so meat stays juicy and seasoned throughout

Dehydrate
Slowly dry out moisture to concentrate flavor and extend shelf life

Cold-Smoke
Perfume cured food with smoke without cooking it through