Heat & Fire
Comal Griddling
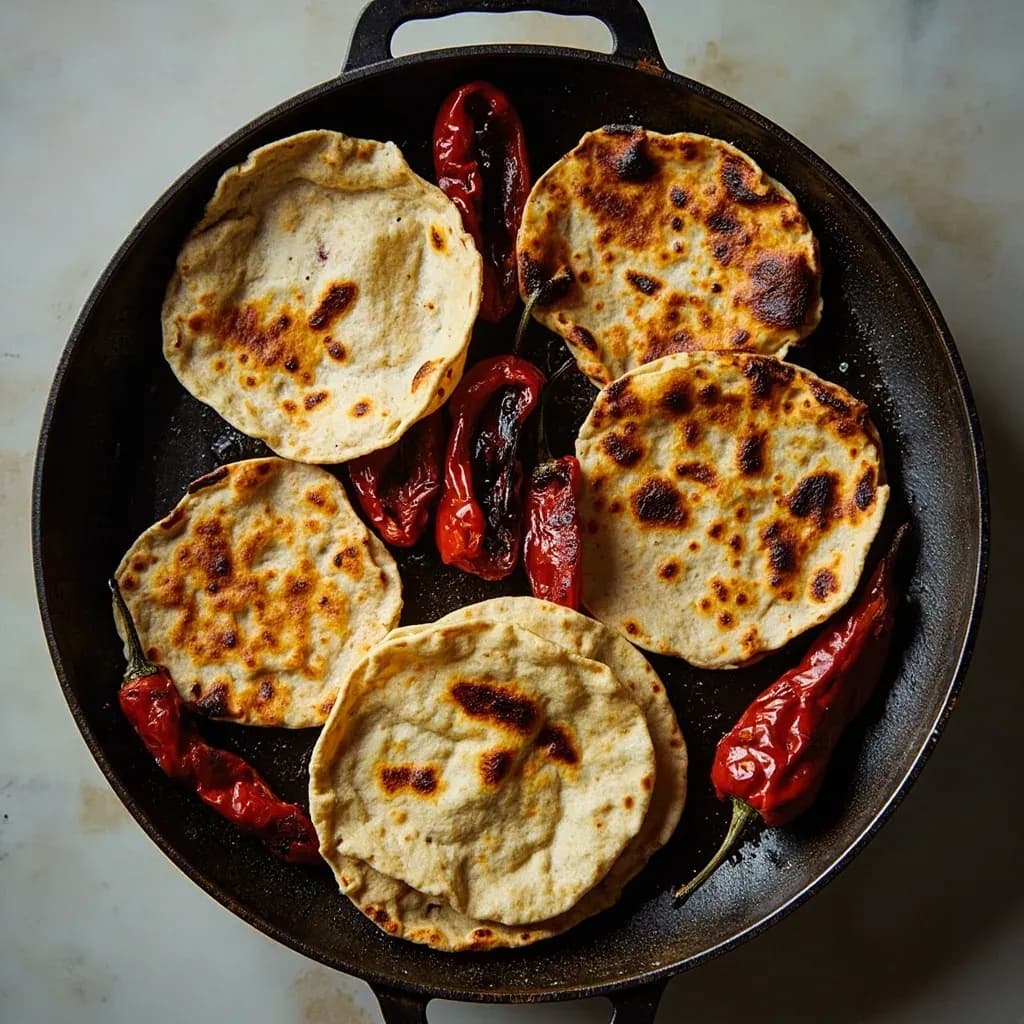
Toasting tortillas, chiles, and tomatoes on a flat dry comal to char and develop deep flavor.
Comal griddling cooks food on a flat, dry cast-iron or clay griddle traditional to Mexican kitchens. It is used to warm and blister tortillas, toast tlayudas, and char chiles, tomatoes, garlic, and onions to build smoky depth for salsas and moles. The dry surface and direct contact heat give spotty charring without added fat.
Comal griddling is the dry-heat technique of toasting, charring, and warming ingredients directly on a flat griddle — the comal — without oil or water. It is the foundation of Mexican and broader Mesoamerican cookery, in use since pre-Columbian times and still inseparable from the flavors of salsa asada, mole, and fresh tortillas. Unlike a greased skillet or an oiled plancha used for searing, the comal is run dry: the food sits on bare metal or clay, and the cooking happens through direct conductive contact rather than through fat.
What makes the technique distinct is the comal's thermal mass. A heavy cast-iron or seasoned steel surface, once preheated, holds and radiates heat with a steadiness a thin frying pan cannot match. That stability lets chiles blister evenly, tomatoes collapse into a blackened skin, and tortillas pick up the leopard-spotted char that signals properly heated maize. The chemistry is Maillard browning and light pyrolysis — the same family of reactions that produces char on a charcoal grill — but executed without fat and at moderate, controlled temperatures.
In practice, comal griddling rewards restraint. Items are laid in a single layer, given time to develop color, turned once or twice, and removed before they turn to ash. The cook's real job is managing surface temperature: too cool and the food steams in its own moisture, too hot and the outside burns before the inside softens. Learn the right heat for each ingredient — chiles need only a brief blister, garlic and onion want a slower browning, tortillas need just enough time to become pliable — and the comal becomes the most versatile surface in the kitchen.
- Difficulty
- Easy
Types & varieties
Traditional Oaxacan and Michoacán style. Porous, slightly concave, imparts a faint earthy note, and must be cured slowly over low heat before first use to prevent cracking.
The home-kitchen workhorse. Heavy, retains heat evenly, seasons dark with use, and tolerates aggressive charring.
Lighter and quicker to heat than cast iron; also develops a patina with use and responds faster to burner adjustments.
Slightly concave with a low rim, sized to keep tortillas centered and flat.
Rectangular cast-iron plate, common in restaurants, used for searing meats and vegetables in addition to toasting.
Caribbean and Venezuelan flat griddle, used for the same technique with regional staples such as cassava bread (casabe) and roasted plantains.
Traditional wood-fired comal with short legs, set directly over hot coals for fiestas and outdoor cooking.
How to do it
- 1
Set up and preheat
Place the comal over a medium-high flame or burner and give it 3–5 minutes to heat through. Test readiness by flicking a few drops of water onto the surface; they should dance and evaporate within a second. The comal is ready when heat radiates evenly and the water test works across the whole surface, not just over the flame.
- 2
Arrange ingredients in a single layer
Lay chiles, tomatoes, tortillas, or spices directly on the dry surface with space between each piece. Steam needs somewhere to go, and direct metal-to-food contact is what produces the char. Work in batches rather than crowding — overcrowding turns the comal into a steamer.
- 3
Toast with intent
Let each side develop the right effect before turning. Tortillas want small dark spots and pliability (about 20–40 seconds per side). Dried chiles should stiffen and blister briefly (10–20 seconds per side) or they turn acrid. Tomatoes split and blacken over 2–4 minutes. Garlic and onion halves brown at the cut face in 1–2 minutes. Spices are better moved constantly or shaken in a dry skillet so they don't scorch.
- 4
Turn and rotate
Use metal tongs or a flat comal spatula to flip items. One or two turns is usually enough for chiles and tomatoes; tortillas benefit from a single flip once the first side is spotted. Resist the urge to move things around constantly — let the browning reaction run.
- 5
Remove and use
Transfer toasted ingredients to a plate, a bowl, or directly into a molcajete or blender. For chiles destined for salsa, cover them with a kitchen towel for a few minutes — the trapped steam loosens the blistered skin for easy peeling. For tortillas, stack and wrap in a clean cloth (a tortillero, ideally) to keep them warm and pliable until serving.
- 6
Clean and store
Wipe a cast-iron or carbon-steel comal with a dry cloth or stiff brush, then rub a thin film of oil over the surface before storing. Rinse a clay comal with water only, dry it immediately over low heat, and keep it somewhere dry — moisture left in the clay will crack it on the next firing.
Choosing a comal
The right comal depends on what you cook most often and what heat source you have. For a gas or electric home kitchen, a 12-inch cast-iron comal is the most forgiving — it holds heat through batches of chiles and tortillas without cooling noticeably when food lands on it. Carbon steel heats faster and is easier to lift, which matters when you want to sear a steak and slide it off quickly. A clay comal is a specialist's tool: it gives an inimitable toasted-corn flavor to tortillas and is the choice for an authentic Oaxacan tetela, but it cannot be rushed and must never see soap. For restaurant ranges, a rectangular plancha expands the surface area and accommodates multiple components at once.
Comal vs. skillet vs. grill
A comal is not a skillet and not a grill. A skillet has sloped sides and is built for shallow oil; a grill delivers radiant heat from below through grates and leaves grill marks. The comal sits between them: flat, low-rimmed or rimless, and conductive, transferring heat by direct contact across the full underside of whatever is placed on it. That geometry is what produces the uniform char on a chile or the all-over blister on a tortilla — effects a grill cannot replicate and a skillet, used dry, struggles to match because its thin base loses heat the moment food arrives.
The role of ventilation
Charring chiles and tomatoes produces real smoke — not the heavy plumes of a grill, but enough to set off a smoke alarm in a closed kitchen. A working range hood or a strong cross-breeze from an open window is part of the setup, not an afterthought. Some cooks run the comal on a back burner near a window specifically to keep smoke moving away from the cook and from smoke detectors.
Common uses
Tips & pitfalls
- Preheat fully before adding anything. A properly heated comal is the difference between food that releases cleanly and food that sticks and tears.
- Resist flipping too often. Chiles that are turned every few seconds won't blister properly and the skin won't lift in clean patches.
- Aim for char, not ash. Blackened patches with soft flesh underneath give smoky depth; pure carbon means bitterness.
- Ventilate. Charred chiles and tomatoes produce real smoke — open a window or run the hood before you start.
- Never soap a clay comal. Water and thorough drying are all it needs; soap soaks into the porous clay and will flavor (and eventually crack) the next tortilla.
- Toast dried chiles briefly — 10 to 20 seconds per side is plenty. Beyond that, the flesh carbonizes and the chile turns bitter rather than smoky.
- For a first-use clay comal, cure it slowly: warm it over the lowest flame for 10–15 minutes the first few sessions, gradually building up to full heat, to drive out residual moisture and prevent thermal shock.
- Crowding is the most common mistake. Give each piece of food its own patch of hot metal; if you can't, work in batches.
Good to know
- Origin
- Mesoamerica; comals have been in continuous use since pre-Columbian times among the Aztec and Maya, and appear in colonial-era codices.
- Traditional materials
- Clay (barro), cast iron, and carbon steel.
- Modern alternatives
- Non-stick and enameled comals exist but are not traditional; most serious cooks avoid them for true char work.
- Heat source
- Wood fire, mesquite, gas burner, or electric coil — anything that can heat the surface evenly.
- Cooking method
- Dry heat only. No oil, no water, no butter.
- Typical comal size
- 10–14 inches (25–35 cm) for home use; larger rectangular planchas are standard in restaurants.
- Working surface temperature
- Roughly 180–230°C (350–450°F) for most toasting; push higher for a quick char.
- Preheating time
- 3–5 minutes over medium-high flame for steel or iron; longer for thick cast iron or unseasoned clay.
- Regional names
- Comal in Mexico and Central America, plancha across much of Latin America, budare in Venezuela and the Caribbean.
Also called
clayudas-toasting · Comal Toasting
Dishes that rely on it
Related

Sear
Blast the surface hot for a deep-browned, savory crust

Sauté
Cook quickly in a little fat over lively heat, tossing as you go

Stir-Fry
Toss bite-sized pieces over roaring heat for fast, smoky cooking

Pan-Fry
Crisp food in a shallow layer of hot fat, turning once or twice

Deep-Fry
Submerge in hot oil for an all-over crackling crust

Roast
Cook uncovered in dry oven heat for browned edges and tender centers

Bake
Cook with steady, surrounding oven heat — the soul of bread and pastry

Broil
Hit food from directly above with fierce overhead heat